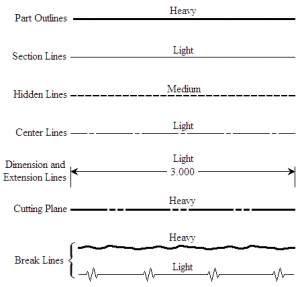
When you are preparing drawings, you will use different types of lines to convey information. Line characteristics, such as widths, breaks in the line, and zigzags, all have definite meanings.
Construction Lines
Usually the first lines that you will use on a drawing are construction lines. These are the same lines that you used to lay out your drafting sheet. They will also be used to lay out the rest of your drawing. Line weight for construction lines is not important since they will not appear on your finished drawing. They should be heavy enough to see, but light enough to erase easily. A 4H to 6H pencil with a sharp, conical point should be used. With the exception of light lettering guidelines, all construction lines must be erased or darkened before a drawing is reproduced.
Center lines
Center lines are used to indicate the center of a circle, arc, or any symmetrical object. (See fig. 3-24.)
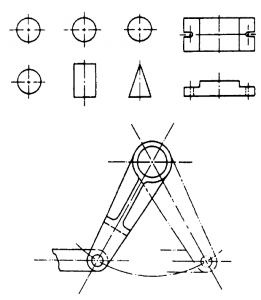
Center lines are composed of long and short dashes, alternately and evenly spaced, with a long dash at each end. They should extend at least one-fourth in. outside the object. At intersecting points, center lines should be drawn as short dashes. A very short center line may be drawn as a single dash if there is no possibility of confusing it with other lines. Center lines may also be used to indicate the travel of a moving center, as shown in figure 3-24.
Visible Lines
The visible edge lines of the view are drawn as solid, thick lines. These include not only the outlines of the view, but lines defining edges that are visible within the view. (See fig. 3-25.)
Hidden Lines
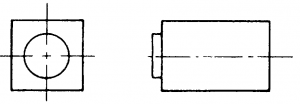
Hidden edge lines are drawn with short dashes and are used to show hidden features of an
object. A hidden line should begin with a dash in contact with the line from which it starts,
except when it is the continuation of an unbroken line. (See fig. 3-26.)

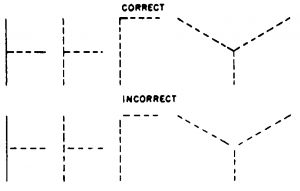
To prevent confusion in the interpretation of hidden edge lines, you must apply certain standard techniques in drawing these lines. A hidden edge line that is supposed to join a visible or another hidden line must actually contact the line, as shown in the upper views of figure 3-27; The incorrect procedure is shown in the lower views.
Extension Lines
Extension lines are used to extend dimensions beyond the outline of a view so that they can be read easily. These thin, unbroken lines are started about one sixteenth of an inch from the outline of the object and extend about one eighth of an inch beyond the outermost dimension line. They are drawn parallel to each other and perpendicular to the distance to be shown. (See fig. 3-30.)
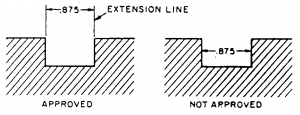
In unusual cases, extension lines may be drawn at other angles if their meaning is clear. As far as practical, avoid drawing extension lines directly to the outline of an object. When it is necessary for extension lines to cross each other, they should be broken (exceptions to this rule have been adopted since the development of CAD software).
Dimension Lines
A dimension line, terminating at either end in a long, pointed arrowhead, is inserted between each pair of extension lines. Occasionally, when the radius of an arc is to be indicated, there is an arrow at only the end of the line that touches the arc. The other end, without an arrow, terminates at the point used as the center in drawing the arc.
The arrowhead on a dimension or leader line is an important detail of a drawing. If these arrowheads are sloppily drawn and vary in size, the drawing will not look finished and professional.
The size of the arrowhead used on a drawing may vary with the size of the drawing, but all arrowheads on a single drawing should be the same size, except occasionally when space is very restricted. The arrowheads used on Navy drawings are usually solid, or filled in, and are between one eighth and one fourth of an inch long, with the length about three times the spread. (See fig. 3-32.)

With a little practice, you can learn to make good arrowheads freehand, Referring to figure 3-32, first define the length of the arrowhead with a short stroke as shown at A. Then draw the sides of the arrowhead as indicated at B and C. Finally, fill in the area enclosed by the lines, as shown at D.
Leaders
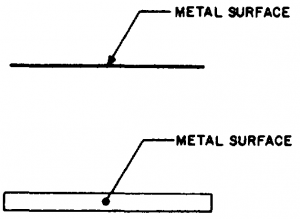
Leaders are used to connect numbers, references, or notes to the appropriate surfaces or lines on the drawing. From any suitable portion of the reference, note, or number, a short line is drawn parallel to the lettering. From this line the remainder of the leader is drawn at an angle (dog leg) to an arrowhead or dot. In this way, the leader will not be confused with other lines of the drawing. If the reference is to a line, the leader is always terminated at this line with an arrowhead, as shown in figure 3-33. However, a reference to a surface terminates with a dot within the outline of that surface.
 Break Lines
The size of the graphic representation of an object is often reduced (usually for the purpose
of economizing on paper space) by the use of adevice called a break. Suppose, for example, you want to make a drawing of a rectangle 1 ft wide by 100 ft long to the scale of 1/12, or 1 in. = 1 ft. If you drew in the full length of the rectangle, you would need a sheet of paper 100 in. long. By using a break, you can reduce the length of the figure to a feasible length, as shown in figure 3-34.

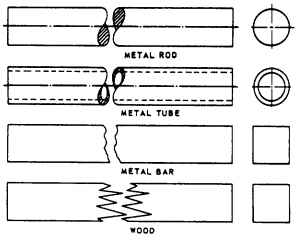
On the original object, the ratio of width to length is 1:100. You can see that on the drawing the ratio is much larger (roughly about 1:8). However, the break tells you that a considerable amount of the central part of the figure is presumed to be removed. The thick, wavy lines shown in view (A), figure 3-34, are used for a short break. A short break is indicated by solid, freehand lines, and is generally used for rectangular sections. For wooden rectangular sections, the breaks are made sharper (serrated appearance) rather than wavy. For long breaks, full, ruled lines with freehand zigzags are used, as shown in view (B), figure 3-34. For wider objects, a long break might have more than one pair of zigzag lines. For drawings made to a large scale, special conventions are used that apply to drawing breaks in such things as metal rods, tubes, or bars. The methods of drawing these breaks are shown in figure 3-35.
 Phantom Lines
Phantom lines are used most frequently to indicate an alternate position of a moving part,
as shown in the left-hand view of figure 3-36.
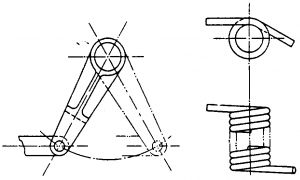
The part in one position is drawn in full lines, while in the alternate position it is drawn in phantomlines.Phantom lines are also used to indicate a breakwhen the nature of the object makes the use of the conventional type of break unfeasible. An example of this use of phantom lines is shown in the right-hand view of figure 3-36.
Section Lines
Sometimes the technical information conveyed by a drawing can best be shown by a view thatrepresents the object as it would look if part of it were cut away. A view of this kind is called a section. The upper view of figure 3-37 shows a plan view of a pipe sleeve.
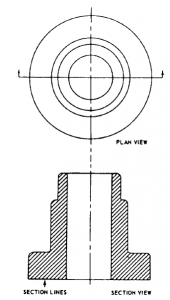
The lower view is a section, showing the pipe sleeve as it would look, viewed from one side, if it were cut exactly in half vertically. The surface of the imaginary cut is crosshatched with lines called section lines. According to DoD-STD-100C, “section lining shall be composed of uniformly spaced lines at an angle of 45 degrees to the baseline of the section. On adjacent parts, the lines shall be drawn in opposite directions. On a third part, adjacent to two other parts, the section lining shall be drawn at an angle of 30 to 60 degrees.”
The cross-hatching shown in figure 3-37 could be used on any drawing of parts made of only one material (like machine parts, for example, which are generally made of metal). The cross-hatching is the symbol for metals and may be used for a section drawing of any type of material.
A section like the one shown in figure 3-37, which goes all the way through and divides the object into halves, is called a full section. If the section showed the sleeve as it would look if cut vertically into unequal parts, or cut only part way through, it would be a partial section. If the cut followed one vertical line part of the way down and then was offset to a different line, it would be an offset section.
Viewing or Cutting Plane Lines
VIEWING PLANE LINES are used to indicate the plane or planes from which a surface or several surfaces are viewed.
CUTTING PLANE LINES are used to indicate a plane or planes in which a sectional view is taken.
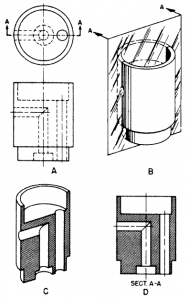
Section views are used to give a clearer view of the interior or hidden feature of an object that normally cannot be clearly observed in conventional outside views. A section view is obtained by cutting away part of an object to show the shape and construction at the cutting plane. Notice the CUTTING PLANE LINE AA in figure 3-38, view A. It shows where the imaginary cut has been made. The single view in figure 3-38, view B, helps you to visualize the cutting plane. The arrows point in the direction in which you are to look at the sectional view.
Figure 3-38, view C, is a front view showing how the object would look if it were cut in half.
The orthographic section view of section A-A, figure 3-38, view D, instead of the confusing front view in figure 3-38, view A, is placed on the drawing. Notice how much easier it is to read and understand.
Note that hidden lines behind the plane of projection are omitted in the sectional view. These lines are omitted by general custom, the custom being based on the fact that the elimination of hidden lines is the basic reason for making a sectional view. However, lines that would be visible behind the plane projection must be included in the section view.
Cutting plane lines, together with arrows and letters, make up the cutting plane indications. The arrows at the end of the cutting plane lines are used to indicate the direction in which the sections are viewed. The cutting plane may be a single continuous plane, or it may be offset if the detail can be shown to better advantage. On simple views, the cutting plane should be indicated as shown in figure 3-38, view A. On large, complex views or when the cutting planes are offset, they should be shown as in figure 3-39.
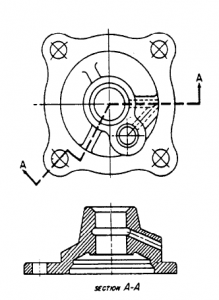
All cutting plane indications should be identified by use of reference letters placed at the point of the arrowheads. Where a change in direction of the cutting plane is not clear, reference letters may also be placed at each change of direction. Where more than one sectional view appears on a drawing, the cutting plane indications should be lettered alphabetically.
The letters that are part of the cutting plane indication should always appear as part of the title; for example, SECTION A-A, SECTION B-B, If the single alphabet is exhausted, multiples of letters maybe used. The word SECTION may be abbreviated, if desired. Place the title directly under the section drawing.
Stitch Lines
Stitch lines are used to indicate the stitching or sewing lines on an article. They consist of a series of very short dashes (medium thickness), approximately half the length of the dash of hidden lines, evenly spaced. Long lines of stitching may be indicated by a series of stitch lines connected by phantom lines.
Match Lines
Match lines are used when an object is too large to fit on a single drawing sheet and must be continued on another sheet. The points where the object stops on one sheet and continues on the next sheet must be identified with corresponding match lines. They are medium weight lines indicated with the words MATCH LINE and referenced to the sheet that has the corresponding match line. Examples of construction drawings that may require match lines are maps and road plans where the length is much greater than the width and it is impractical to reduce the size of the drawing to fit a single sheet.
(Source: NAVEDTRA 14069, U.S. Navy)

Make a table showing the convertional lines most commonly used in engineering drawing mentioning their specific application?
Section view of Object & convention as Indian standards all images tell me
How can I draw an object line?
Ps
how can i draw different polygons of different angles