First-Angle Projection (Europe)
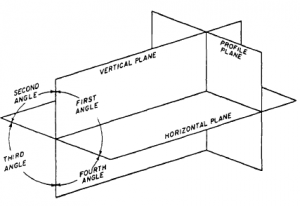
Establishing an object’s true height, width, and depth requires front, top, and side views, which are called the PRINCIPAL PLANES OF PROJECTION. Figure 5-4 shows the three principal (or primary) planes of projection, known as the VERTICAL, HORIZONTAL, and PROFILE PLANES. The angles formed between the horizontal and the vertical planes are called the FIRST, SECOND, THIRD, and FOURTH ANGLES, as indicated in the figure. Currently, however, for technical reasons, only the use of first- and third-angle projection is practical.
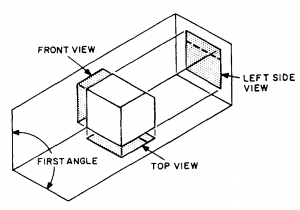
An example of first-angle projection using a cube is shown in figure 5-5. The cube is supposed to be fronting toward the vertical plane of projection. As you can see, you get a front view on the vertical plane, a left side view on the profile plane, and a top view on the horizontal plane. Now, to put these views on a sheet of drafting paper, you must get them all into the same plane. You presume that the vertical plane of projection is already in the plane of the paper. To get the other two views into the same plane, you rotate the profile plane counterclockwise and the horizontal plane clockwise. The projection now appears as shown in figure 5-6.
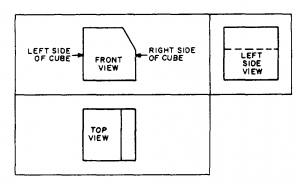
This first-angle projection arrangement of views is considered satisfactory in most European drafting practice. In the United States, it is considered illogical because the top view is below the front view; because the right side of the object, as shown in the front view, is toward the left side view of the object; and because the bottom of the object, as shown in the front view, is toward the top view of the object. For these and other reasons, first-angle projection is not used much in the United States.
Third-Angle Projection
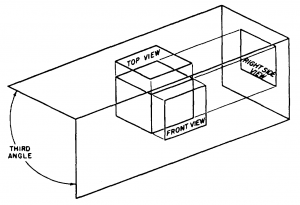
THIRD-ANGLE PROJECTION.— Figure 5-7 shows a third-angle projection of a cube. As you can see, you get a front view on the vertical plane, a top view on the horizontal plane, and a right side view on the profile plane. Again you assume that the vertical plane is already in the plane of your drawing paper. To get the other two views into the same plane, you rotate them both clockwise.
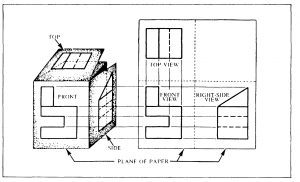
Figure 5-8 shows a third-angle projection of an object brought into a single plane. The top view is above the front view; the right side of the object, as shown in the front view, is toward the right side view;
and the top, as shown in the front view, is toward the top view.

Thankyou!