Initial Project Idea: Lyman Filament Extruder (pdf & Video) and Russ G. (link)
Note: All entries up to 1-8-2014 are back dated.
11-27-2013
Wednesday, November 27, 2013 at 11:14:52:839 AM AutoCAD File Started

Began thinking about options for heater and for extrusion tooling.
First checked Mcmaster Carr and Omega. Looked for suppliers to commercial extruders, found nozzlebandheaters.com and thermalcorp.com.
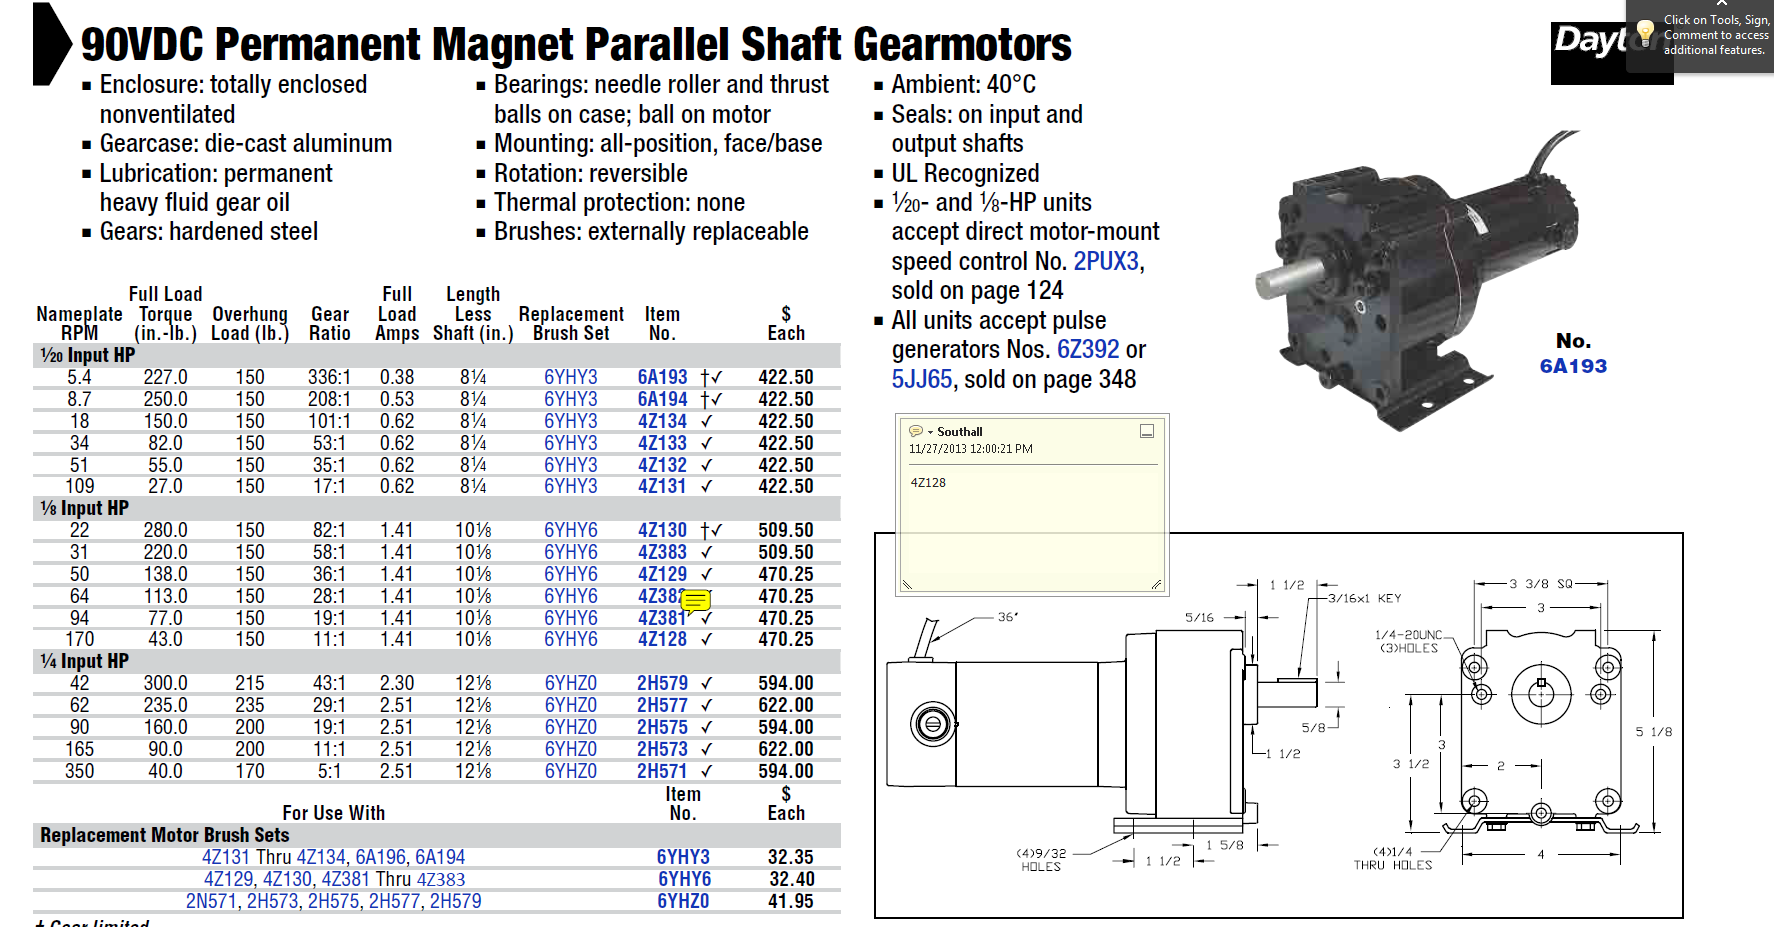
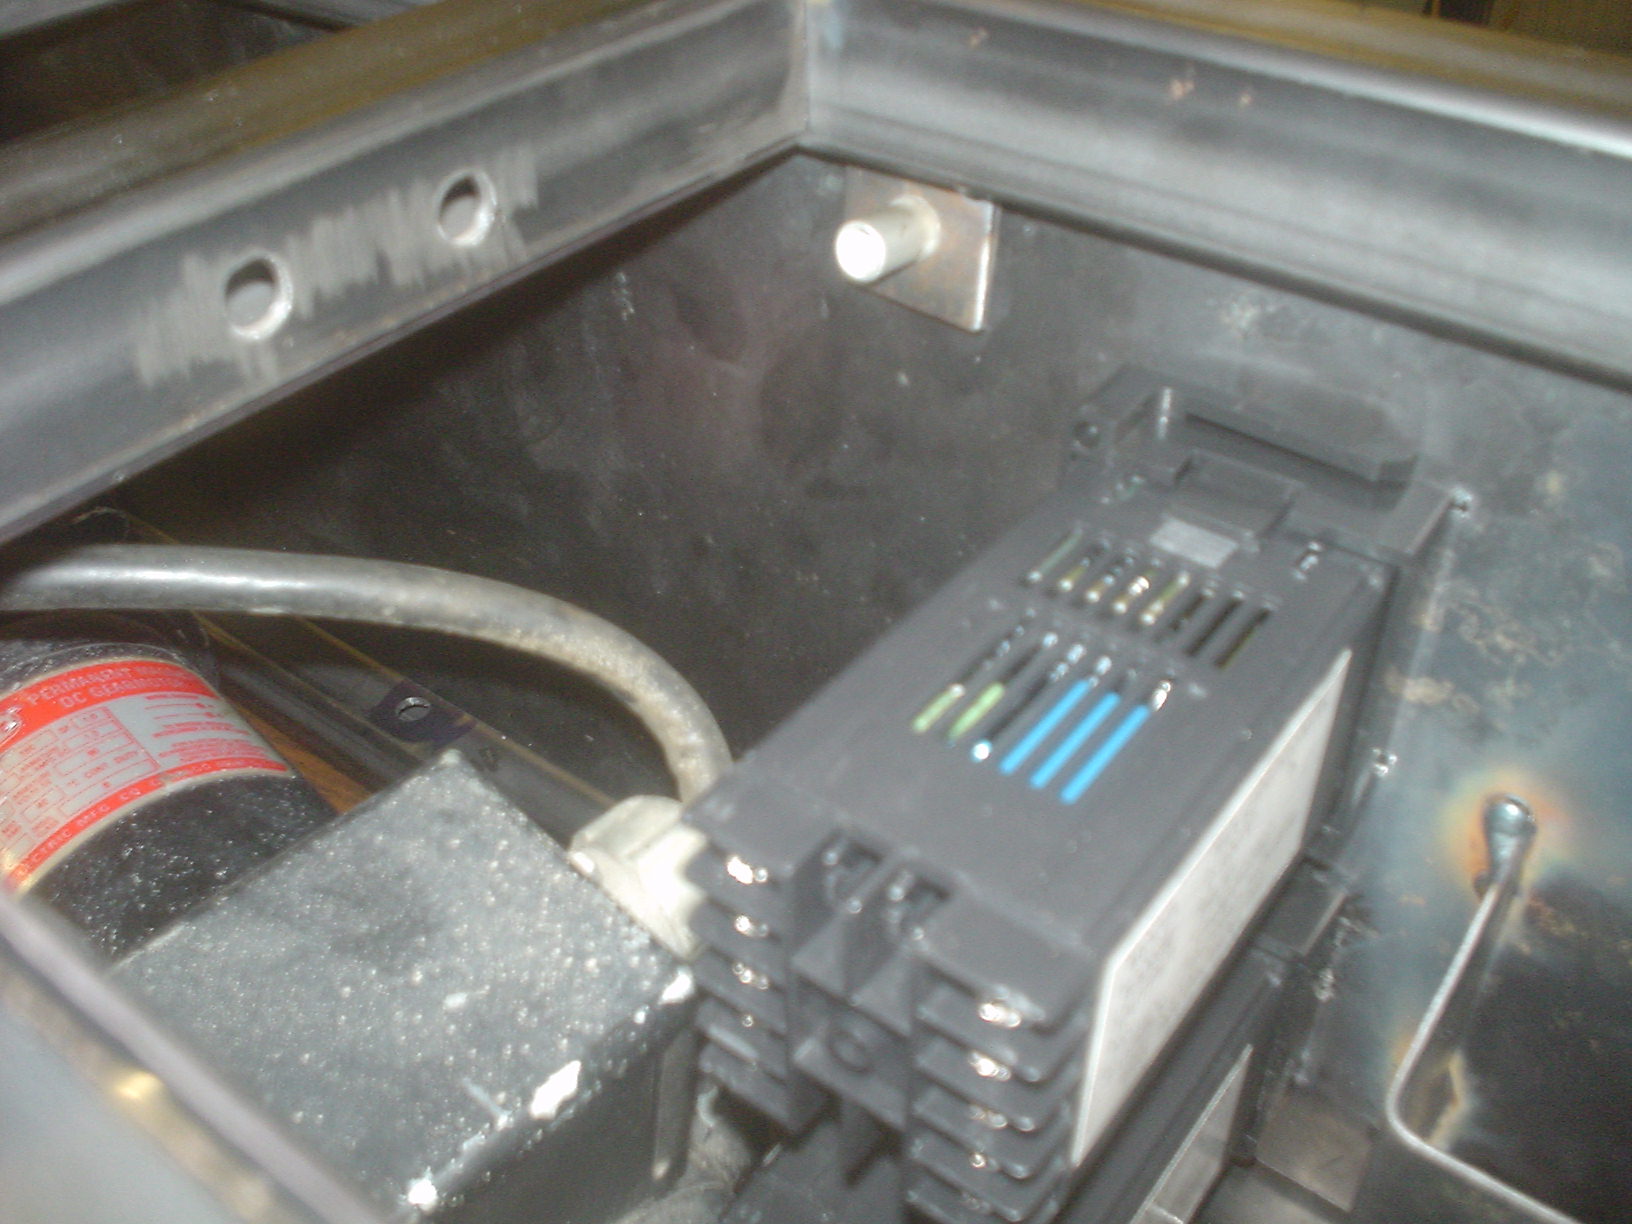
Offered 90VDC gear motor with SCR speed control that was not being used.
- Model: 4Z128 ($494 list)
- Note: Specs on website differ from actual nameplate specs below.
- 43 in-lb
- RPM: 160
- FL amps: 1.5
- Gear Ratio: 11:1
- Max Ambient Temp: 40 deg. C
- 1/8 HP
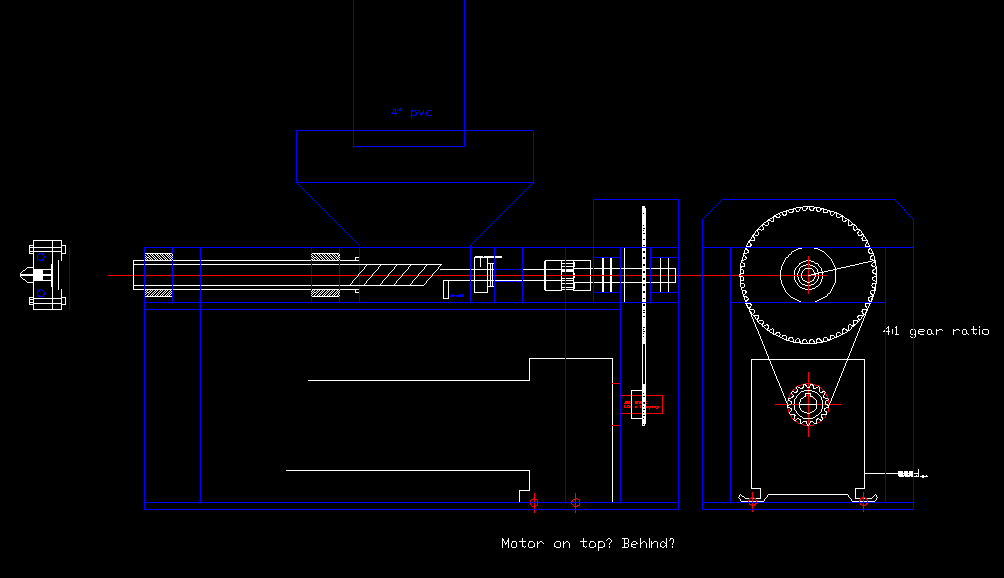
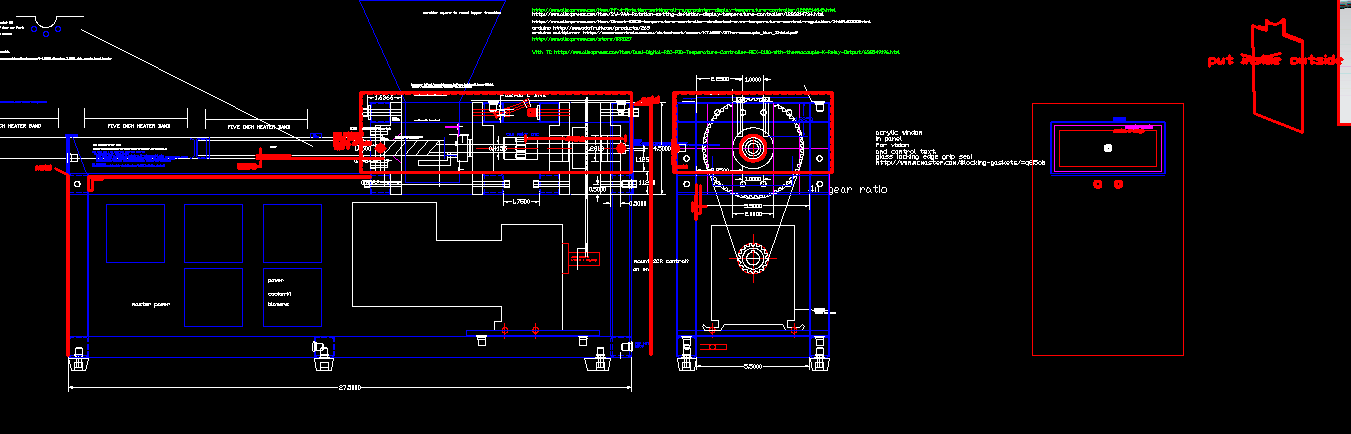
Installation drawing needs to be validated:
12-15-2013
Uses Aluminum Bar for Frame.
12-20-2013
Changed to welded steel frame.
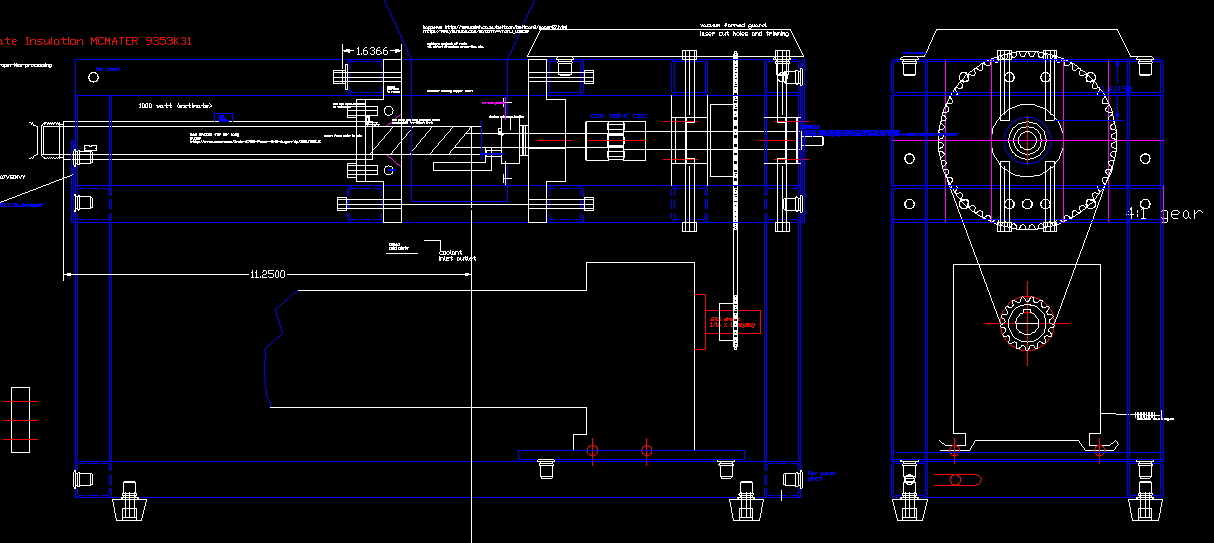
Uses 1″ square steel tube x .060 wall. Bearings mounted in machined blocks that are screwed to 16 ga plate that is welded to the frame. Using 3/4 auger that has flute length of 11.25. Roller chain used is ANSI #25 Chain (1/4″ Pitch) ASME/ANSI B29.1-2011 Roller Chain Standard Sizes (Wikipedia)
From Mcmaster-Carr: http://www.mcmaster.com/#6261k171/=q5ymm6
- Size Designation: #25
- Pitch: 0.250 in (6.35 mm)
- Max Roller Diameter: 0.130 in (3.30 mm)
- Minimum UTS: 780 lb (350 kg)
- NOTE: this value is far higher than Mcmaster published data.
- TODO_____Check Tensile strength requirement and data
- Measuring Load: 18 lb (8.2 kg)
Length: TBD

12-28-2013
Changed to eliminate welded 16 ga. plate. All mounts are now aluminum bolted directly to the square steel.
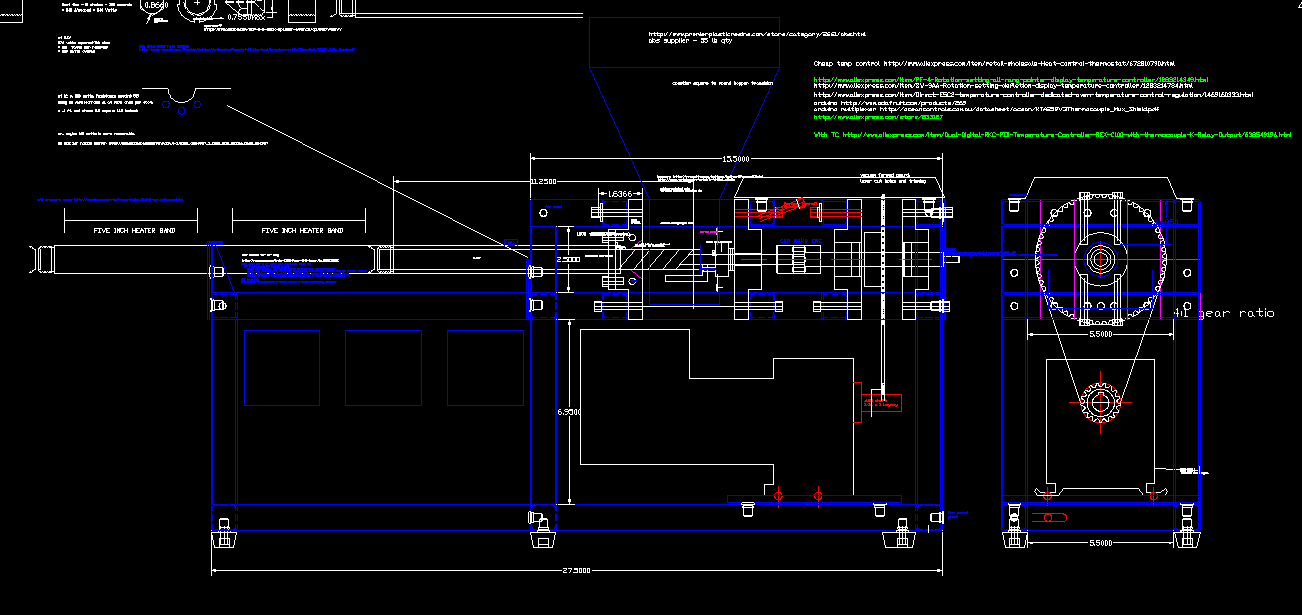
Began sourcing cheap temperature control:
http://www.aliexpress.com/item/retail-wholesale-Heat-control-thermostat/672810790.html
http://www.aliexpress.com/item/PF-4-Rotation-setting-all-rang-pointer-display-temperature-controller/1283214349.html
http://www.aliexpress.com/item/SW-9AA-Rotation-setting-defletion-display-temperature-controller/1283214734.html
http://www.aliexpress.com/item/Direct-E5C2-temperature-controller-dedicated-oven-temperature-control-regulation/1469160333.html
http://www.adafruit.com/products/269
arduino multiplexer http://oceancontrols.com.au/datasheet/ocean/KTA259V3Thermocouple_Mux_Shield.pdf
http://www.aliexpress.com/store/833127
With TC http://www.aliexpress.com/item/Dual-Digital-RKC-PID-Temperature-Controller-REX-C100-with-thermocouple-K-Relay-Output/638549196.html
12-30-2013
Changed all four bearing and auger mount to have same footprint and mounting orientation.
Found 32:1 auger bit: Irwin 47012 Power Drill Pole Auger.
.75 diameter with 24″ flute length

12-8-2013
Started notebook. Checked motor length and height dimension. Good thing, too. only had .040 clearance above junction box on motor. Added .5 clearance.
Need to work on extruder nozzle end support.
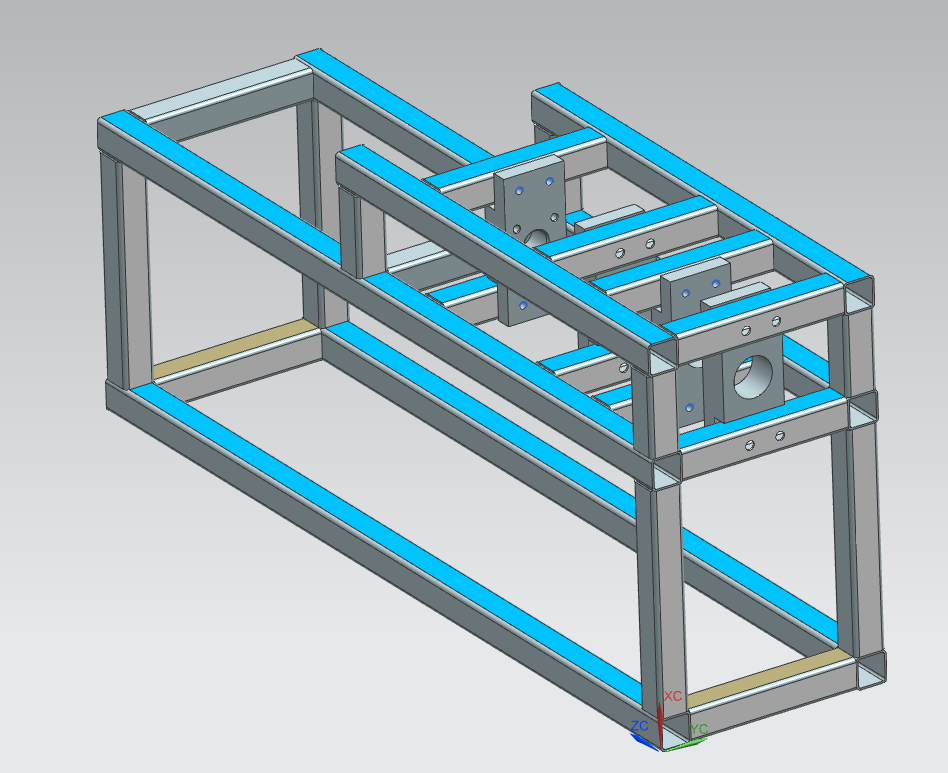
Started Frame Model
NOTE: Tell students to key duplicate parts to maintain orientation.
Removed center upright, designing for 5″ heater bands.

1-9-2014
Restructured assembly using wave geom linker for machined parts. Color-keyed parts to match orientation in assembly. Some parts are added using component arrays. Did part replace on parts that needed holes omitted. Auger is due to arrive on 12-14.
Mcmaster is good source for glass locking edge grip seal in small quantities, but will most likely not use. http://www.mcmaster.com/#locking-gaskets/=q6i5ob
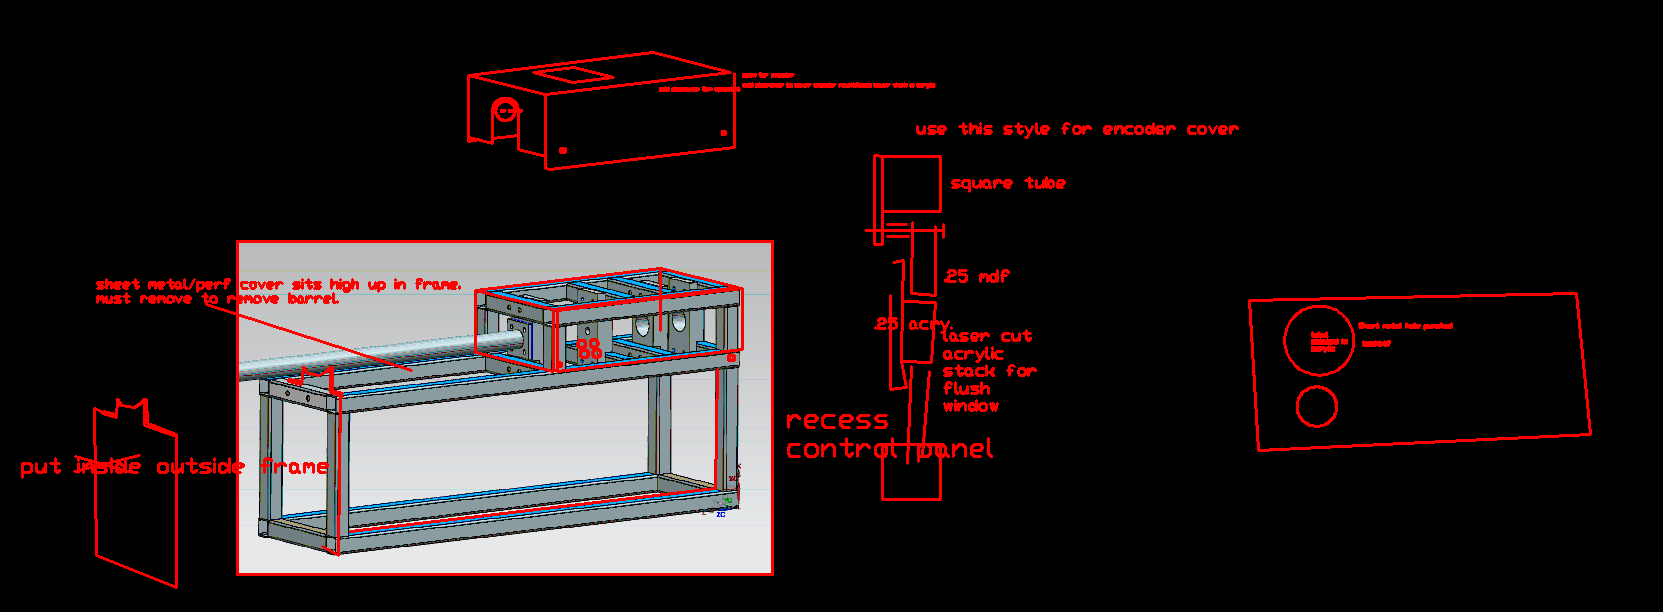
Note: front panel (L shape) extends beyond length by over .35 on end (with bent lip) to permit acrylic panel on rear and front. Panel has 1″ lips that cover all exposed open tube. Lip on top to cover laser cut acrylic panel (backpainted). .5 aluminum angle trim on short edge at top front and top rear short dimension.
TODO____ MAKE SURE TEMP CONTROLLERS clear the frame when front panel folds down.
Cheap perf steel: (Check southern steel)
1-10-2014
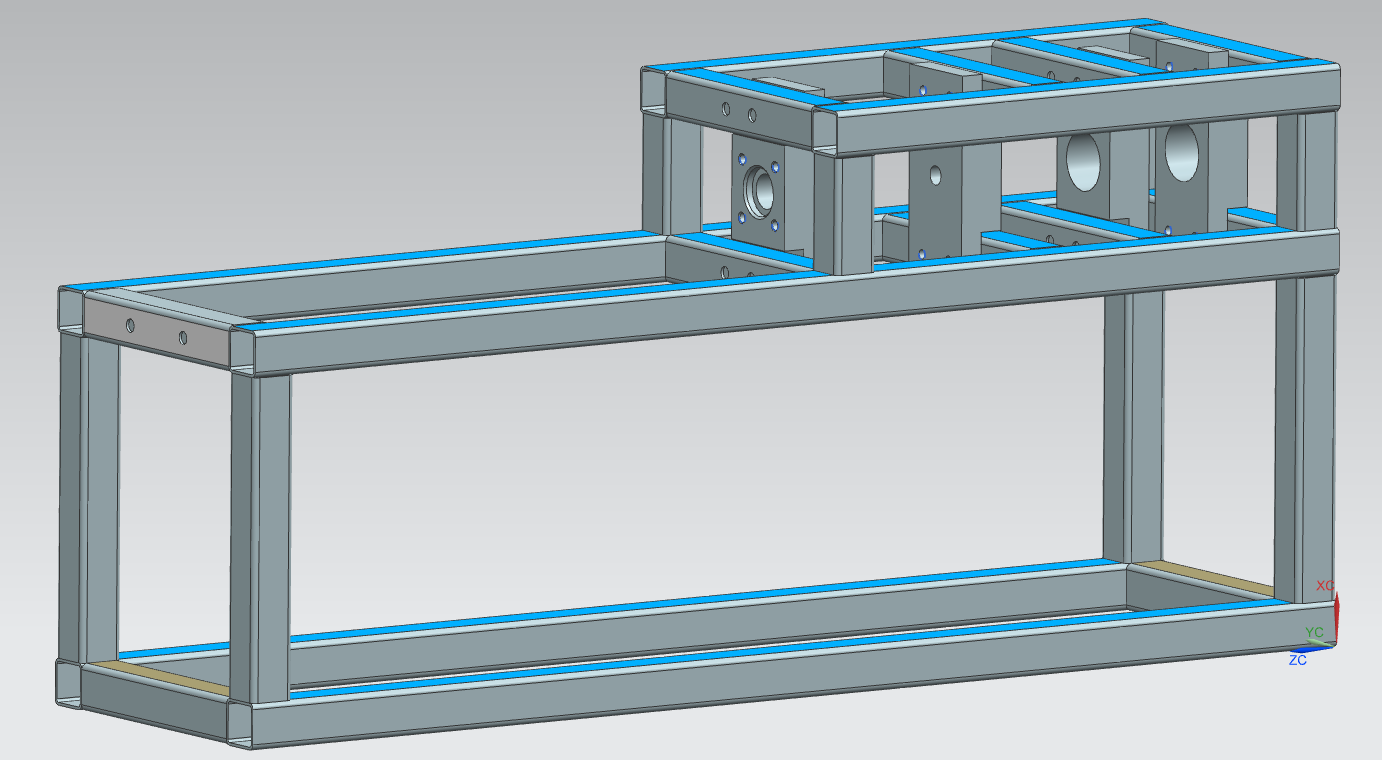
Eliminated rear support. Made it easier to mount front plate. Looks better, too.
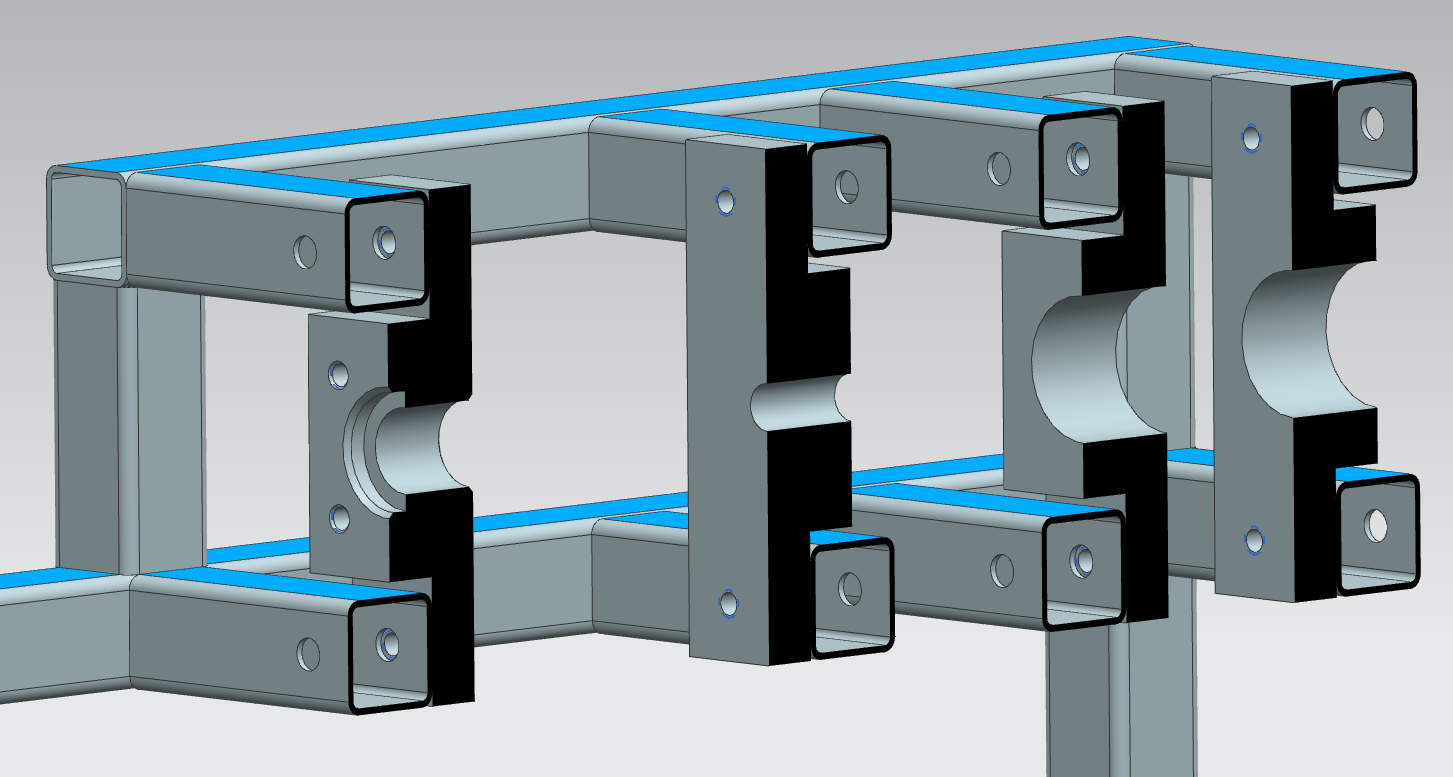
Note: Rear bearing mounts are a good GD&T exercise. Datum for perpendicularity is faying surface of the mount, not the outside of the block.
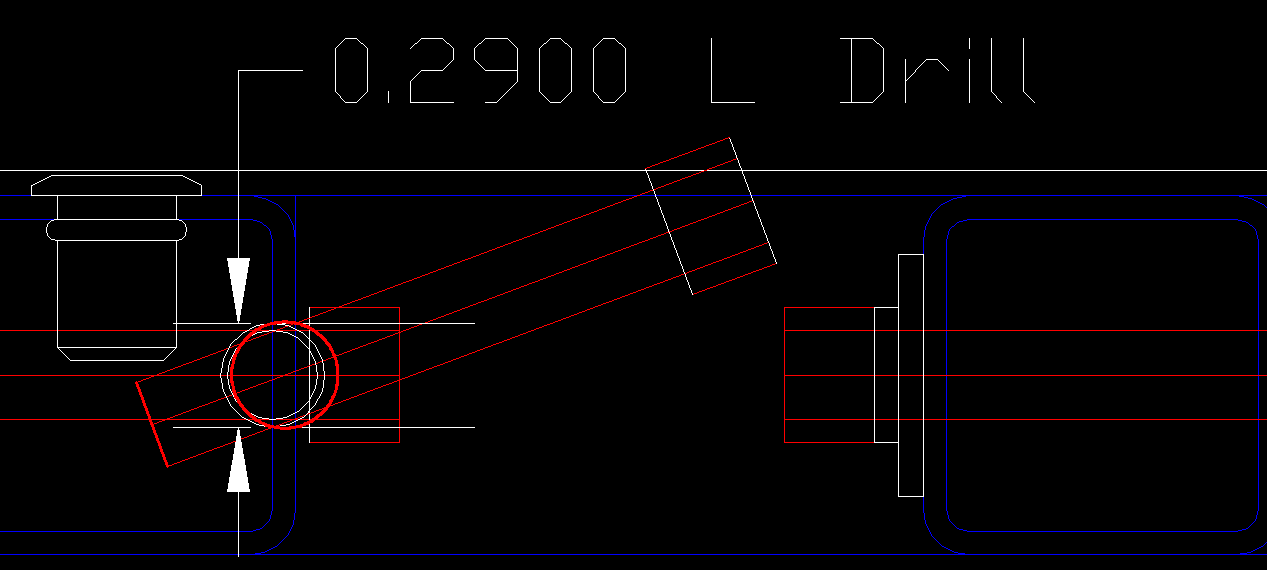
Another good problem, what is the most you can angle a .25 diameter SHCS to get it to go into a .06 wall tube with an L drill?
Designed barrel plate as top-down part, assembly: create part (empty), linked face of barrel mount, used measured distance for parameter (see p0). This makes barrel plate square and the size of the shorter dimension.

- Front panel: Can use MDF for front barrel support (but needs insulation). Probably sheet metal is better.
- no. Sheet metal panel, welded on outside to cover tube ends.
- Use sheet metal bracket to support barrel, separate from end cover.
- Top cover: sheet metal pan. extra depth to clear sprocket. Extra space in front to clear bolt heads.
- Front control panel: recessed sheet metal
- rear panel: welded on top to cover end tubes. Cut a window and install encoder panel. Slot the acrylic panel attaching holes.
- Rear upper (encoder) panel: acrylic, recessed
- Need to cover tubes (weld, plastic plugs, 3dp plugs)
- See drawing for recessed acrylic detail.
- See drawing for backlit acrylic on sheet metal
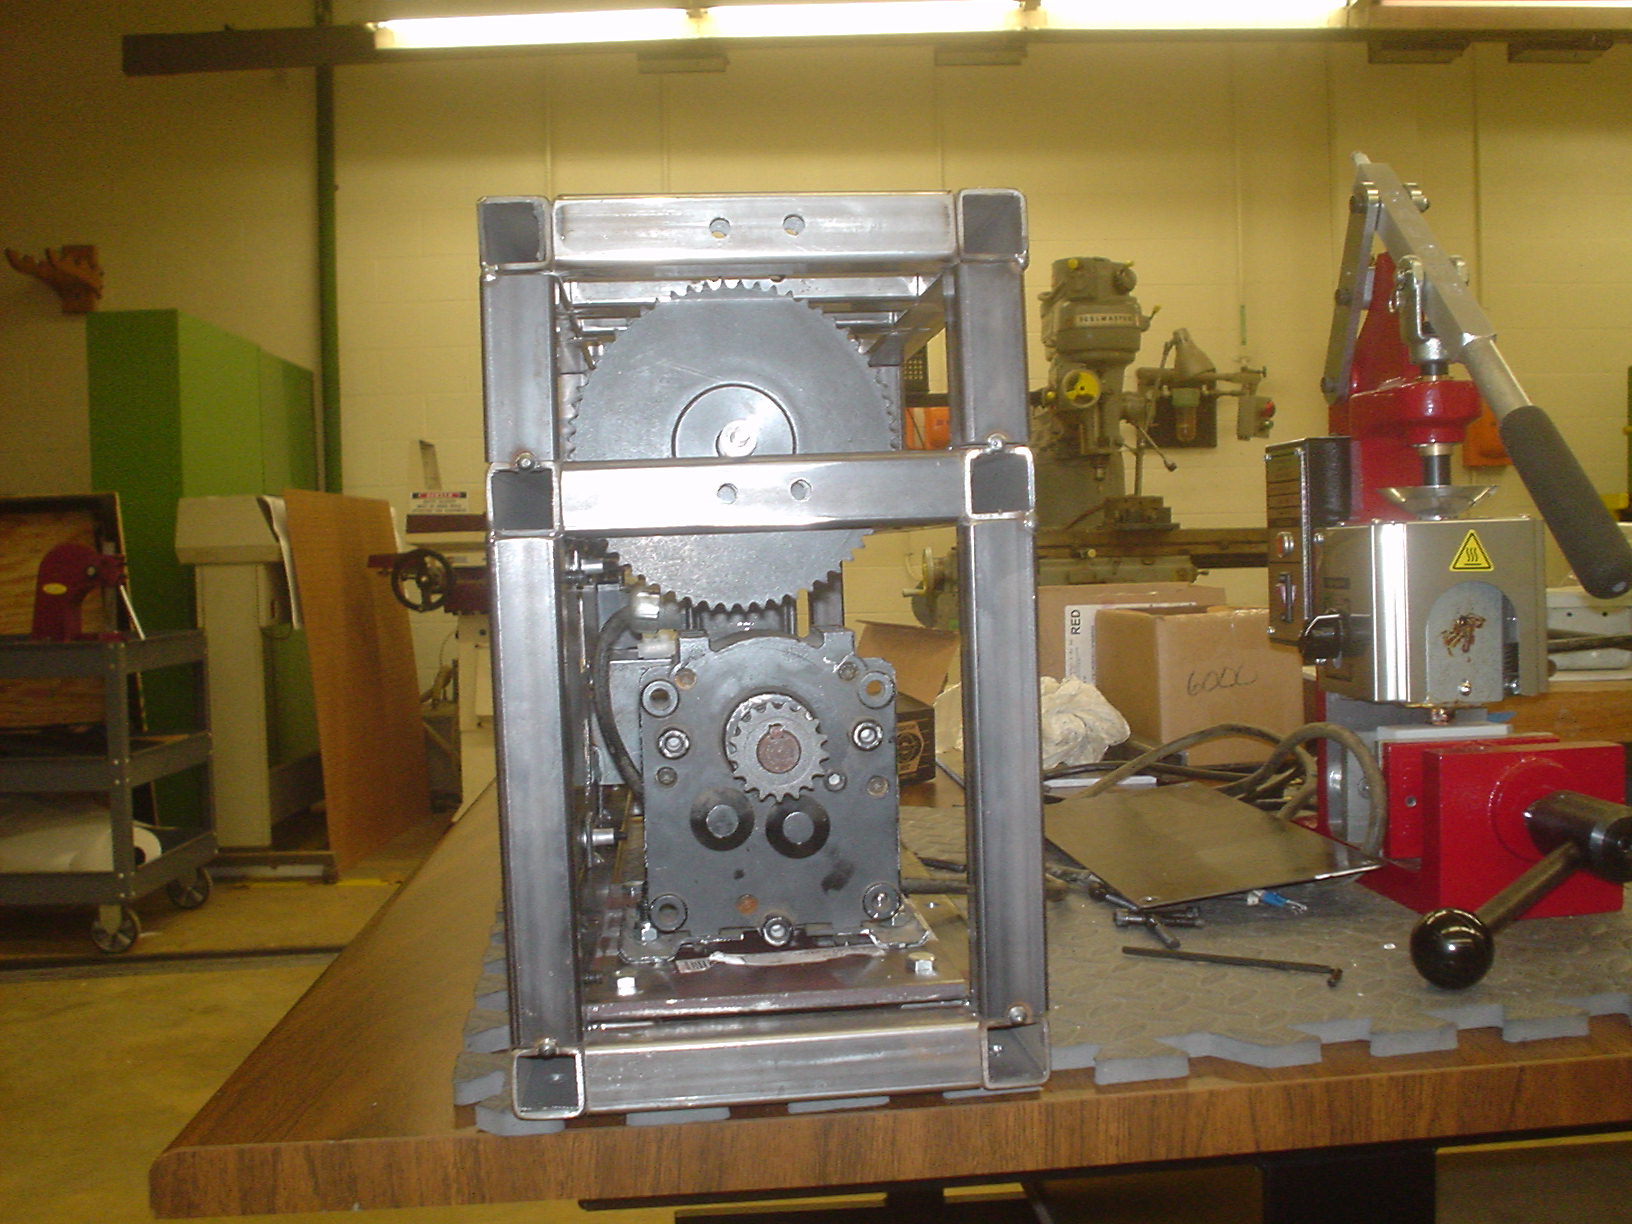
Current State Shown below. Still waiting for auger bit to arrive to check dimensions.
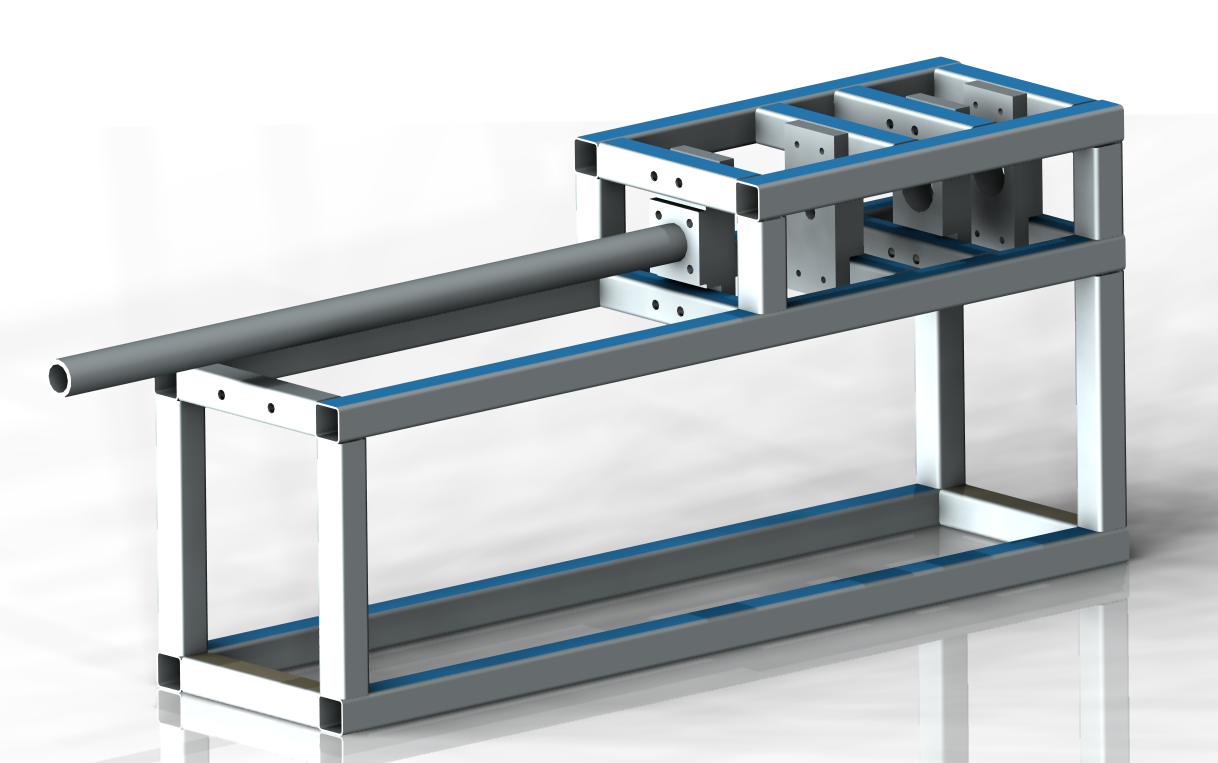
Note: Need to replace front cross brace with the same kind used everywhere else.
1-11-2014
Roughing in enclosure details.
 DONE rear panel missing top two holes for bearing mount.
Button head cap screw head covers: http://www.mcmaster.com/#96306a352/=q7jvp0
These are too high: http://www.lowes.com/pd_137970-37672-881033_4294719505__?productId=3012668&Ns=p_product_qty_sales_dollar|1&pl=1¤tURL=%3FNs%3Dp_product_qty_sales_dollar|1&facetInfo=
1-12
Use this for barrel alignment:
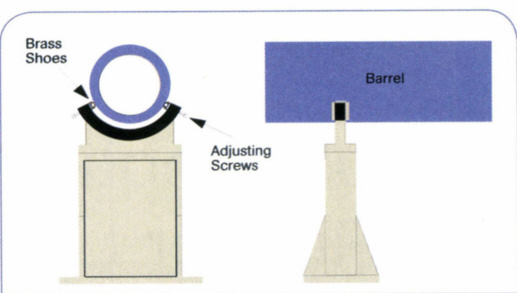
Title: Proper Alignment Saves Wear & Tear…or Worse
Source: Plast Technol 55 no12 D 2009 p. 14-15
What about accululator type device, at barrel end? Screen pack?
Note, excellent puller photo:

Source: Plastics Technology Date: October 1, 2013
1-13-2014
Thoughts…

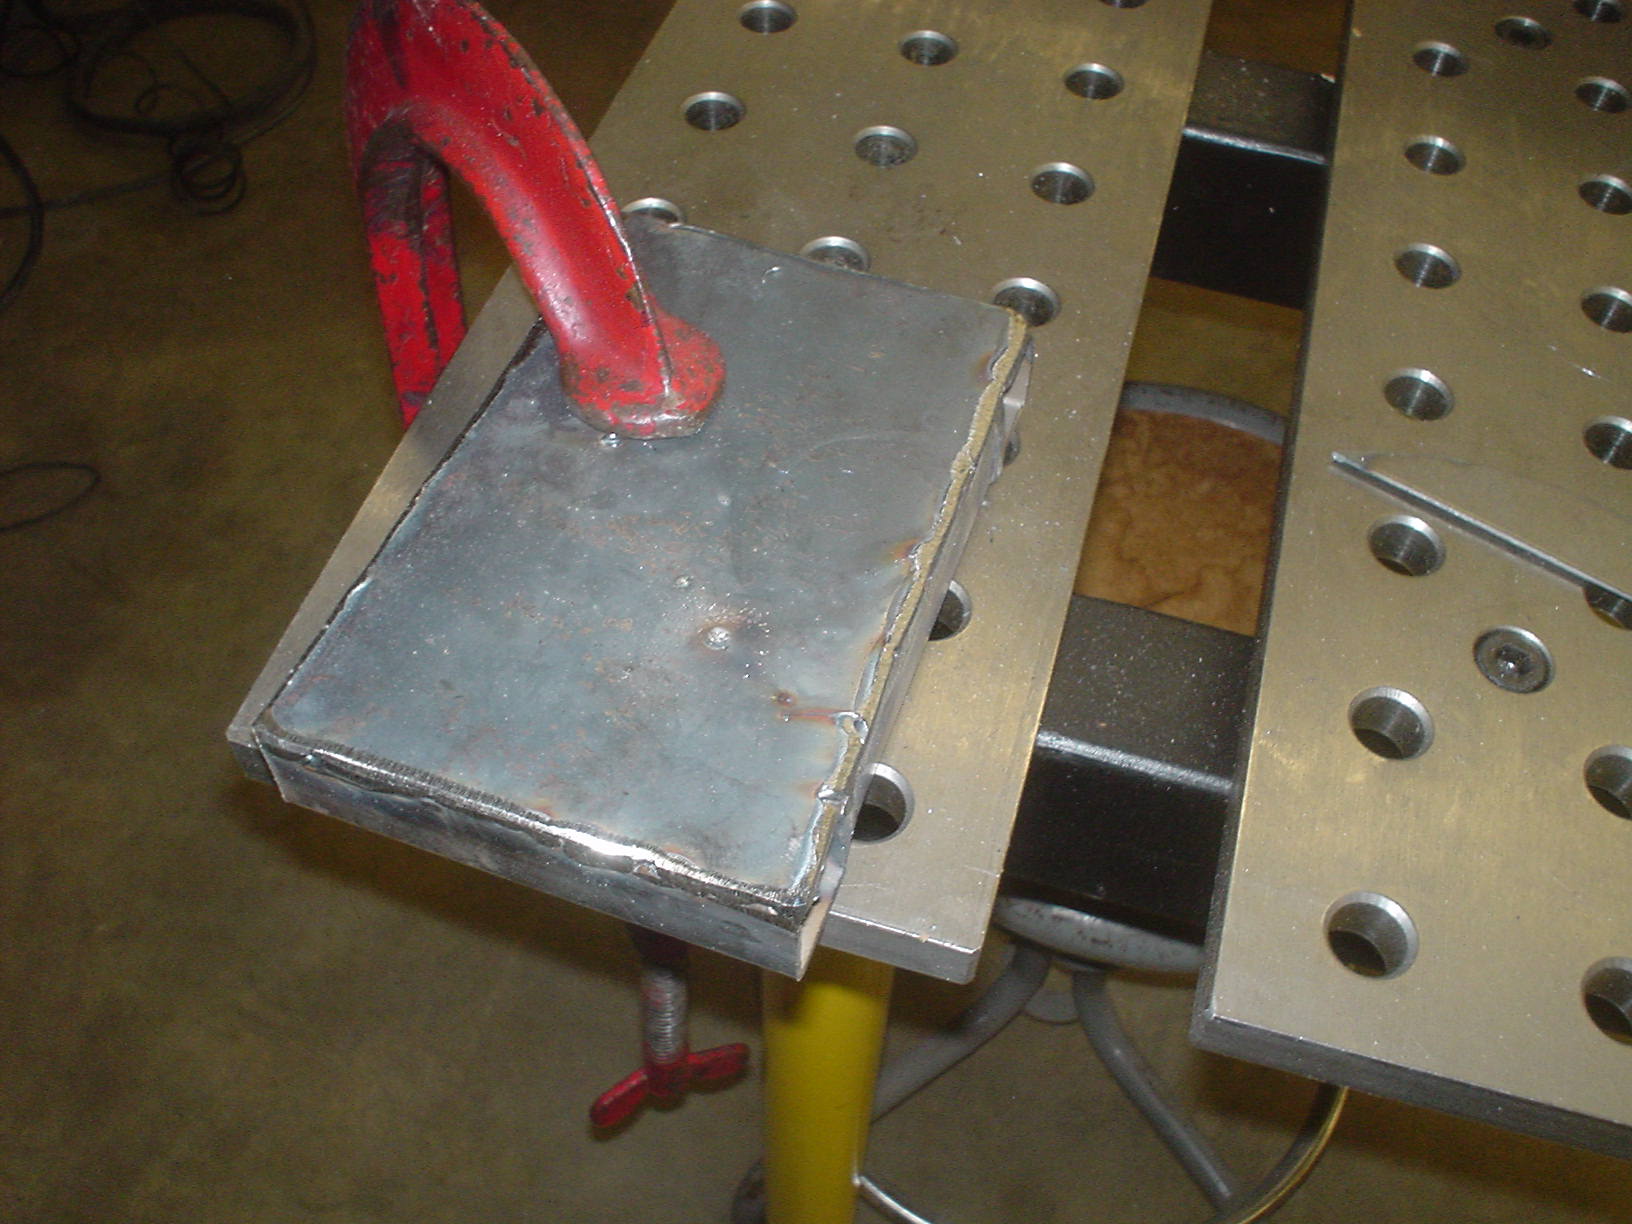
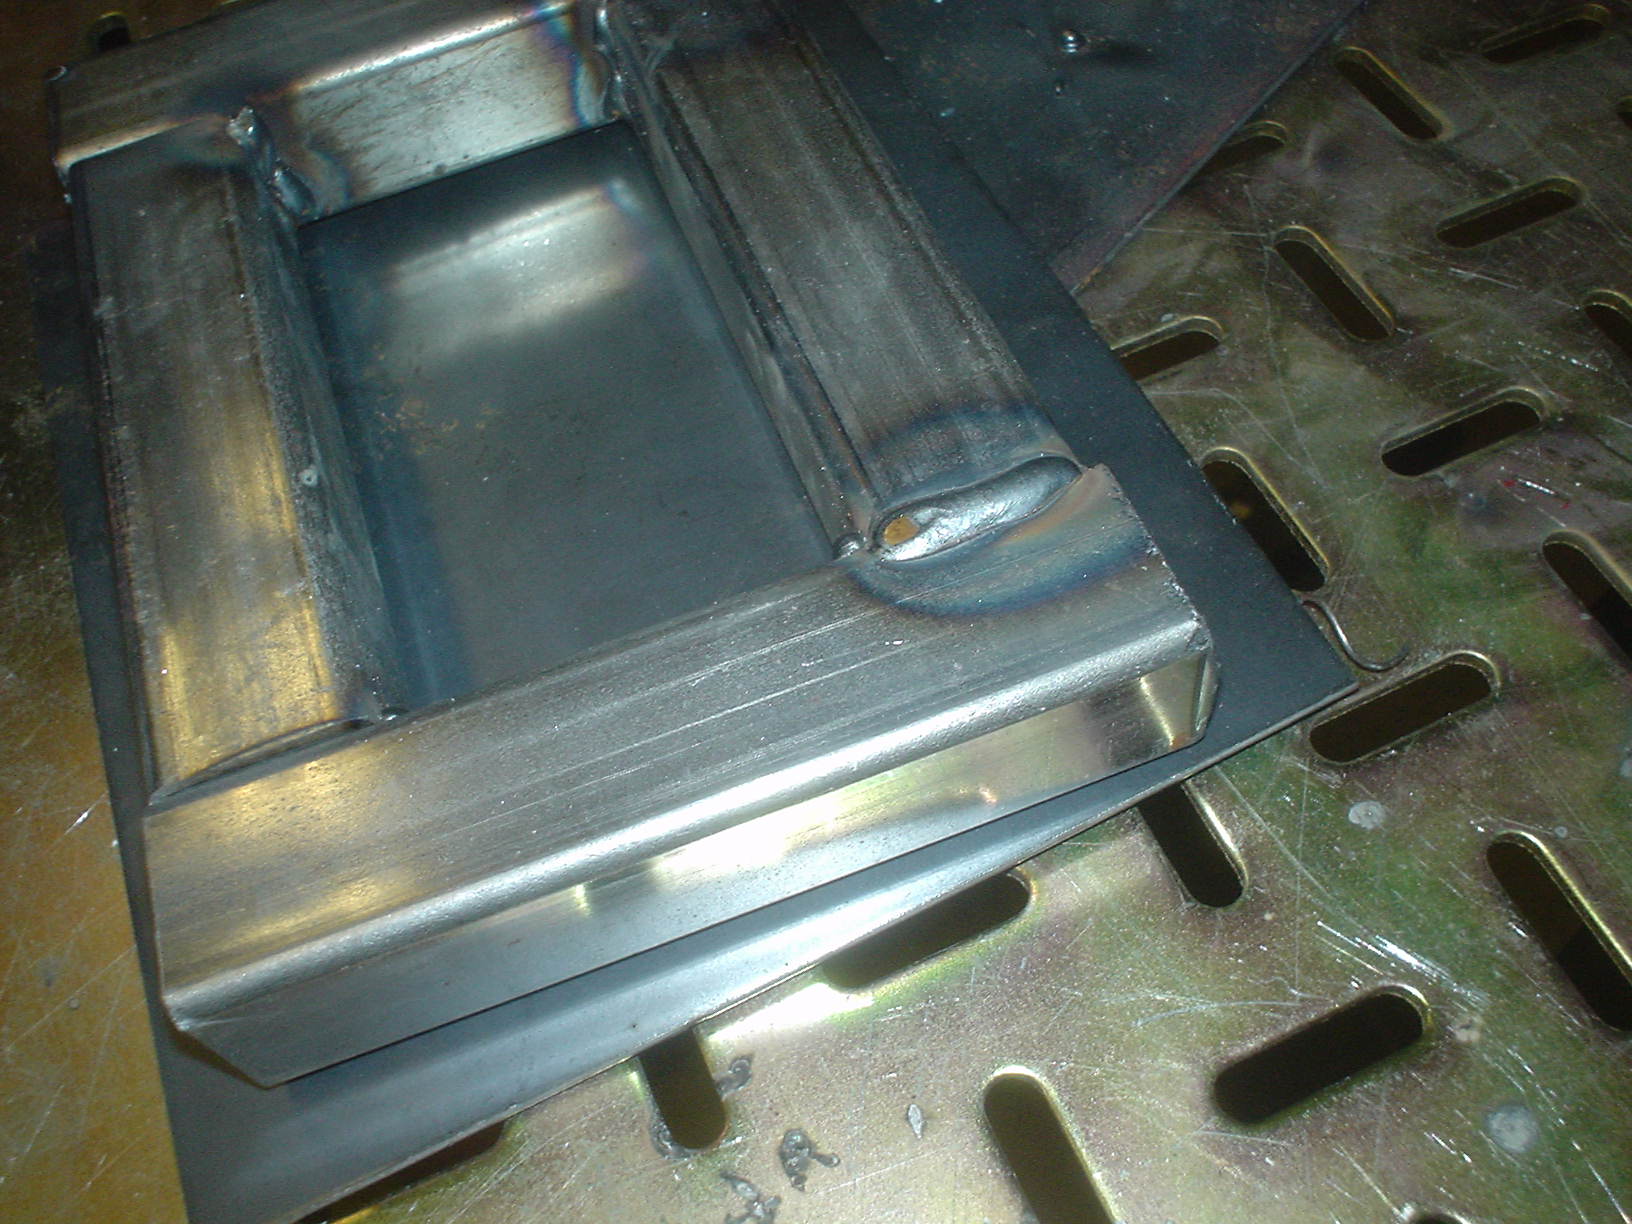
Testing all-around weld with 16 ga. on square tubing…
Numbers for die design:
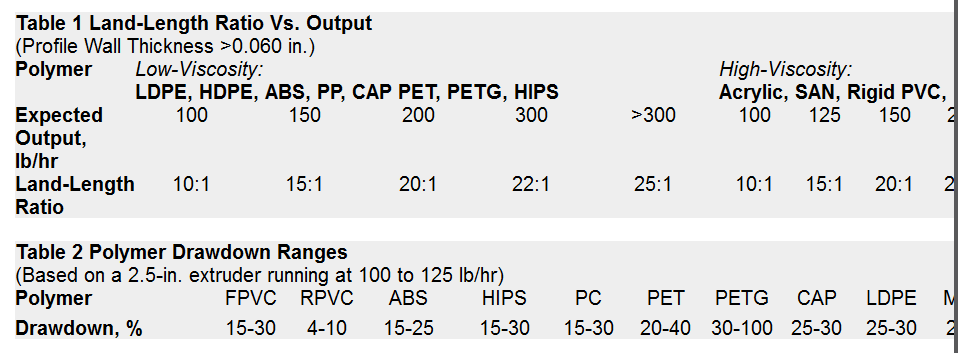
From: http://www.ptonline.com/columns/tooling-know-how-five-tips-on-profile-die-design
1-14-2014
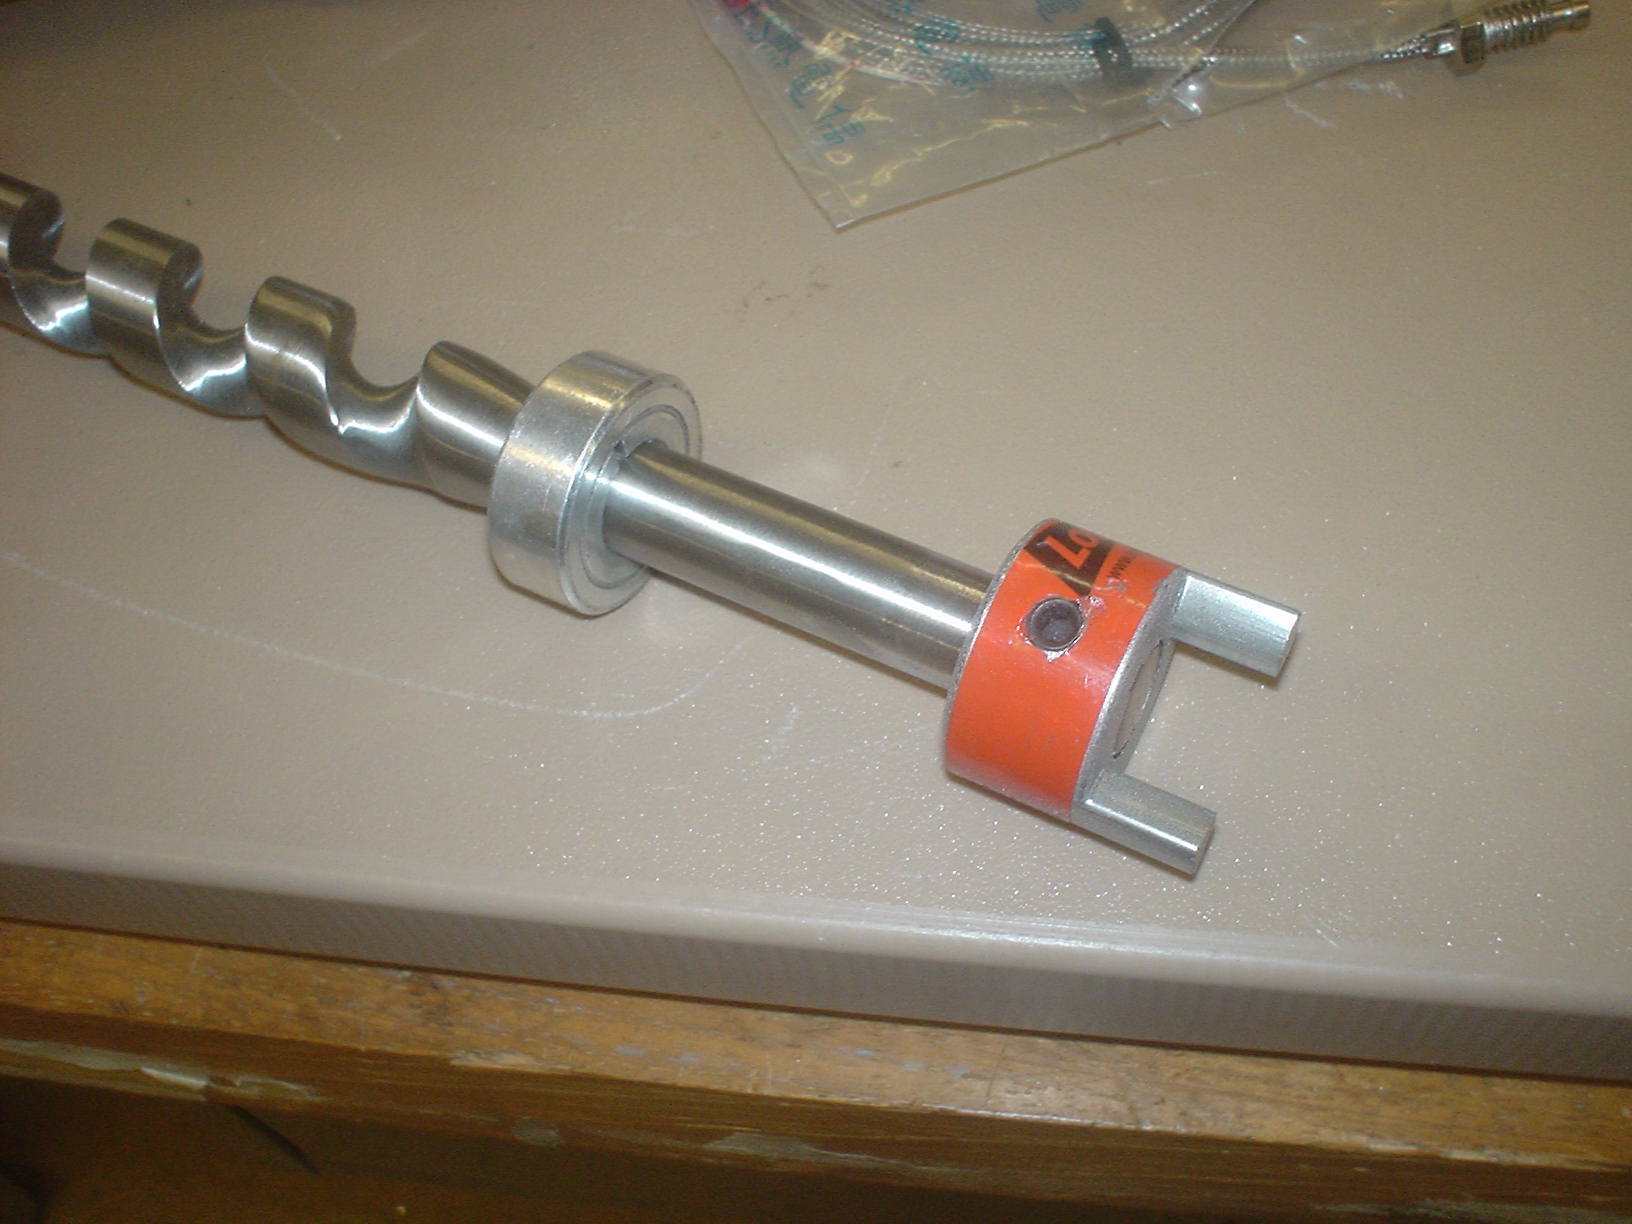
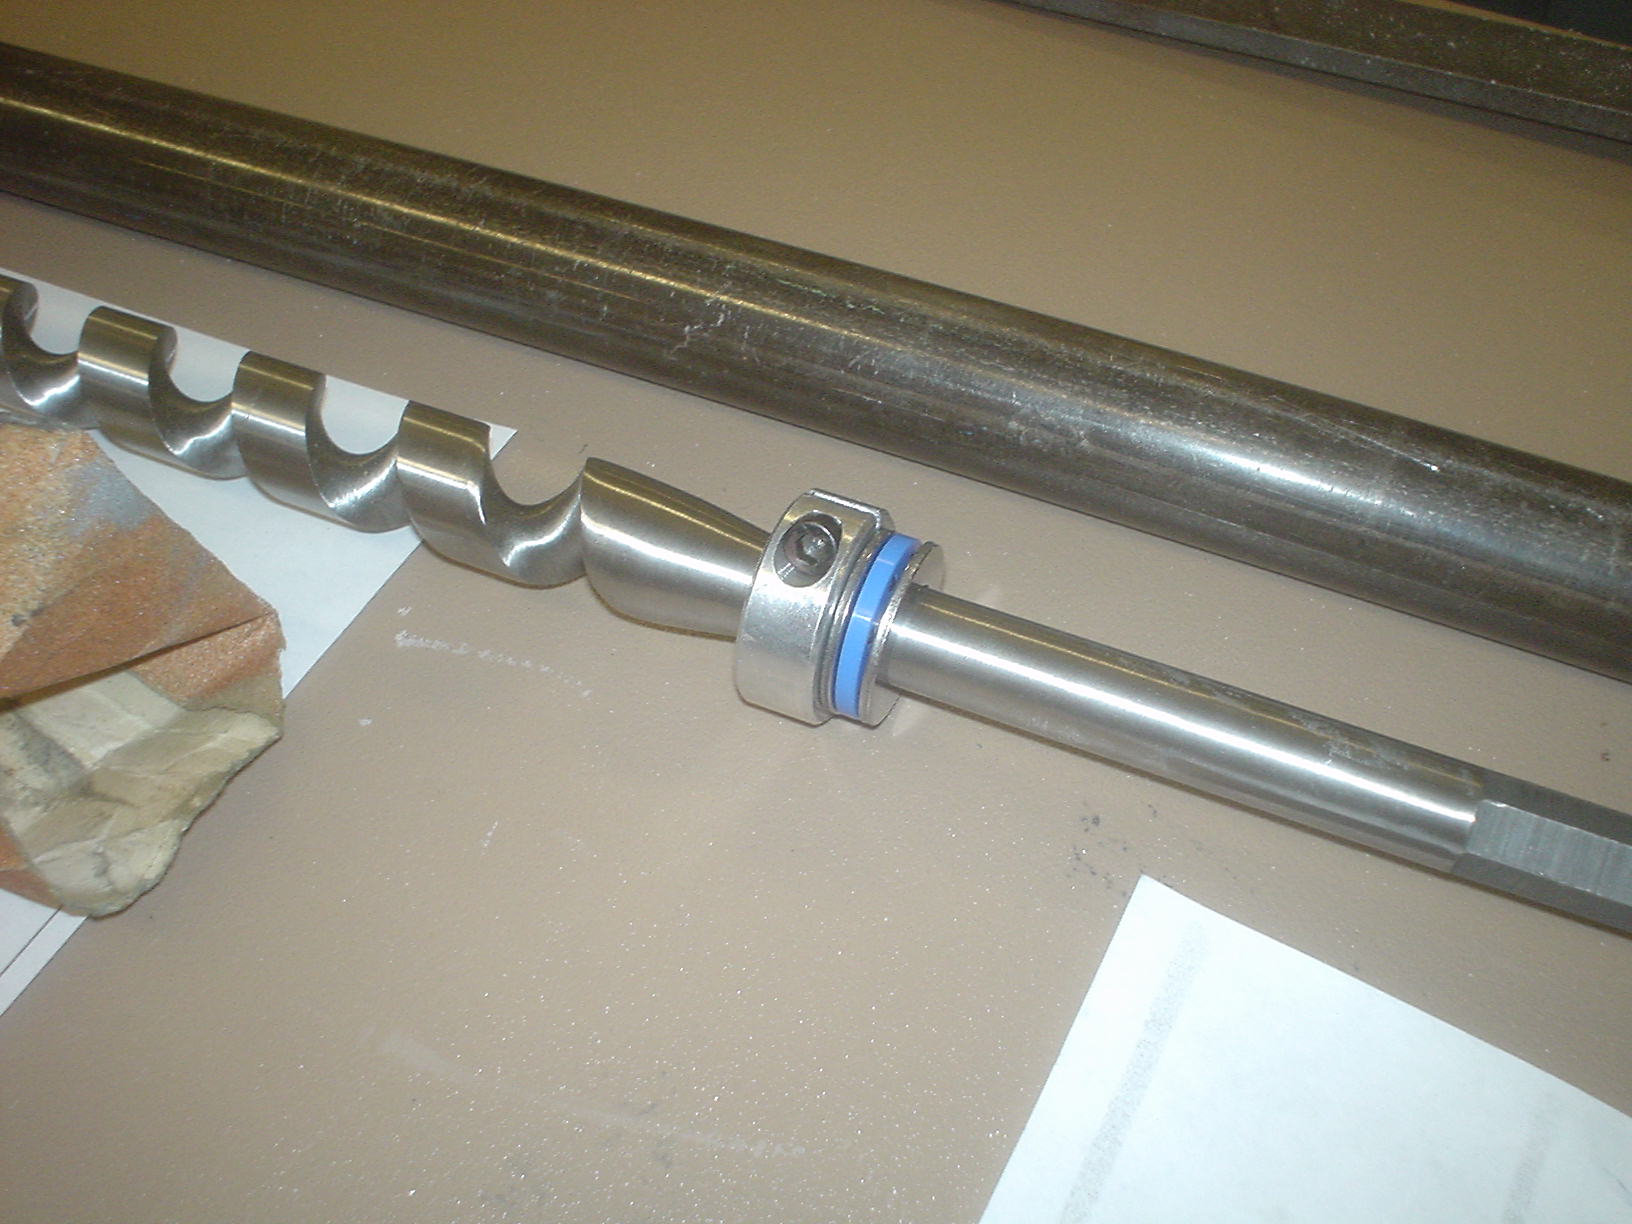
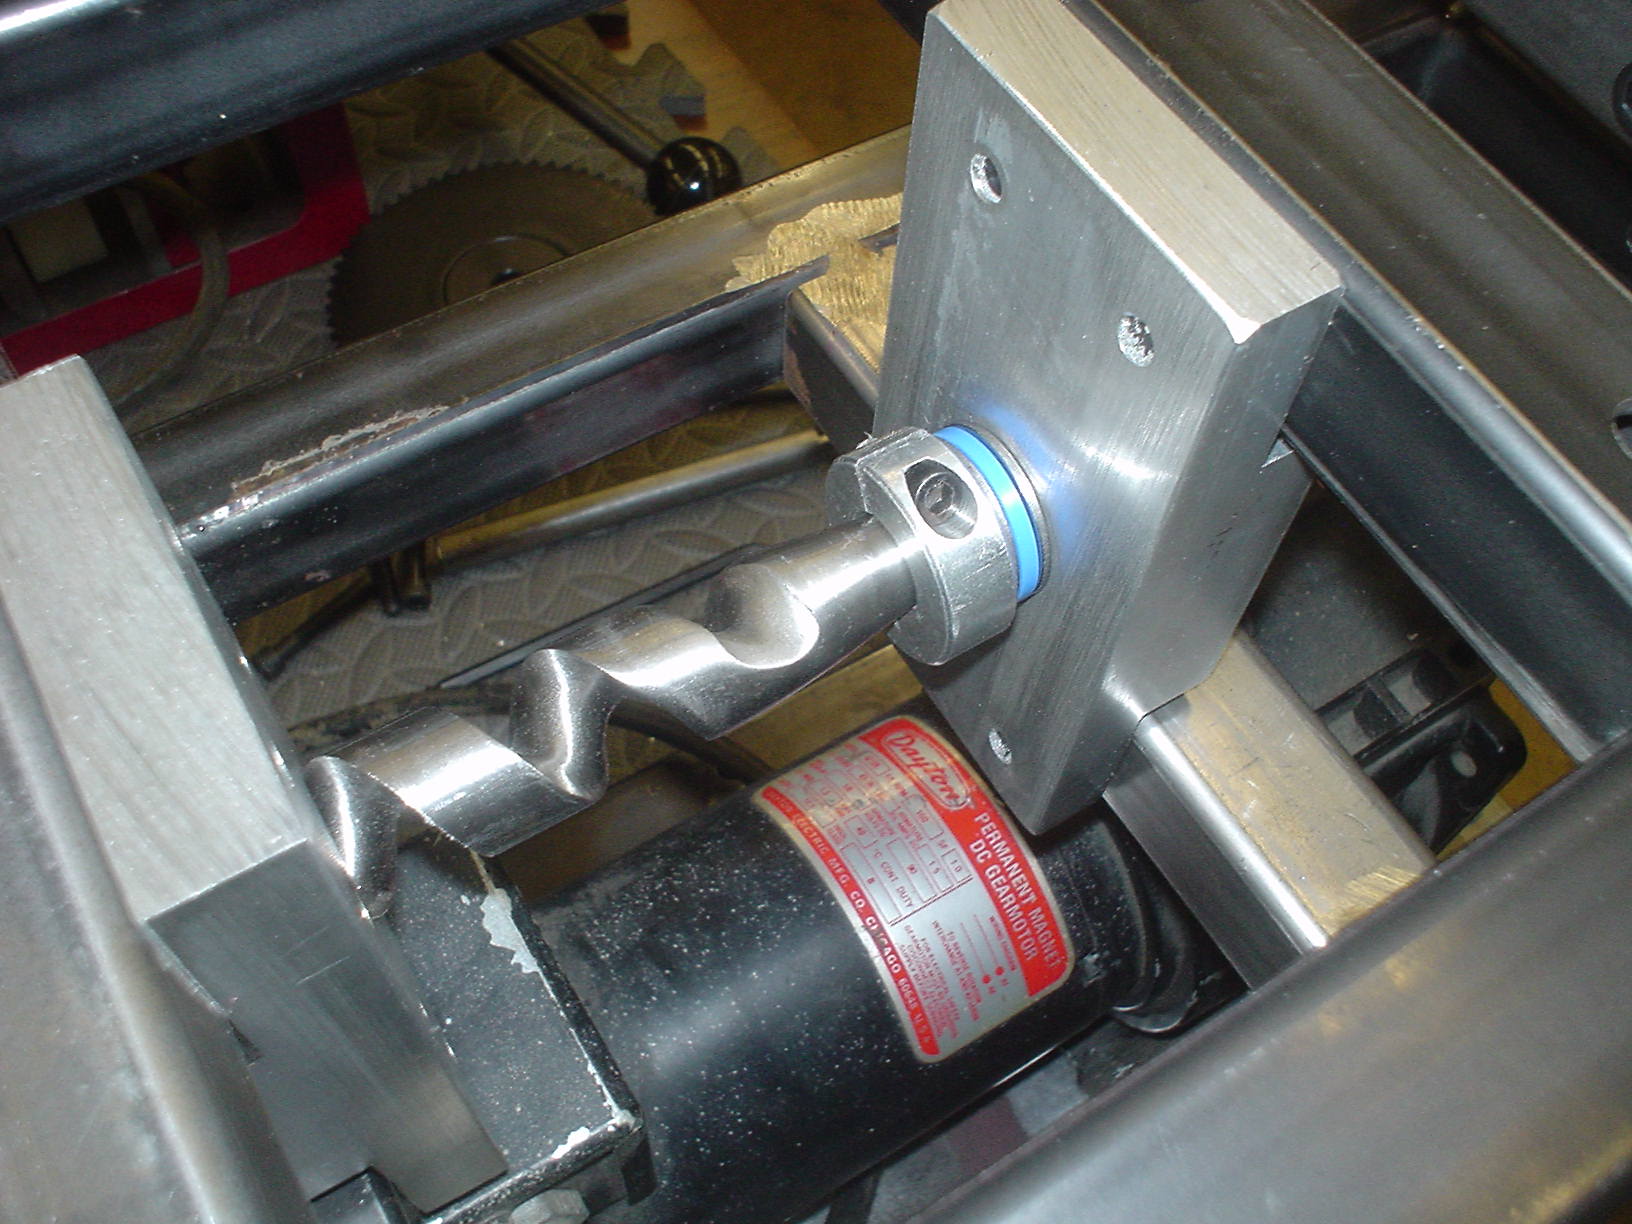
Got the auger bit today. Looks like what I was hoping for. The point end is just barely too big to fit in the DOM tubing, but can easily be ground down. The rest seems to fit quite nicely. Maybe a little oversize, but about the best I could do without gun boring.
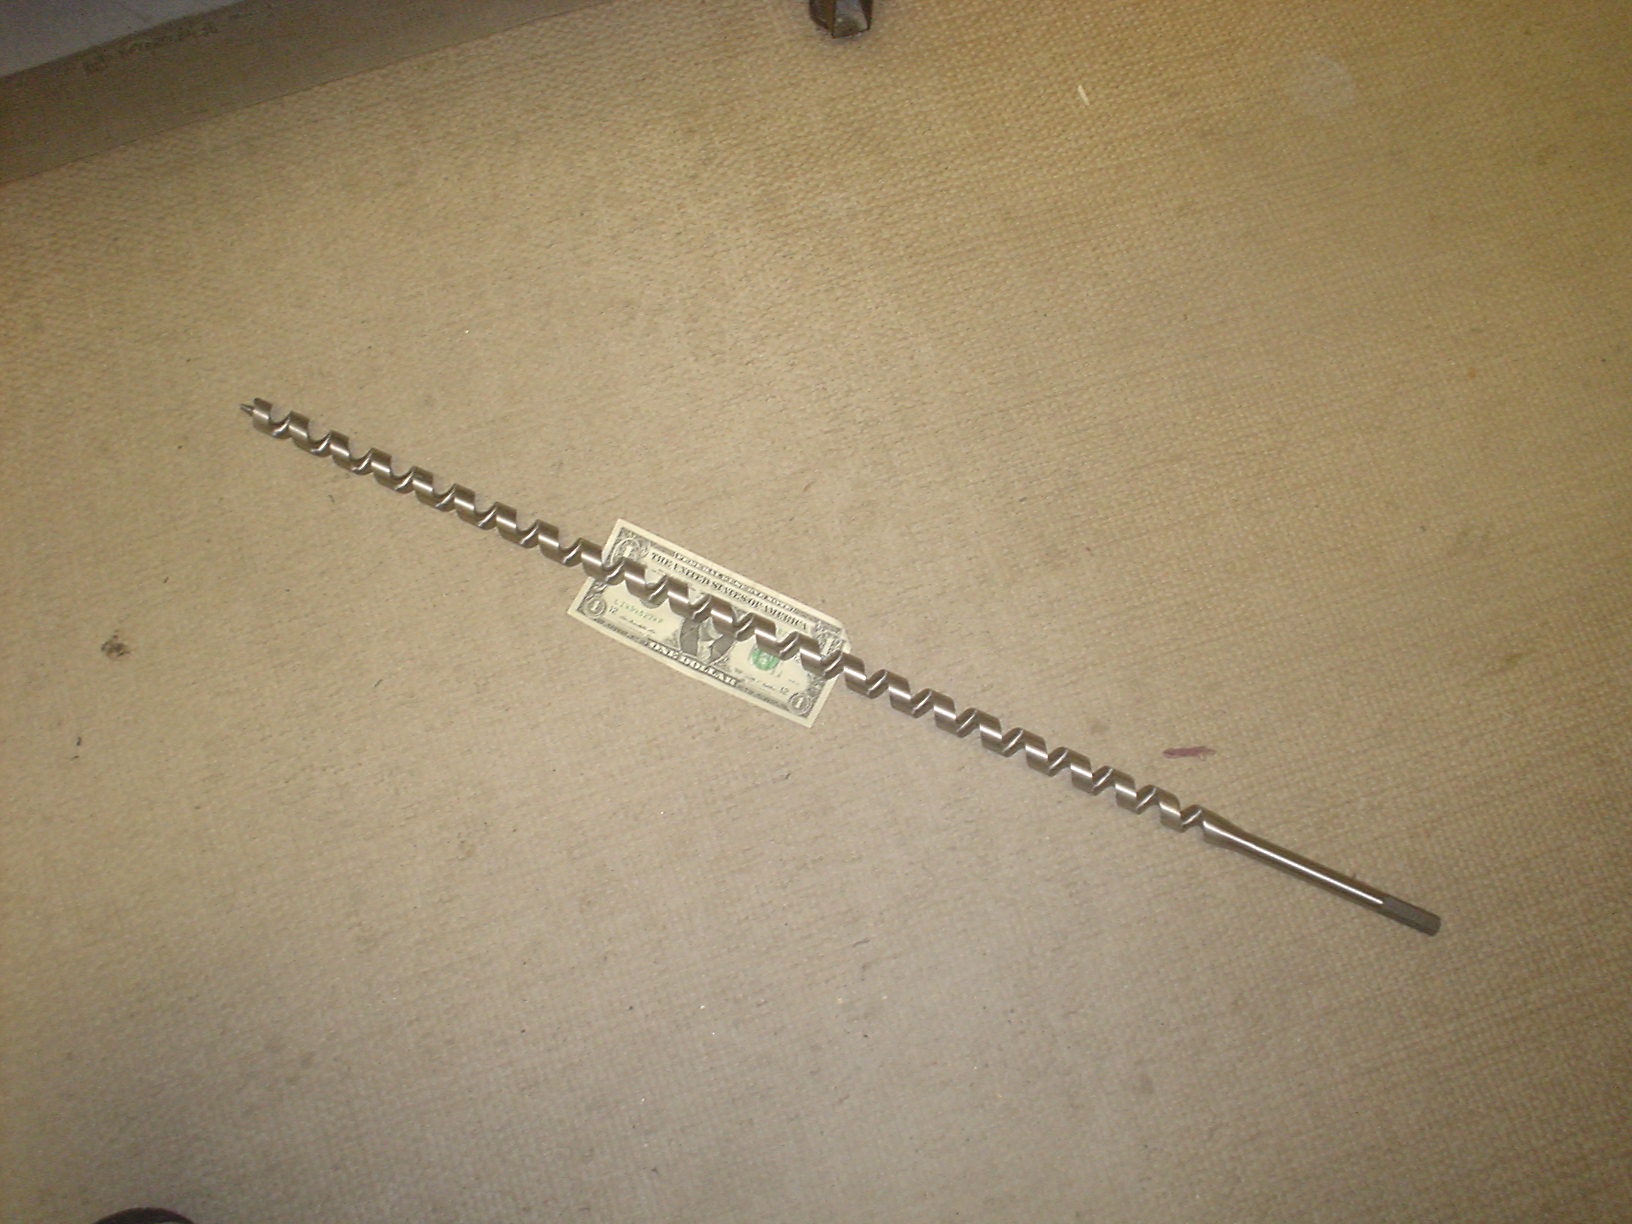
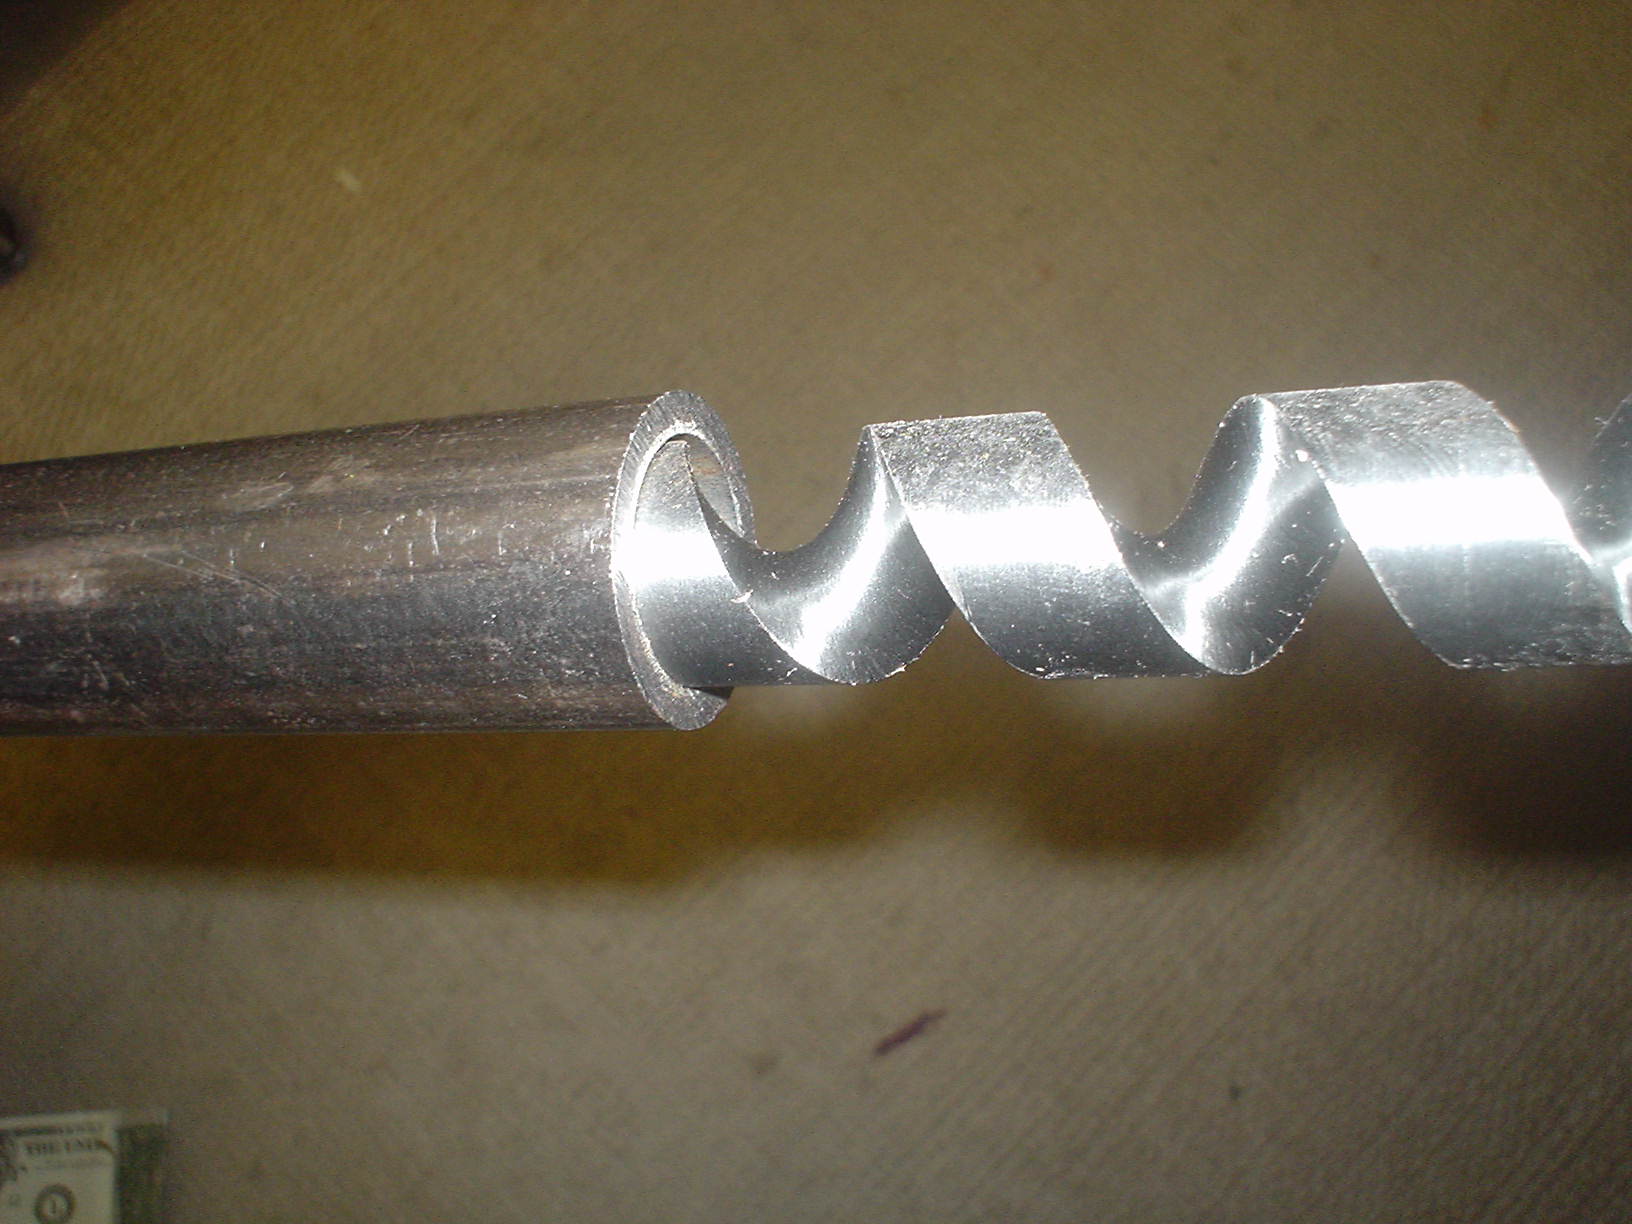


The shaft is larger than the one I was designing with. DONE Change drawings to reflect .50 shaft.
1-15-2014
![]()
Began revising drawings to reflect the actual auger dimensions.
- Need larger thrust bearing.
- Need .500 diameter on both sides of the flex conn.
- IMPORTANT: Shortened base by approx. 1.0
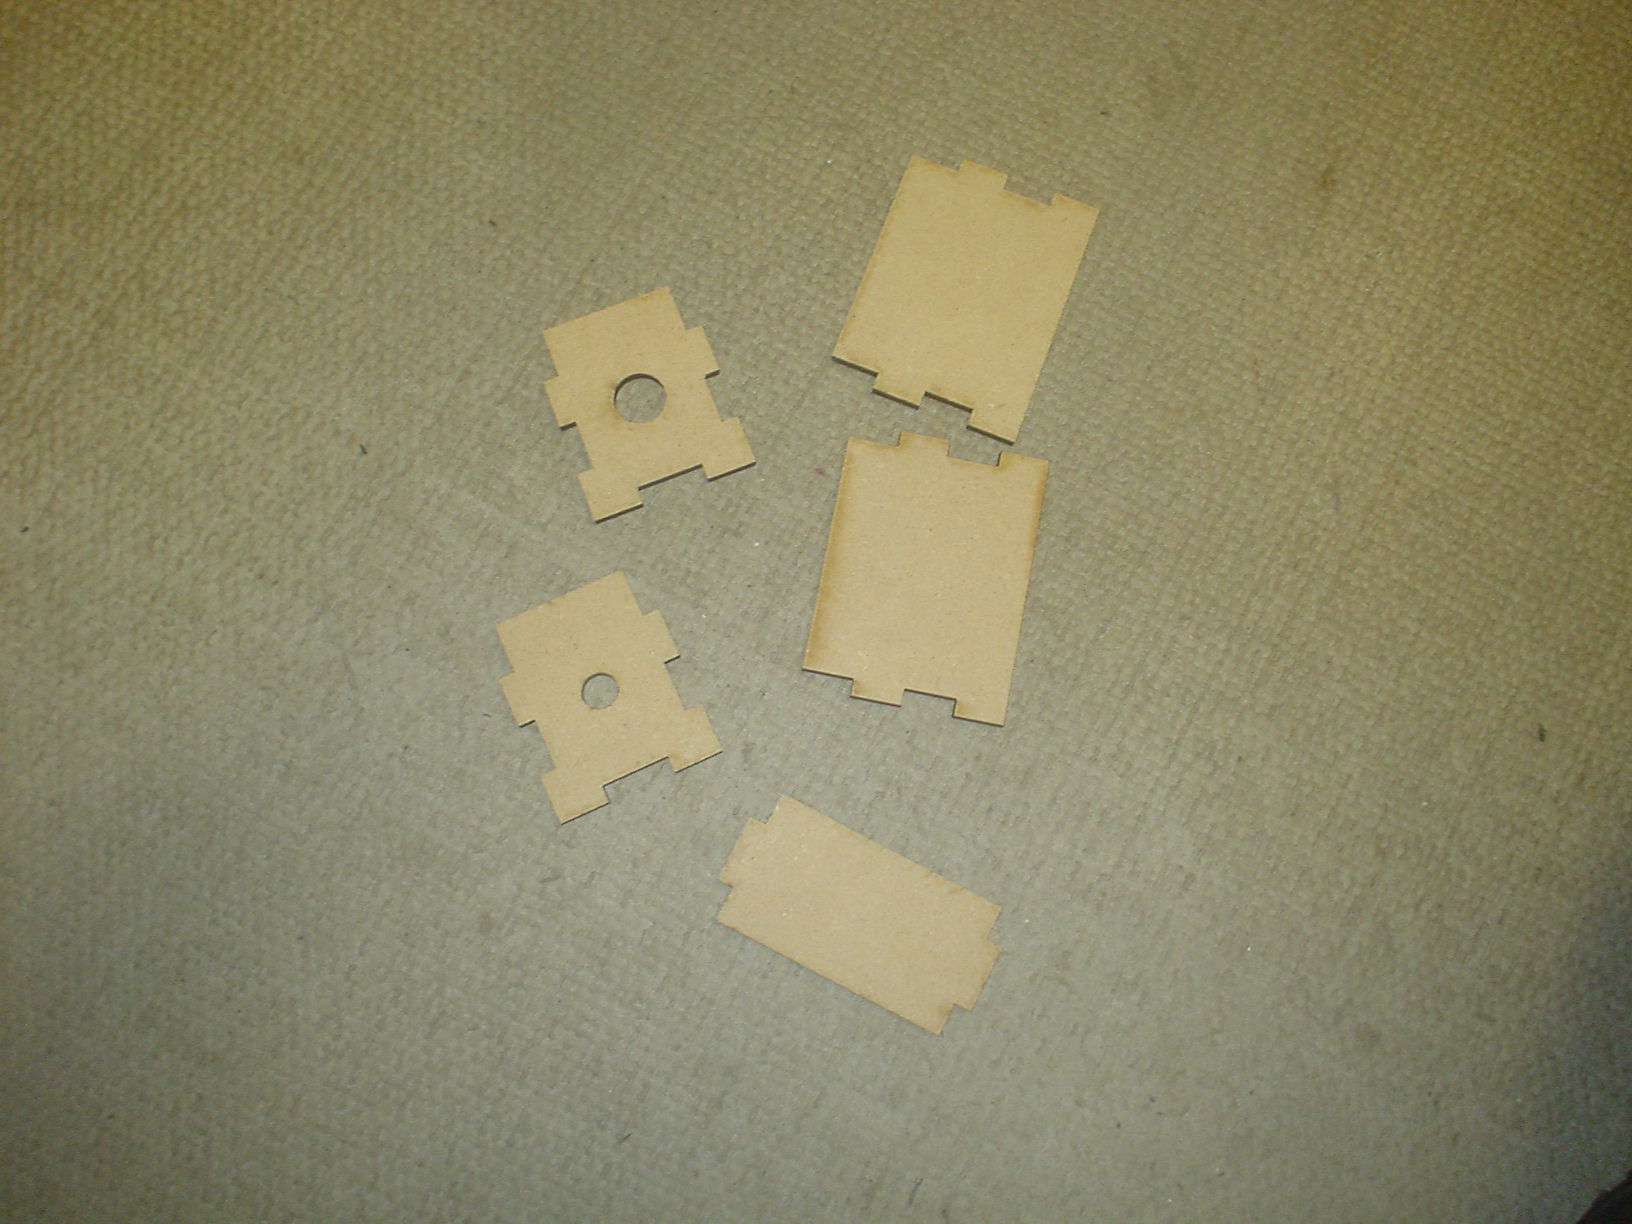
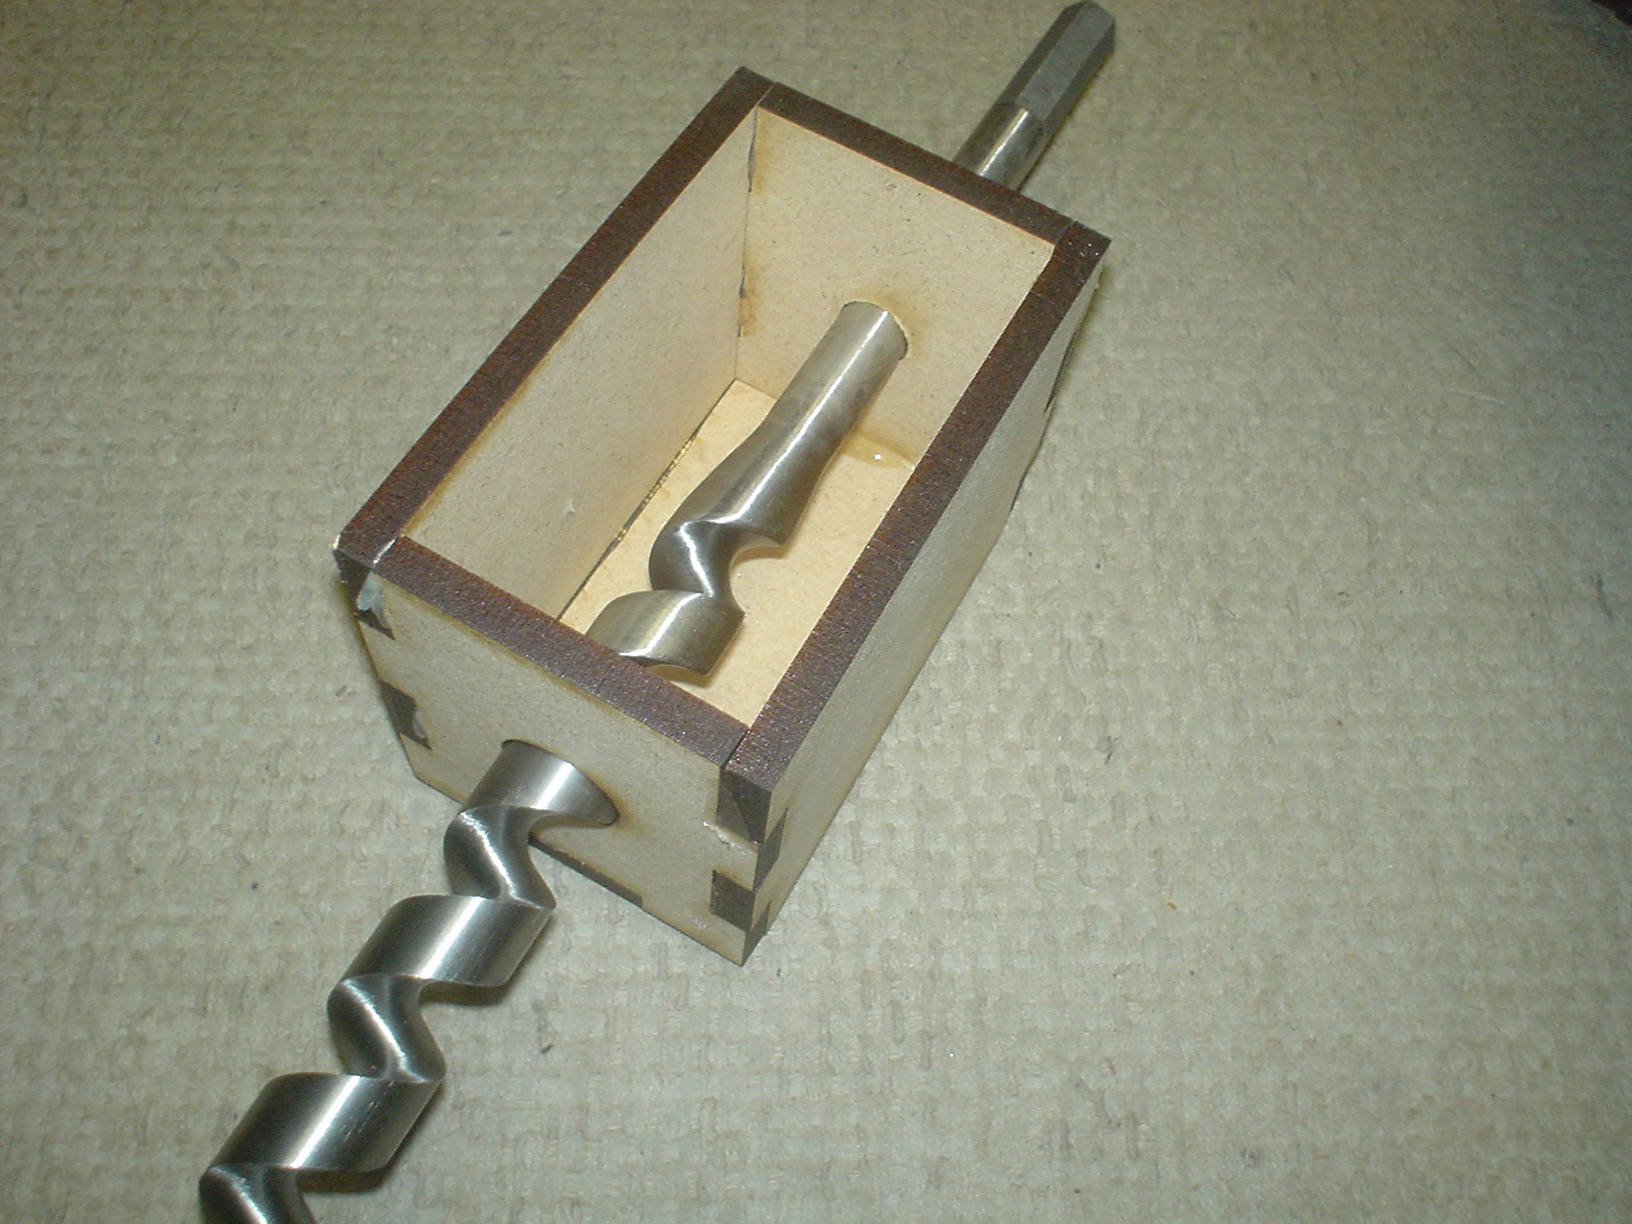
- TODO____Need to laser cut a box to test feed efficiency.
Current PO Status:
McMaster-Carr
| Line | Quantity | Product | Ships | Unit price | Total | |
|---|---|---|---|---|---|---|
| 1 | 2 each | 6408K11 | Flexible Shaft Coupling, Hub for 1/2″ Diameter Shaft, 1-23/32″ Overall Length, Iron | today | $3.61 each | 7.22 |
| 2 | 1 each | 6408K84 | Buna-N Spider for 1-5/64″ Outside Diameter Flexible Shaft Coupling | today | $2.35 each | 2.35 |
| 3 | 1 each | 6655K17 | Steel Thrust Ball Bearing, Steel Washers, for 1/2″ Shaft Diameter, 15/16″ OD | today | $2.72 each | 2.72 |
| 4 | 2 each | 6383K39 | Steel Ball Bearing, Plain Open for 1/2″ Shaft Diameter, 1-9/32″ OD, 5/16″ W | today | $6.62 each | 13.24 |
| 5 | 1 each | 2737T341 | Steel Finished-Bore Roller Chain Sprocket for #25 Chain, 1/4″ Pitch, 60 Teeth, 1/2″ Bore | today | $32.84 each | 32.84 |
| 6 | 1 each | 2737T118 | Steel Finished-Bore Roller Chain Sprocket for #25 Chain, 1/4″ Pitch, 17 Teeth, 5/8″ Bore | today | $10.63 each | 10.63 |
| 7 | 1 each | 6261K171 | Standard ANSI Roller Chain, #25, Sngl Strand, 1/4″ Pitch, Rollerless,.13″ Diameter, 3′ L | today | $11.19 each | 11.19 |
| 8 | 1 pack | 93482A681 | Aluminum Rivet Nut, 1/4″-20 Internal Thread, .020″-.080″ Material Thickness, packs of 25 | today | $6.94 pack | 6.94 |
| 9 | 1 pack | 9540K781 | Round Bumper, Rubber, 13/16″ Diameter, 13/16″ High, without Washer, packs of 10 | today | $6.03 pack | 6.03 |
| Merchandise total | $93.16 | |||||
Amazon:
- PID Temp con 1pcs REX-C100 PID Digital Temperature Control Controller Thermocouple 0…
$14.99
- SSR?
Nozzle Band Heaters:
- 1-1/2 inch diameter X 1 inch wide, 150 watts, 120 volts with 10 inch flexible leads (SKU: 1S150-100LAP150-120)One piece nozzle band heater, 1-1/2 inch diameter X 1 inch wide, 150 watts, 120 volts with 10 inch flexible leads ….Allow 3 weeks to ship this heater
- Price $11.36
- 1 inch diameter X 5 inch wide, 500 watts, 120 volts with 10 inch flexible leads (SKU: 1S100-500LAP500-120)One piece nozzle band heater, 1 inch diameter X 5 inch wide, 500 watts, 120 volts with 10 inch flexible leads ….Allow 3 weeks to ship this heater
- Price $15.64
Southern Steel:
- 1″ square x .060 (2 sticks at 20′) 18.5′ per unit, one stick for welding auditions by students.
Tested hopper feed layout. Seems to work.

Sent all but southern steel order to purchasing.
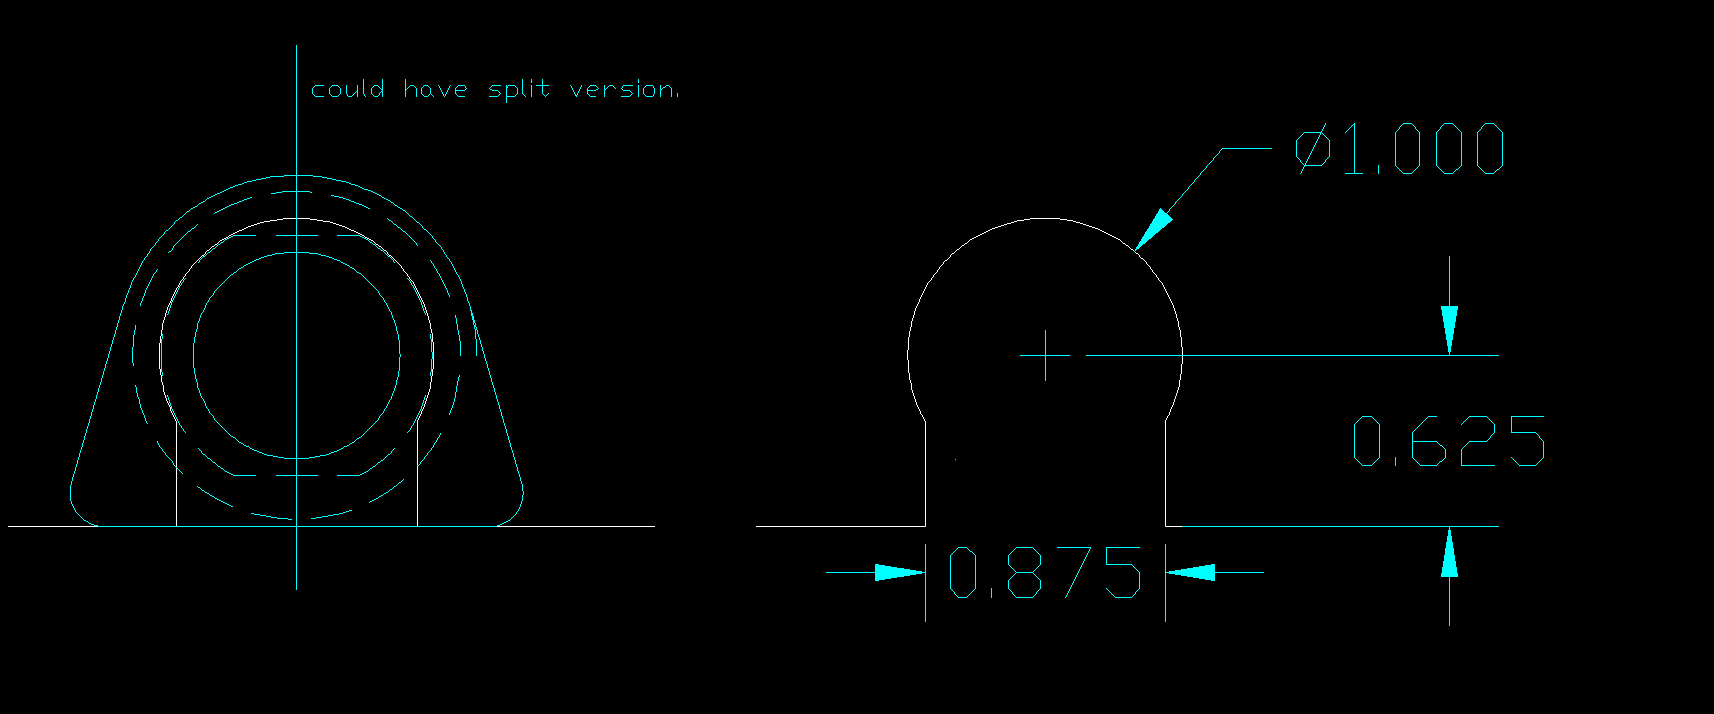
Found aluminum for nozzle, blank: 1.75 diameter x 2.0 long.

Assigned to “team members”:
- Model the frame and bearing blocks (using wave geometry linker).
1-17-2014
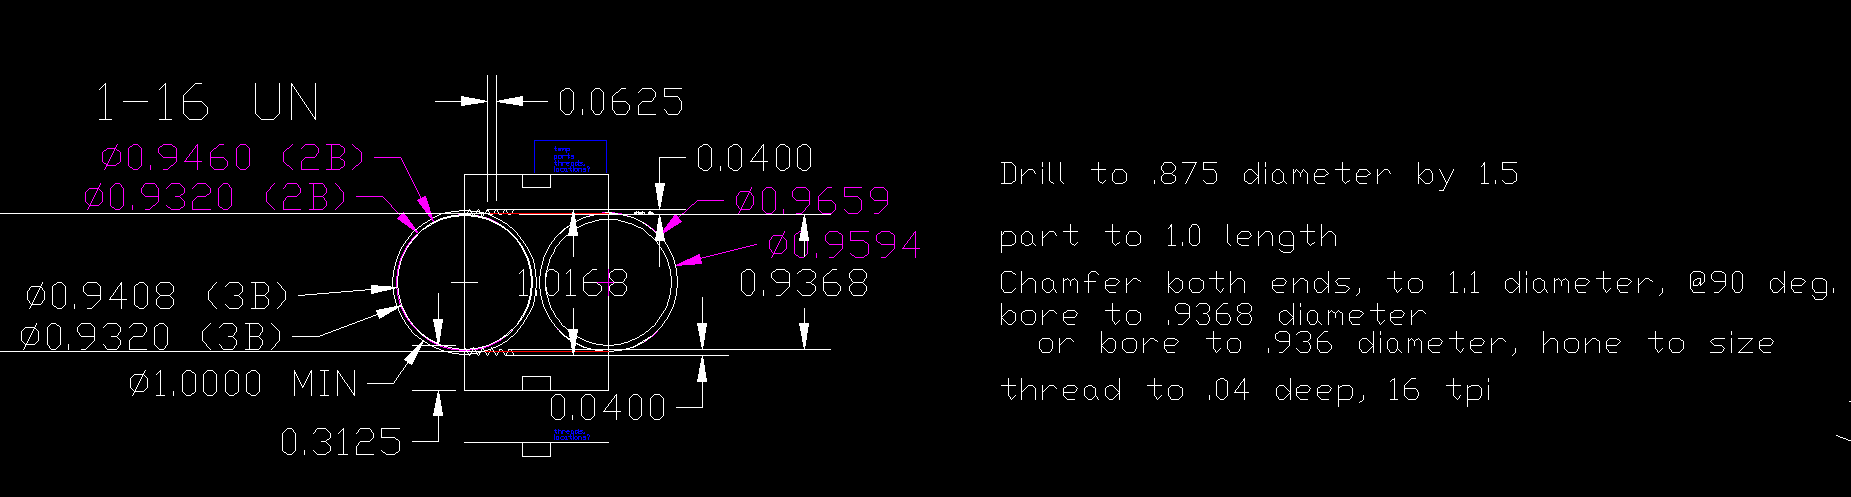
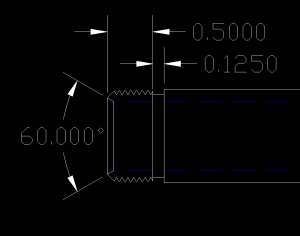
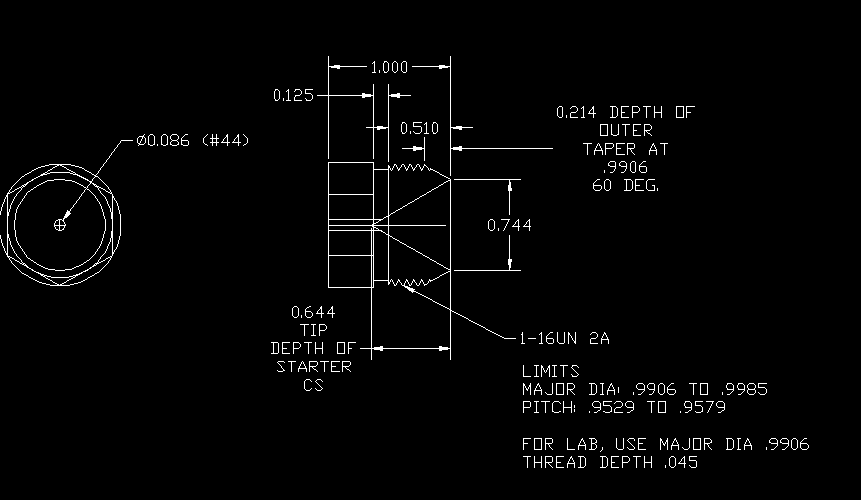
Found a usable piece of D2. for nozzle end. Would be more durable than Aluminum. Try Al first, use 1-16UN with internal threading tool on lathe. Class 2A Limits:
- 1-16UN
- Internal Limits 2B
- Minor Diameter: .9320 to .946
- Pitch Diameter: .9594-.9659
- Major Diameter Minimum: 1.0000
- Internal Limits 3B
- Minor Diameter: .9320-.9408
- Pitch Diameter: .9594-.9643
- Major Diameter Minimum: 1.0000
Use these dimensions (middle of 2B Pitch diameter tolerance, if perfect, is in spec for 3B):
- Tip Depth: .040
- Bore: .9368
- Makes Major Dia: 1.0168
- Makes Pitch Dia: .9627
- Procedure:
- Drill to .875
- Part to 1.0 long
- Chamfer both ends
- Chamfer both ends of hole, 90 deg, OD 1.1
- Bore to just under size
- Hone to size
- Thread
- Internal Limits 2B
May need to change thread pitch to 1-20UNEF because of the internal threading tool size (only a problem if thread milling). Internal threading bar can accommodate up to .050 or so thread depth.

1-21-2014
In Lab
- Parts arrived from McMaster-Carr
- Inventoried Parts
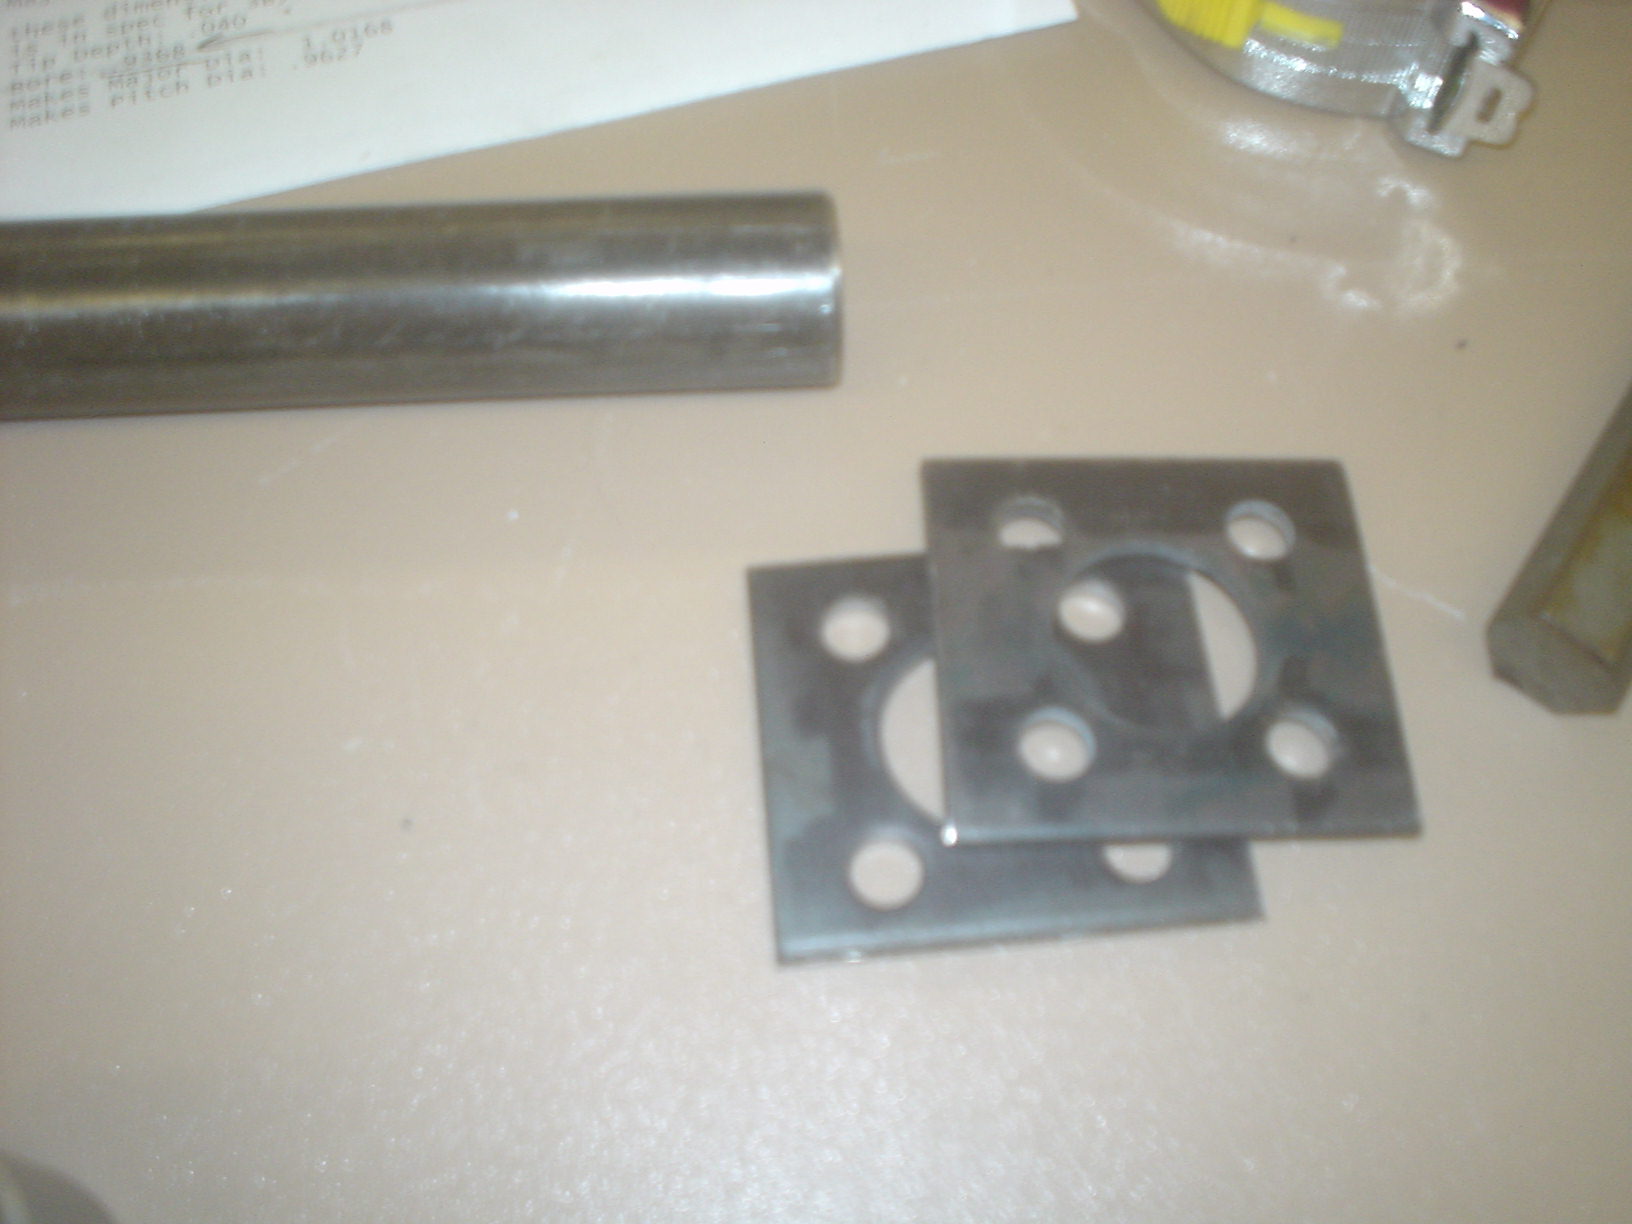
- Cut bearing blocks to size
- Started machining nozzle adapter
1-23-2014
Received Material from Southern Steel (14 Ga. tube)
In Lab
- Familiarize students with TM-1
- Redo offset for vise
- I-Beam fixture
- 3 Jaw Fixture
- Machine I-beam Fixture
1-28-14
Received nozzle heaters. Seem to be the right size.
In lab,
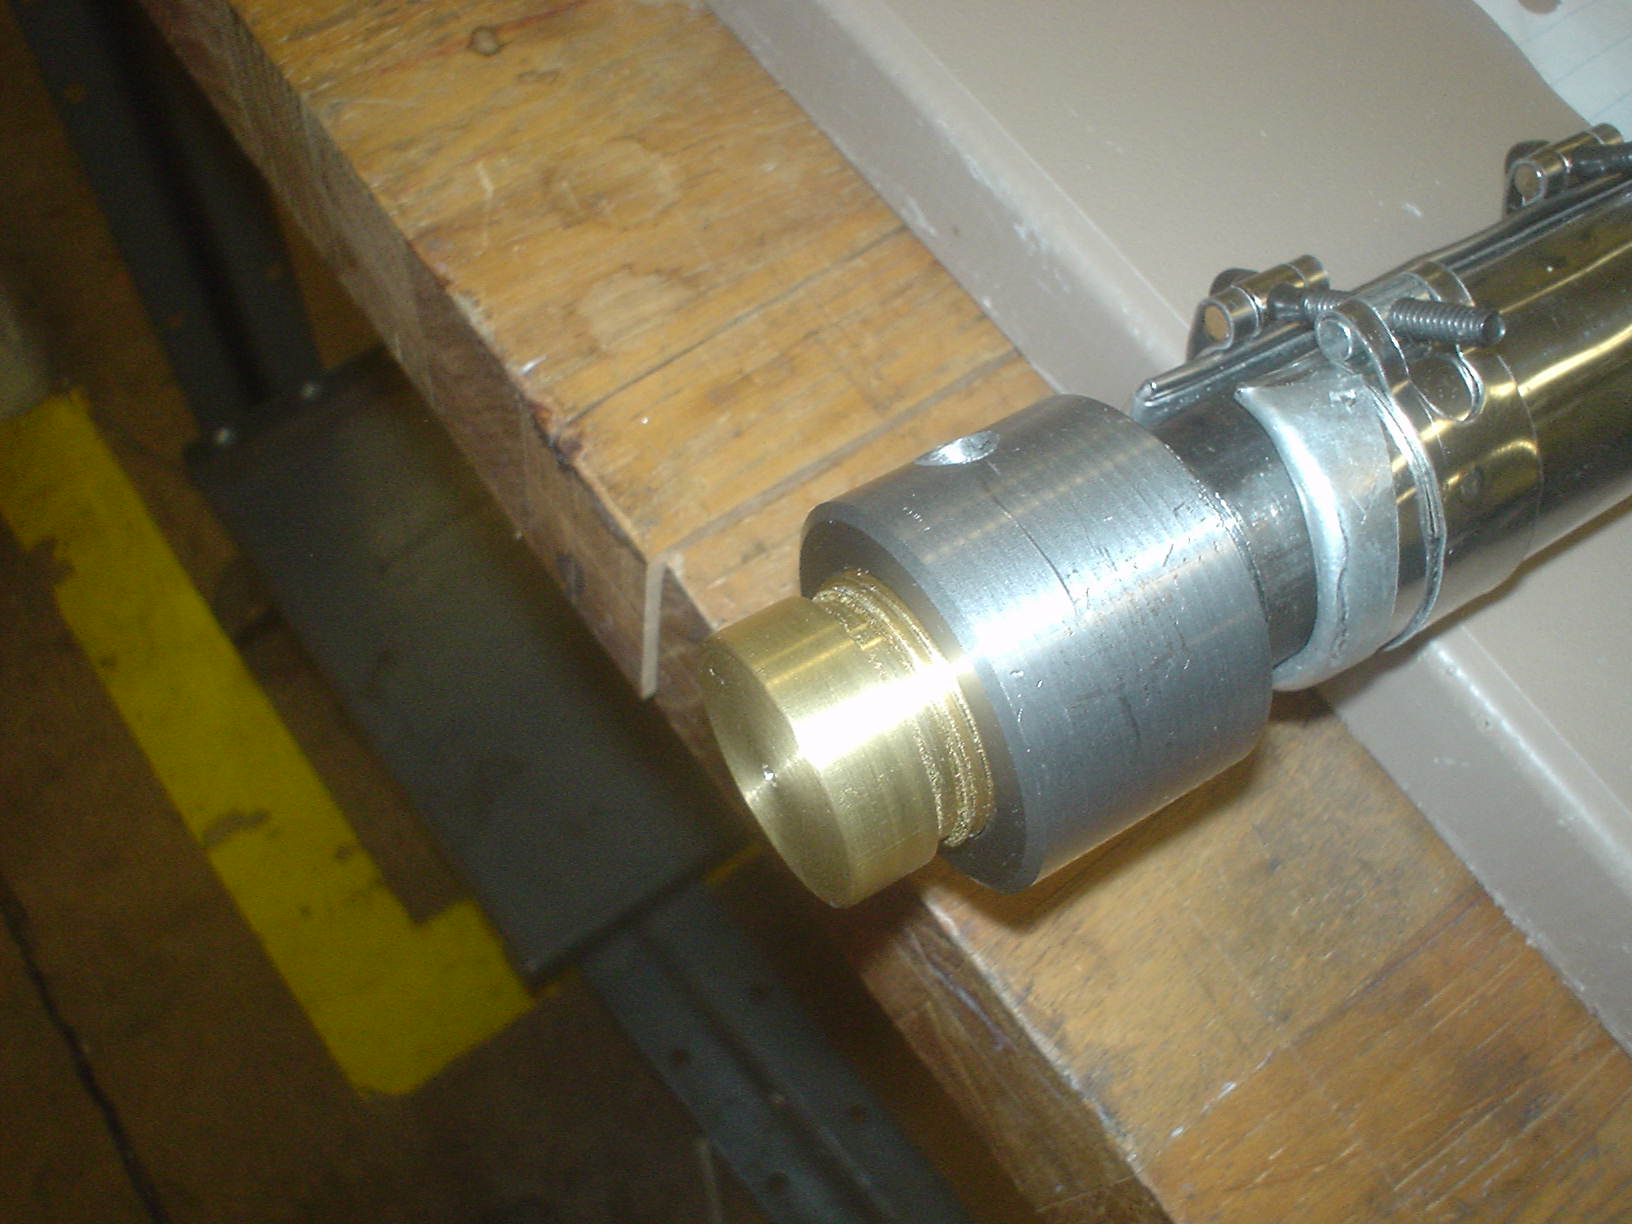
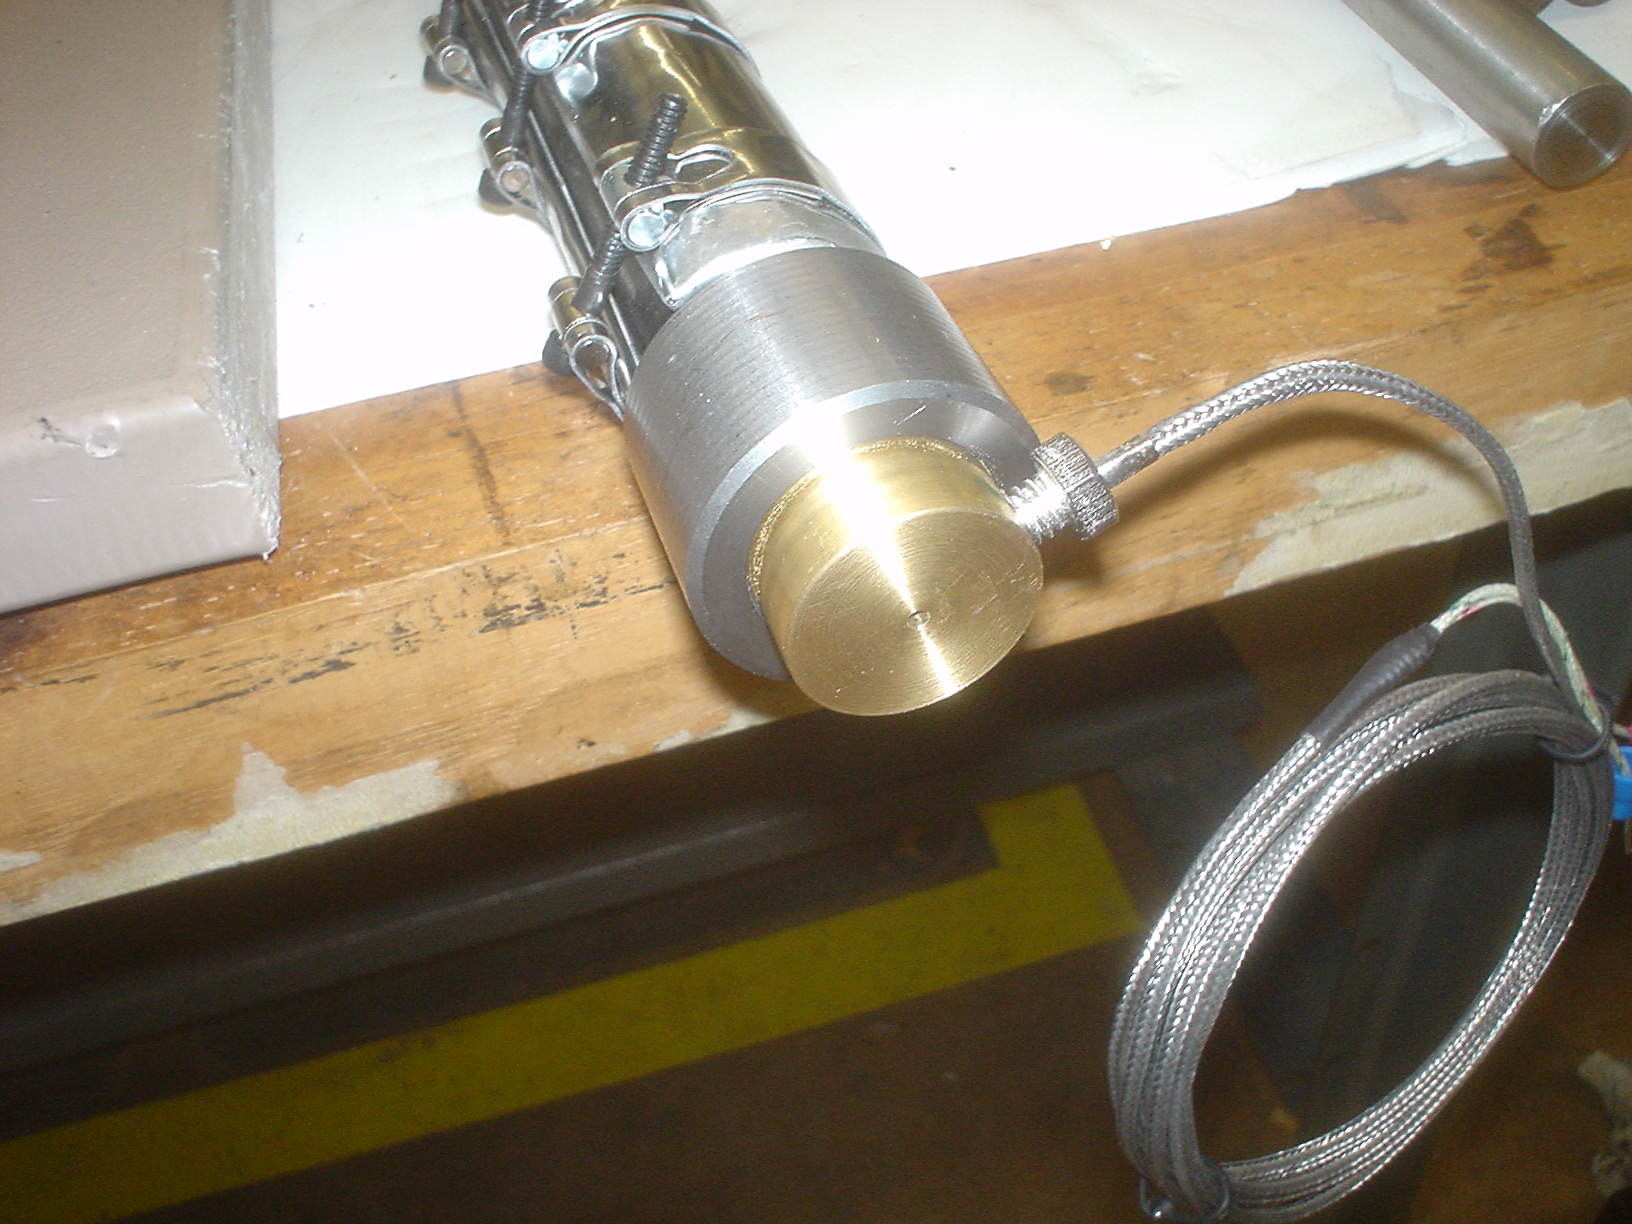
- Finish making nozzle adapter
- Put threads on barrel (External, MH p. 1744)
- Major diameter .9906
- Depth of threads: .0445

- Barrel Adapter is made from D2 tool steel
- More photos here (thanks, Nate)


1-29-14
Reworked threads on end of extruder barrel to avoid killing lab time. Still need to add 60deg taper inside.
2-4-14
In Lab: {LAB CANCELLED DUE TO INCLEMENT WEATHER}
- Cut 1″ square tube for frame:
- LR Long Rails: 26.25 Qty: 4
- LU Long Uprights: 6.95 Qty: 4
- SU Short Uprights: 2.5 Qty: 4
- SR Short Rails: 12.75 Qty: 2
- CB Cross Brace: 5.5 Qty: 11
- NOTE: Label each piece LR1, LR2, etc.
- Using .25 kerf, allow 6.25 inches
- Total: 235 in or 19.6 ft
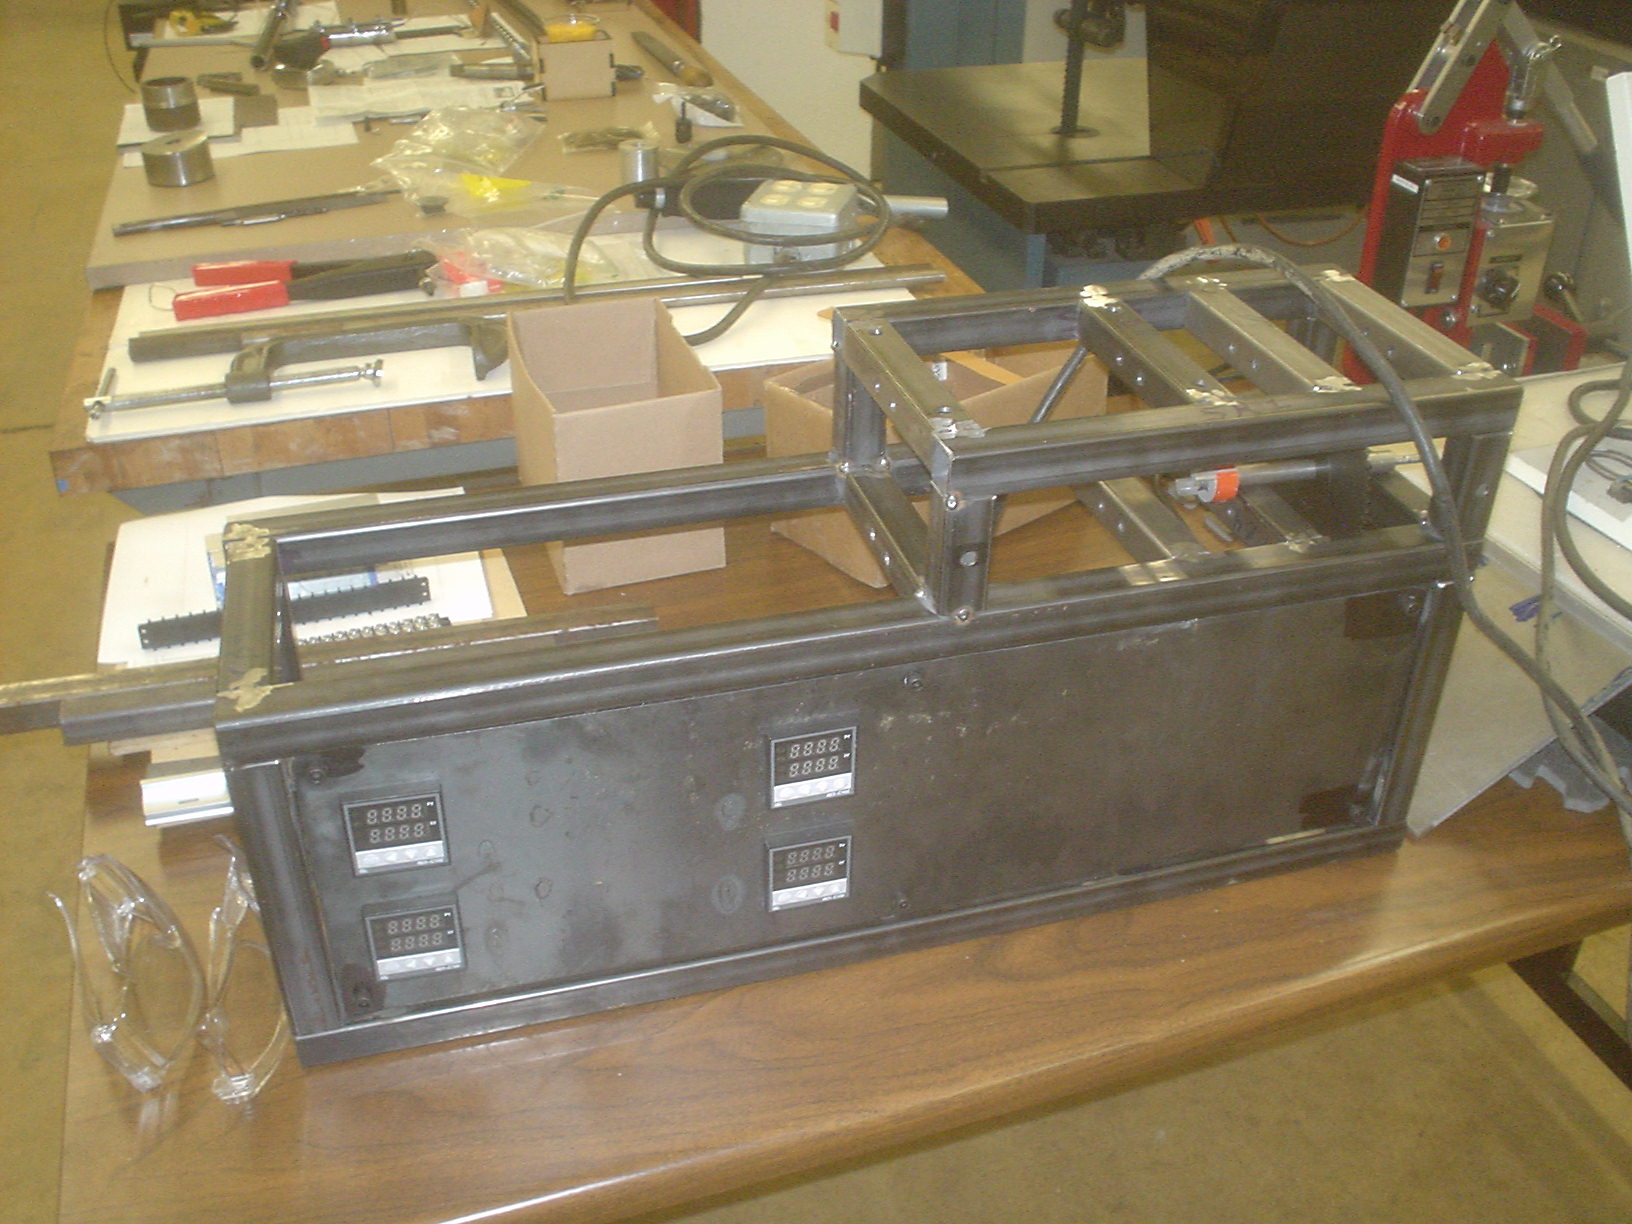
PID Temperature controllers arrived.
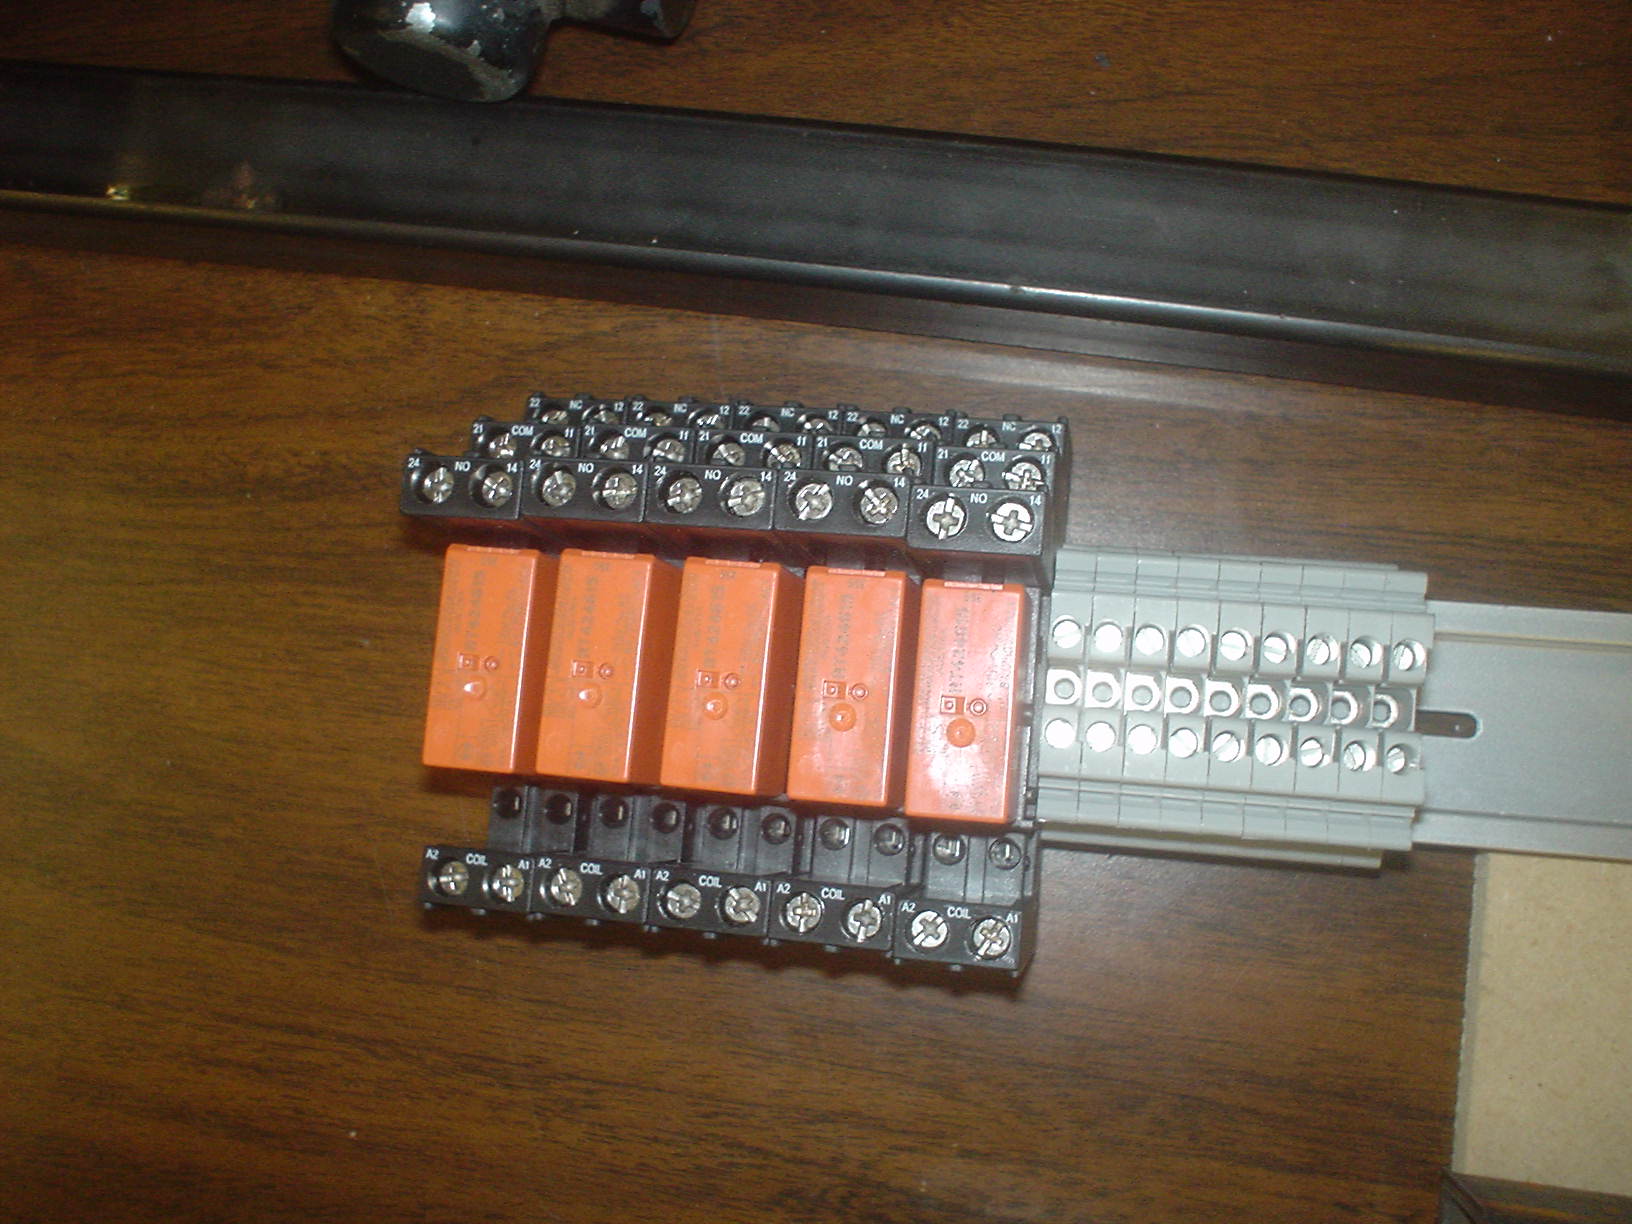
Found Relays, bases and DIN rail on-hand:
- Schrack RT424615
- Omron ES50/3 Din Rail Mounted 8 Pin Relay Base
- Note: These are DPDT, only need single pole.
2-5-2014
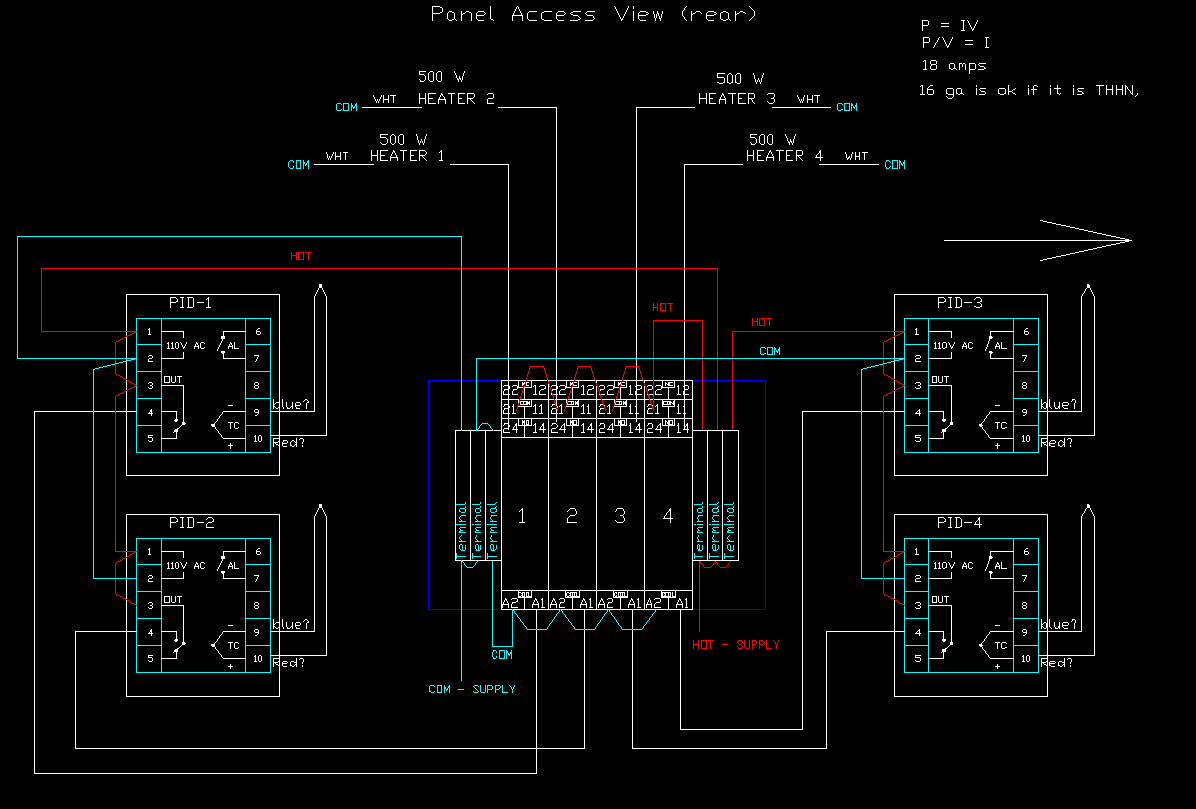
Draft wiring diagram for temperature control:
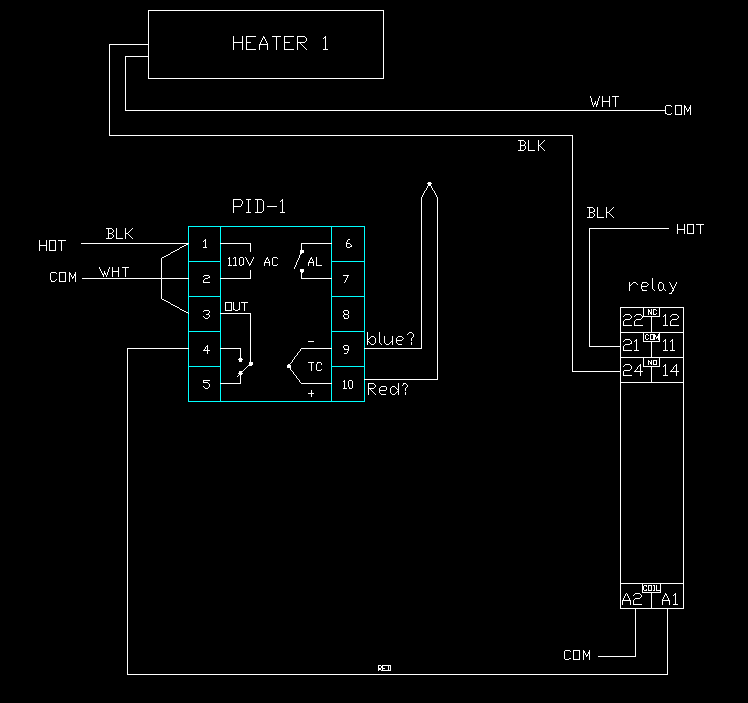
Full (Draft)
TODO_ add switch for main, and for each element? could override on/off with a DPDT?
2-11-2014
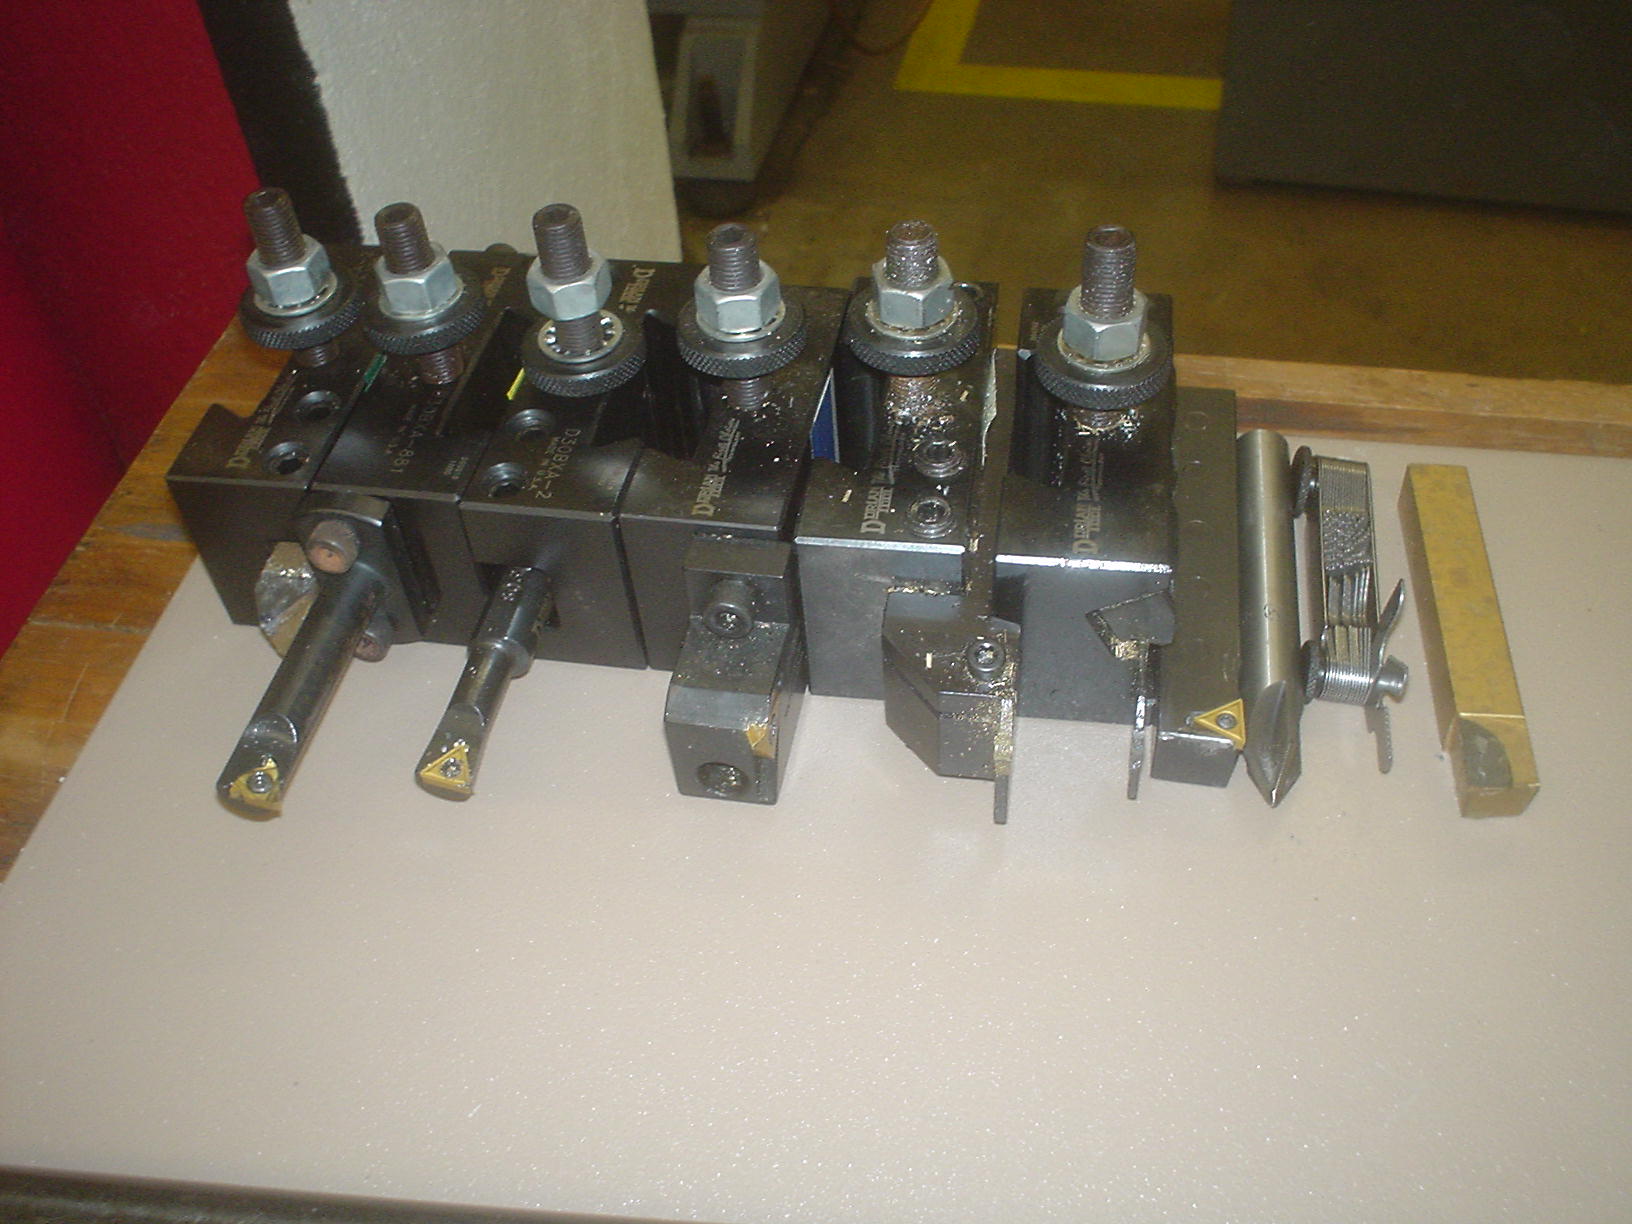
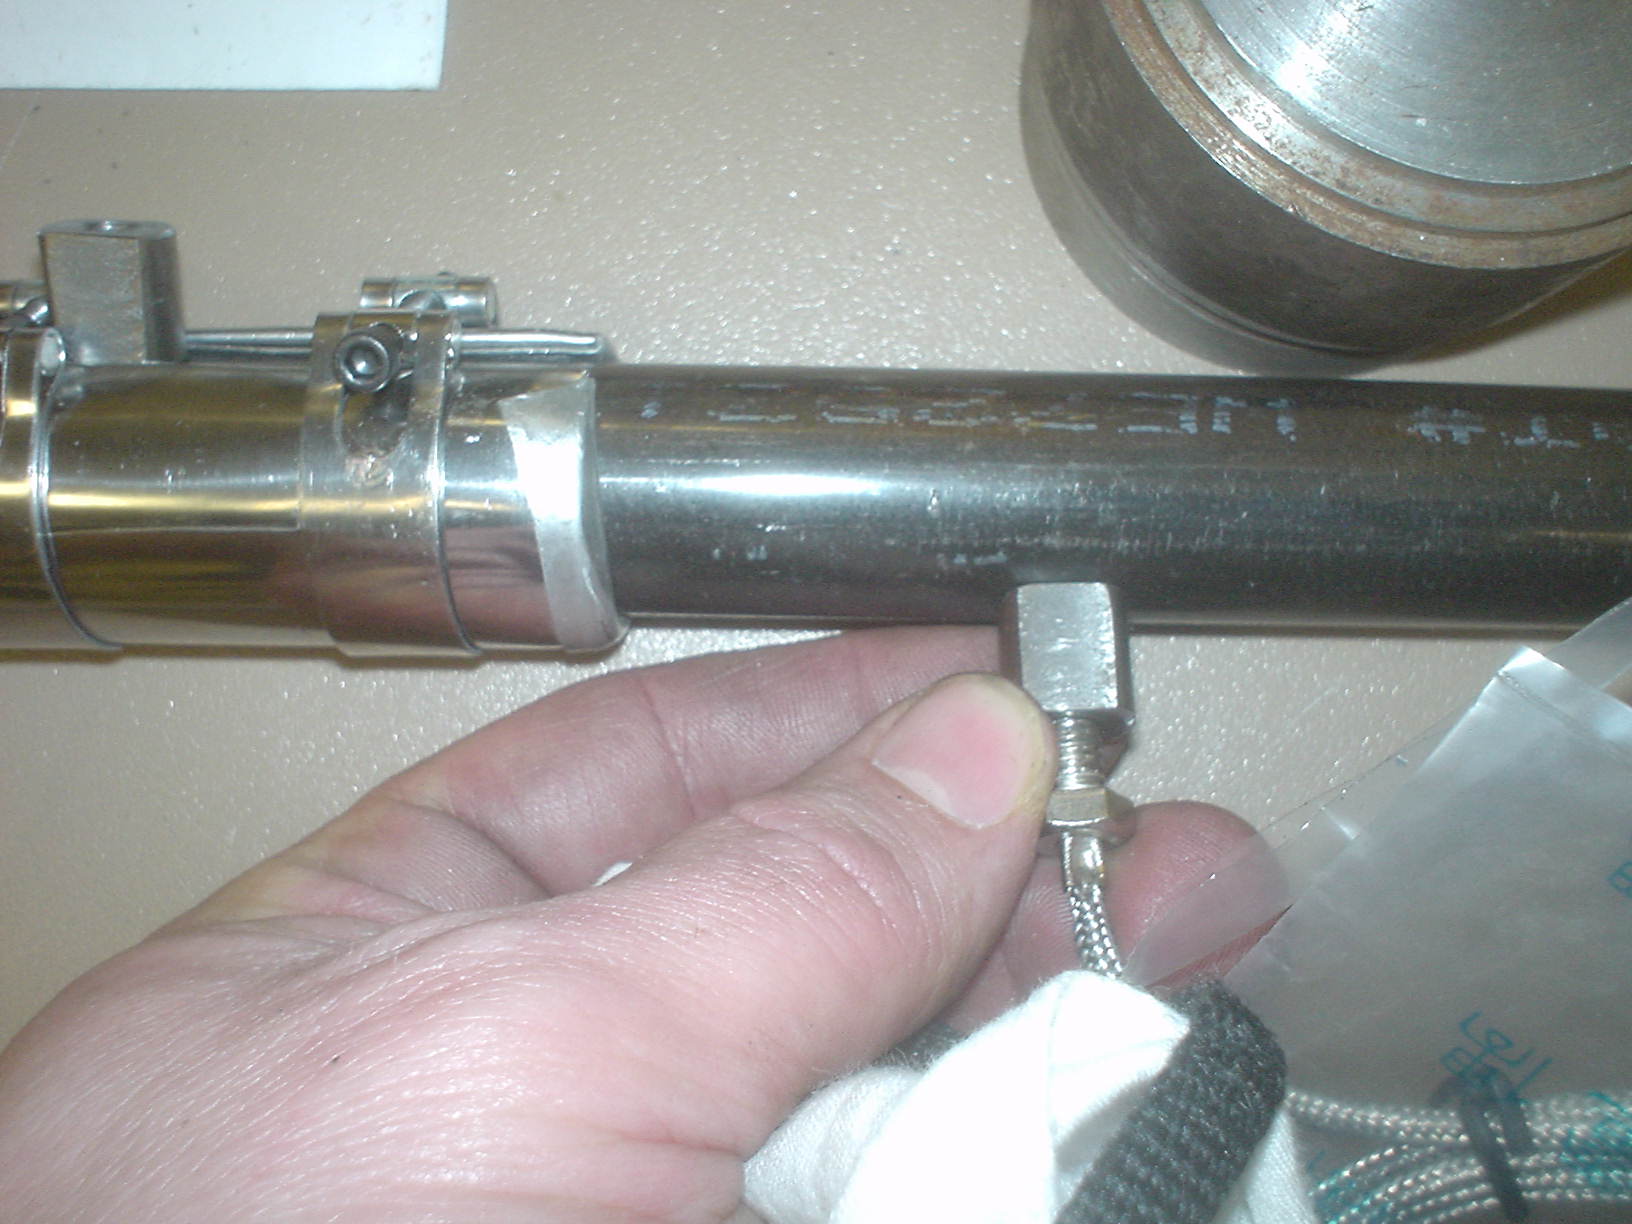
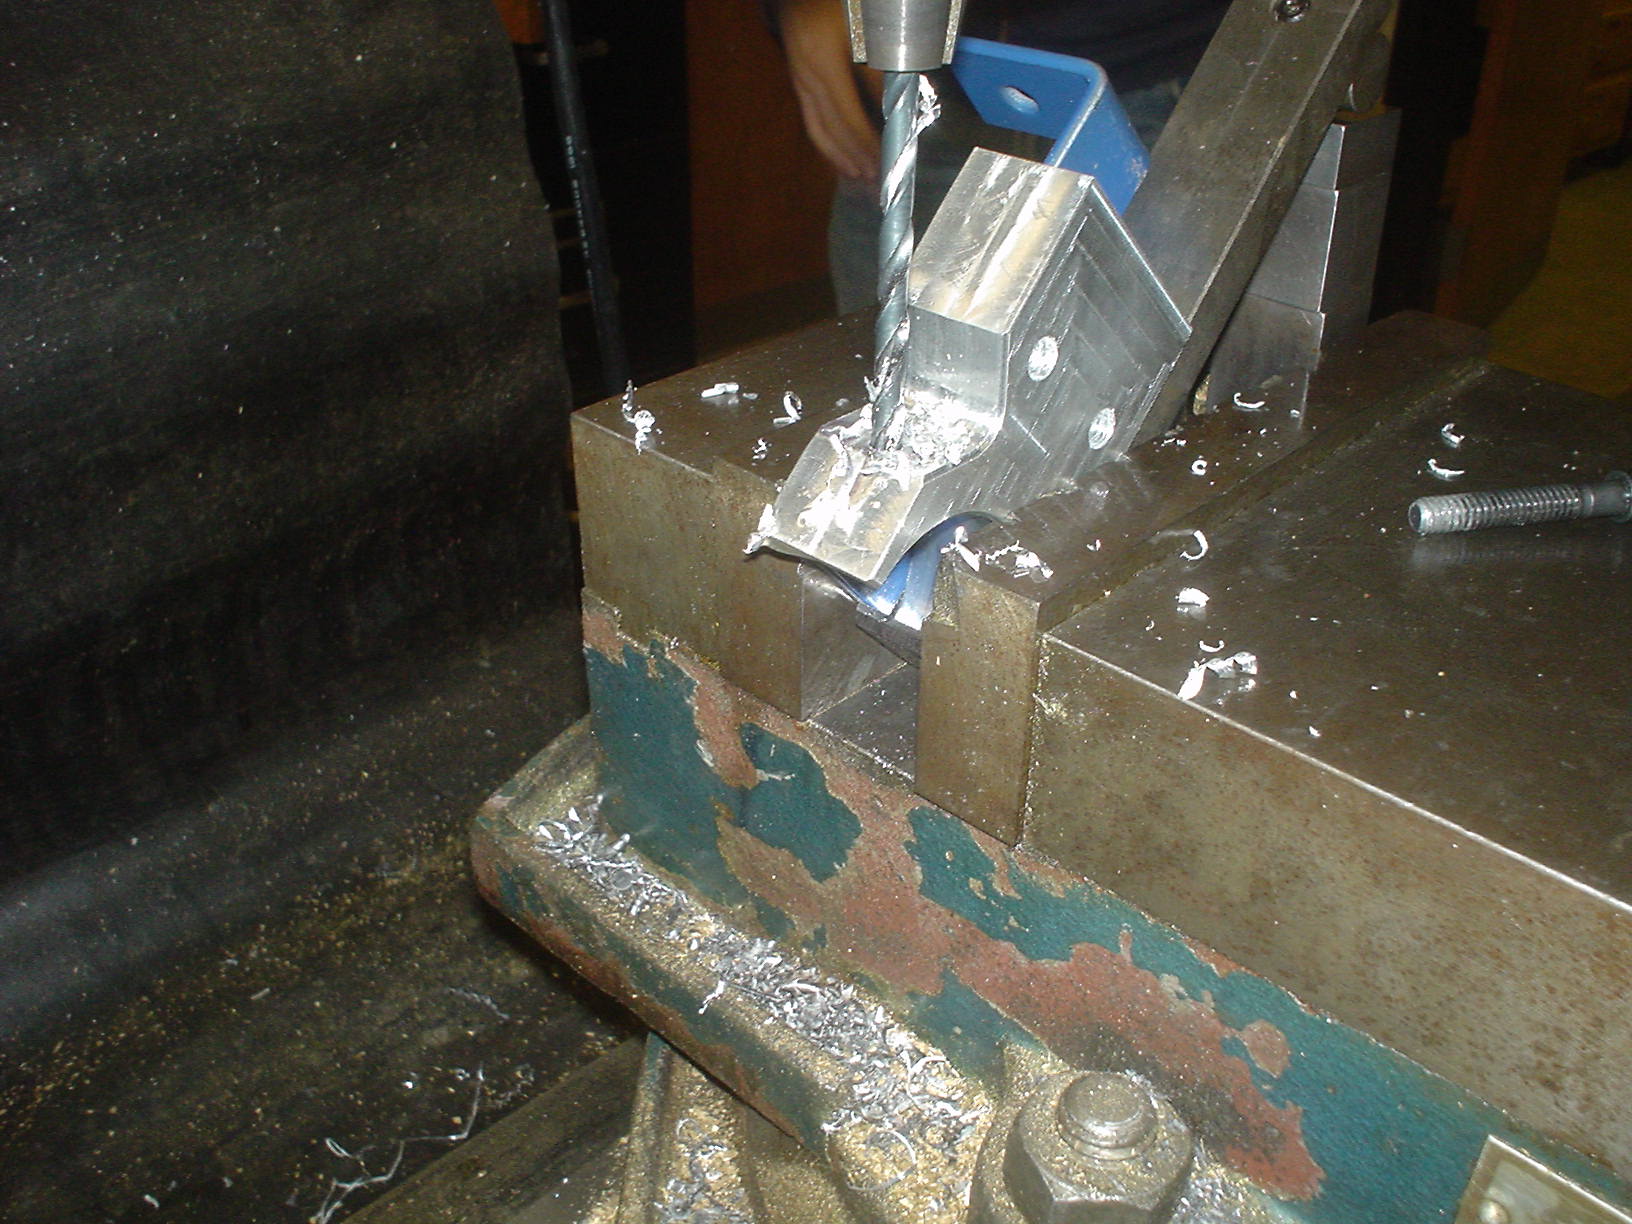
In TECH 3421 – Machined nozzle to these dimensions (did not add hex/flats)
Built welding fixture
Students designed plasma fixture in class
Built plasma fixture
Cut control panel out ( Still needs holes, bracket, and rounded corners)
Began tack welding frame.
![IMG_0090[1]](http://www.manufacturinget.org/wp-content/uploads/2014/01/IMG_00901.jpg)
![IMG_0092[1]](http://www.manufacturinget.org/wp-content/uploads/2014/01/IMG_00921.jpg)
2-13-14
Finished tack welding frame
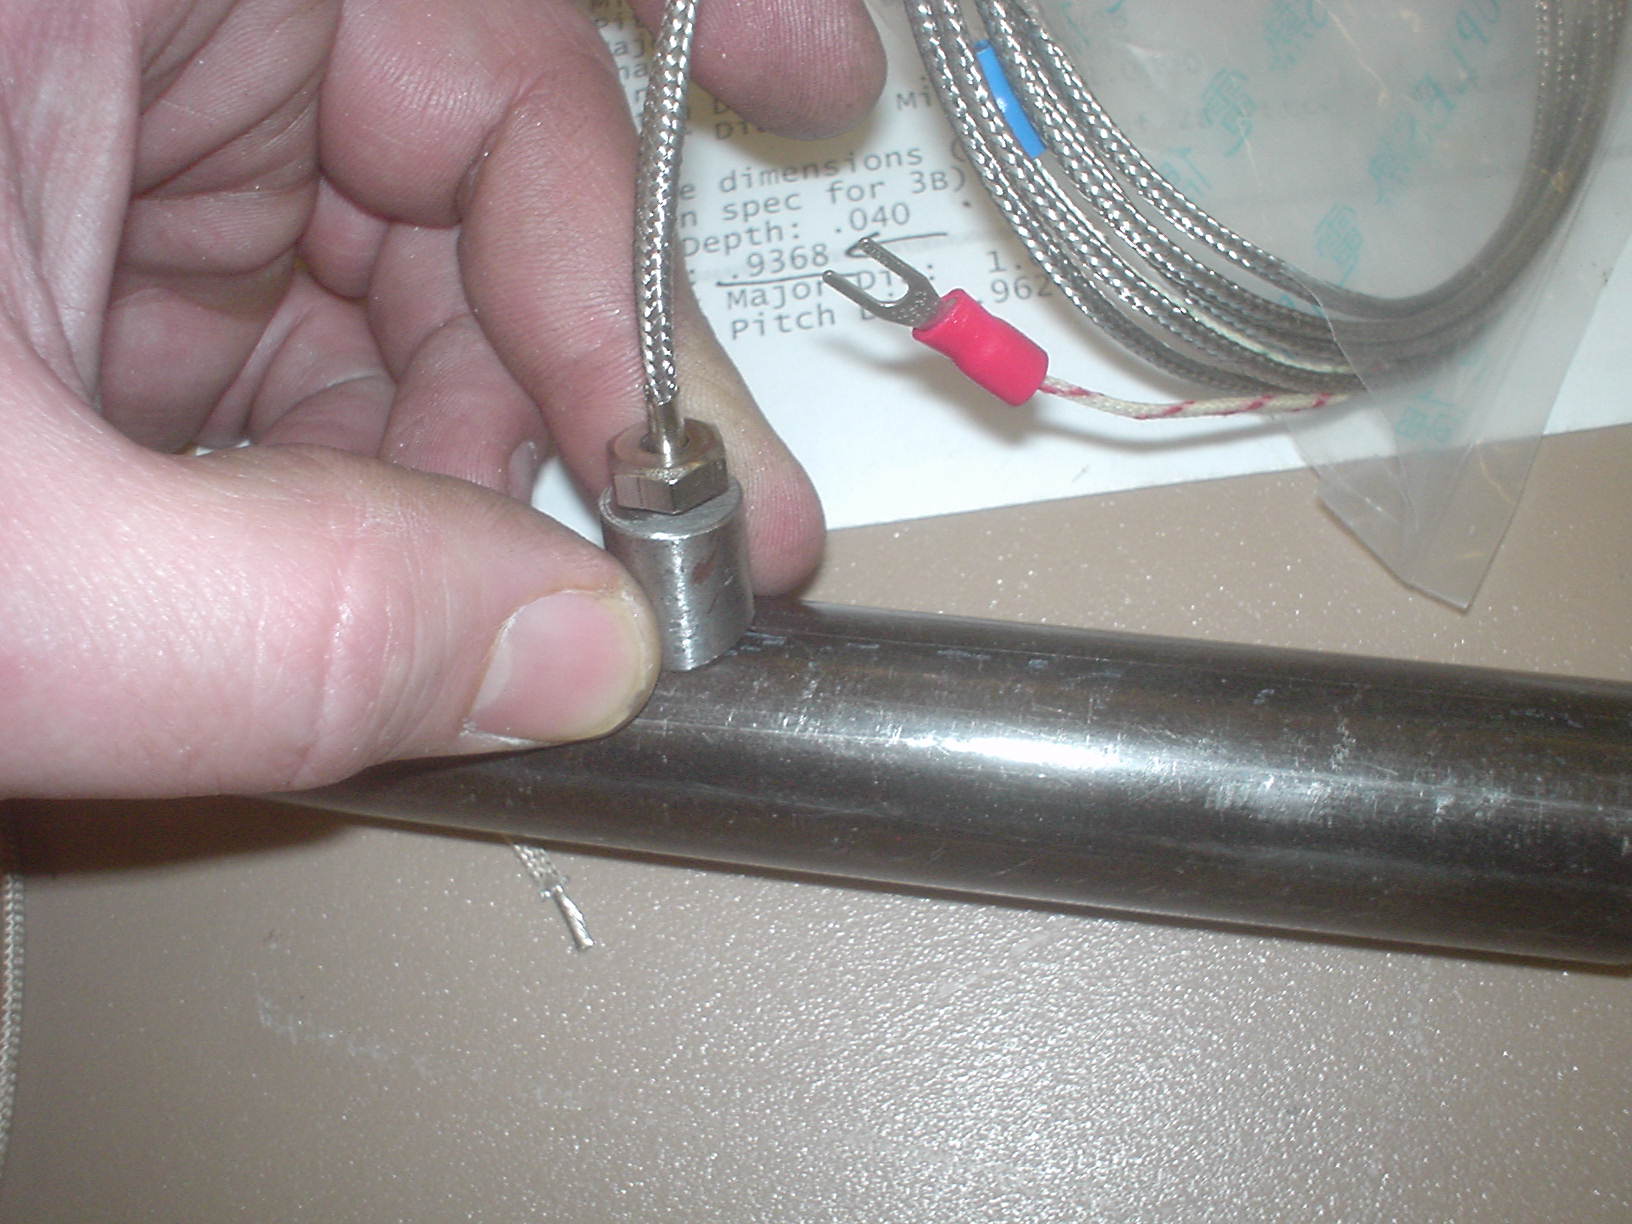
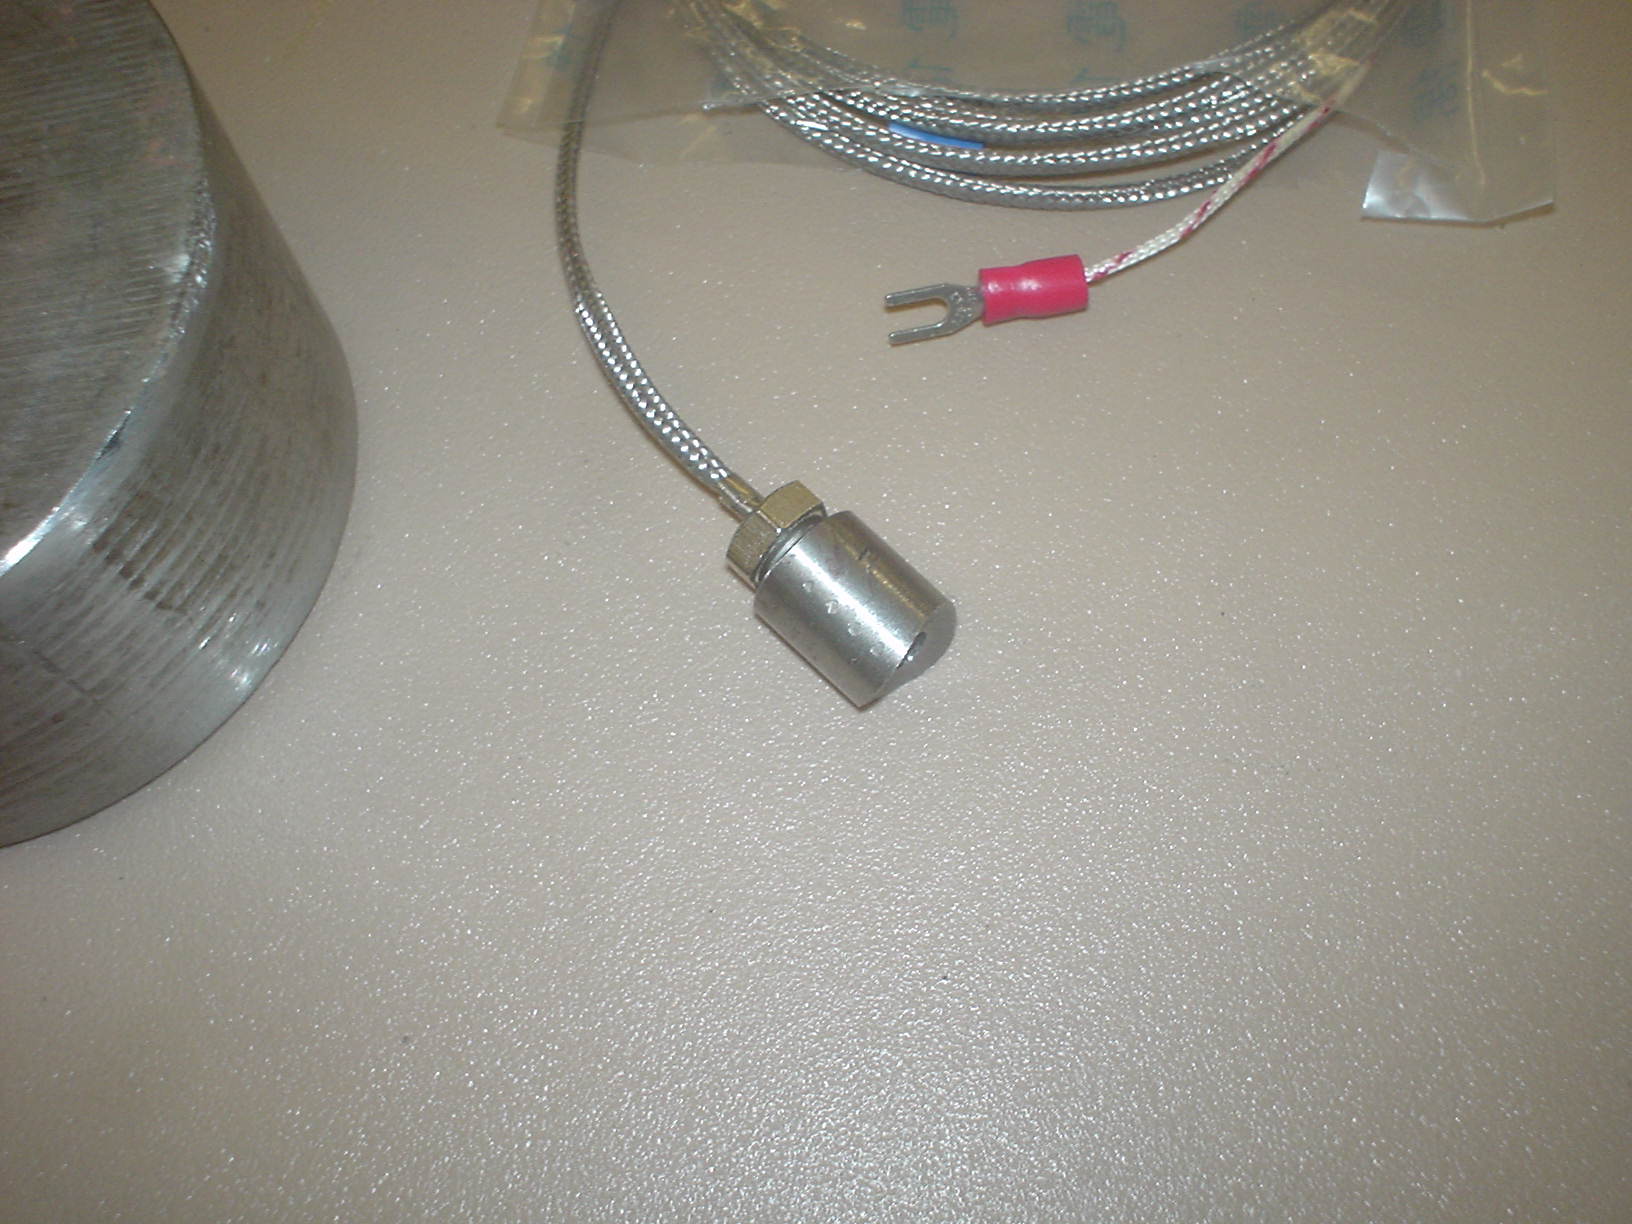
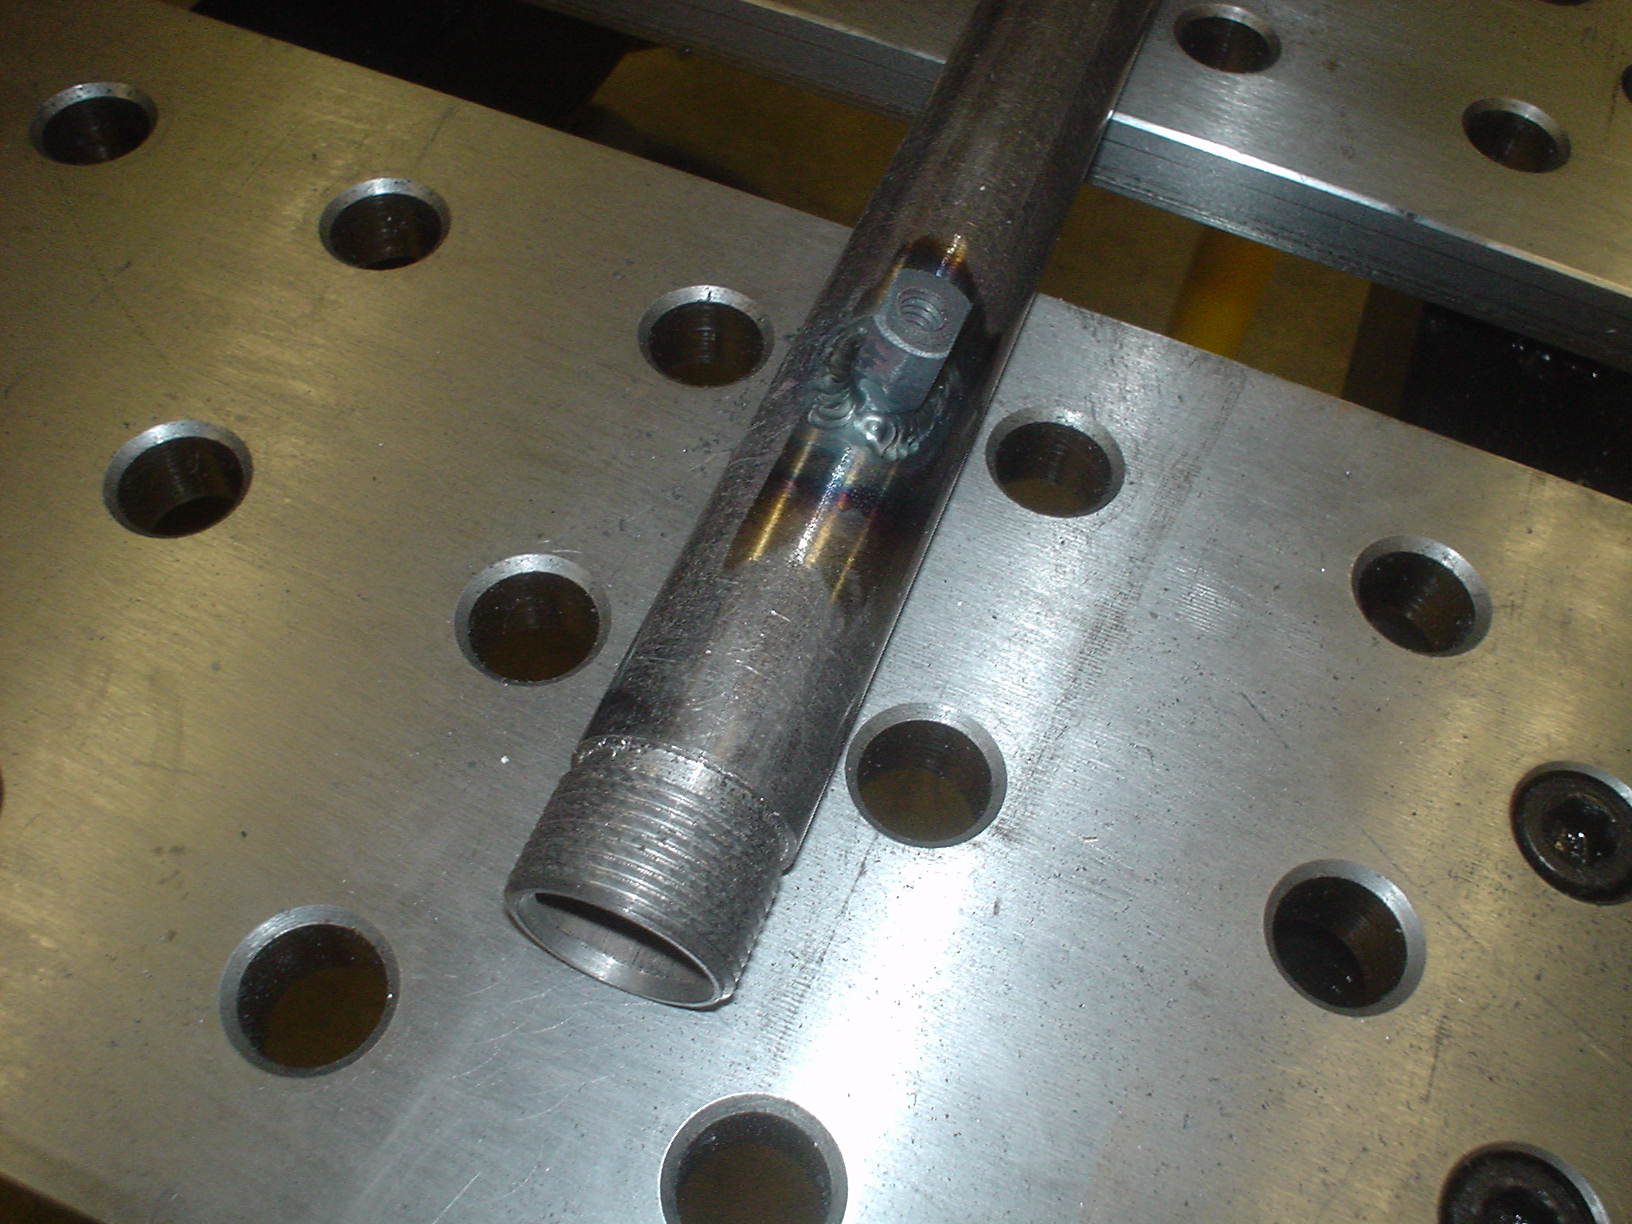
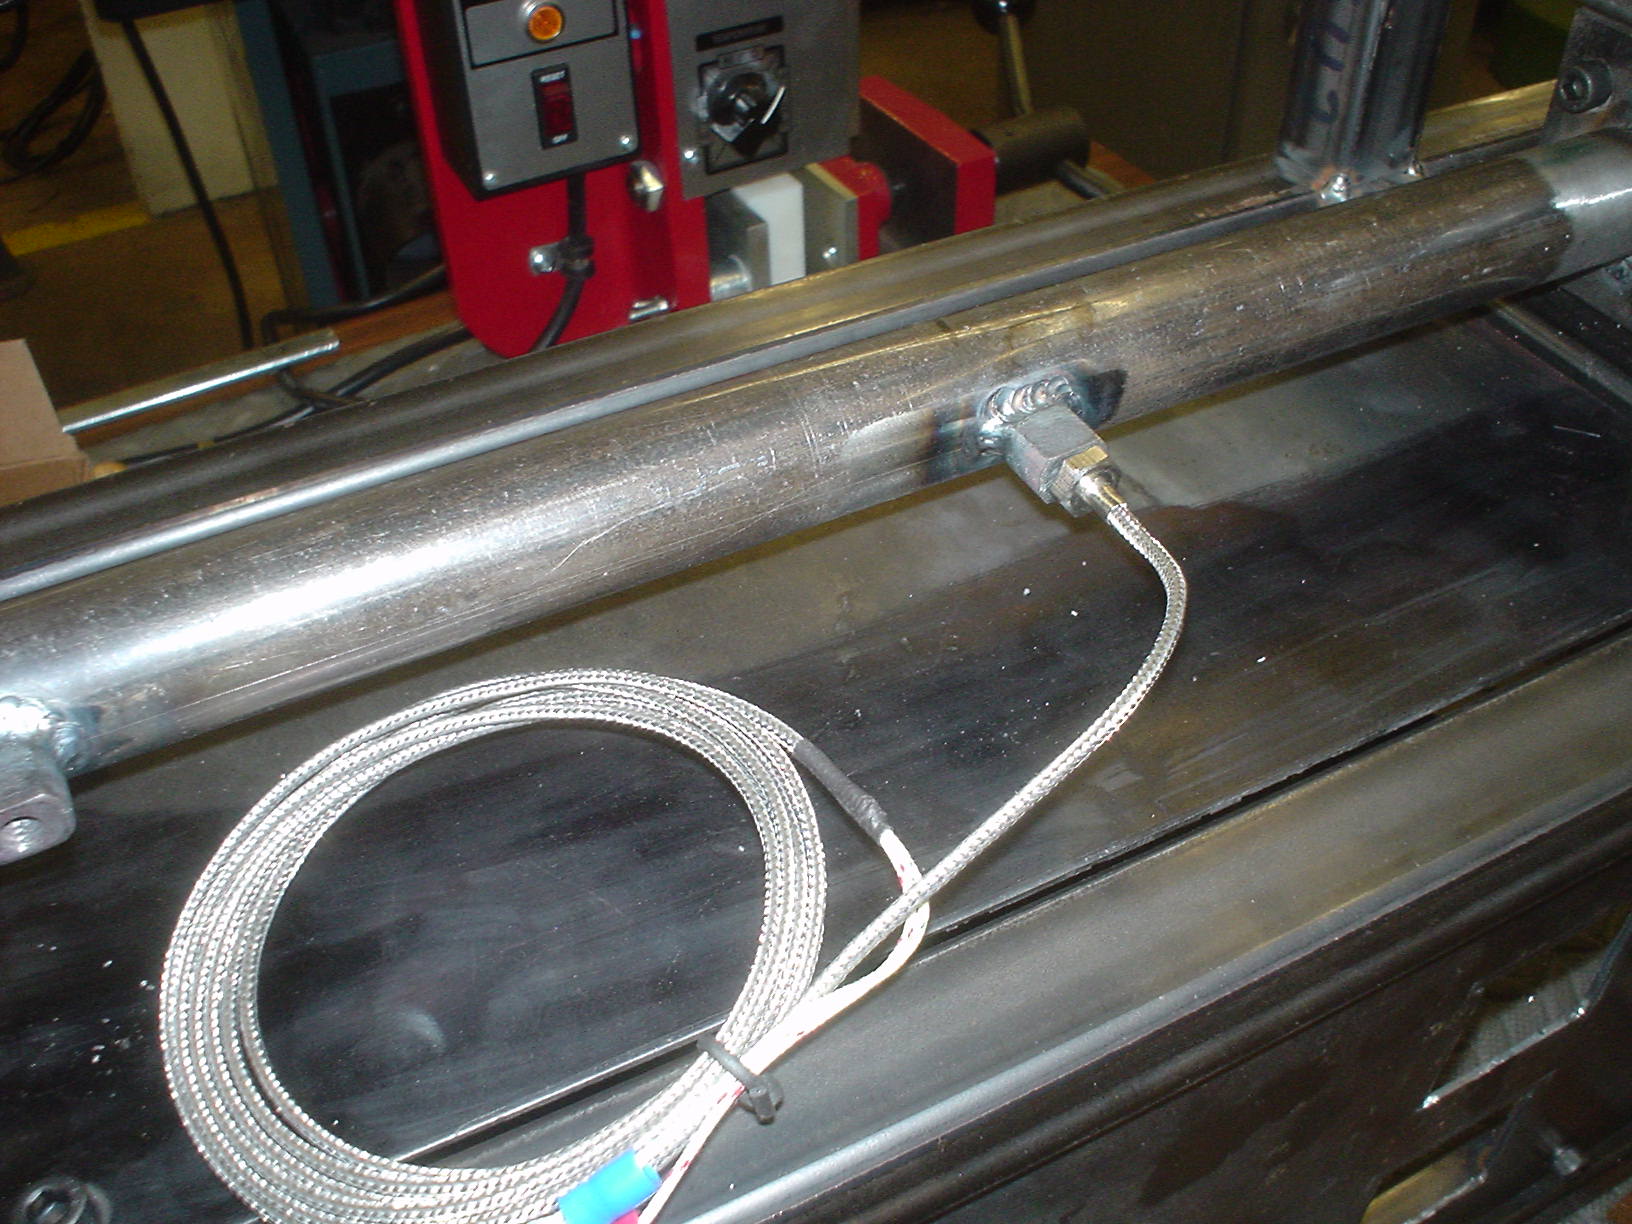
Began making thermocouple mounts
Finished control panel
Installed control panel rivnuts


2-18-14
- Tried to begin programming CNC for blocks (License server error 18)
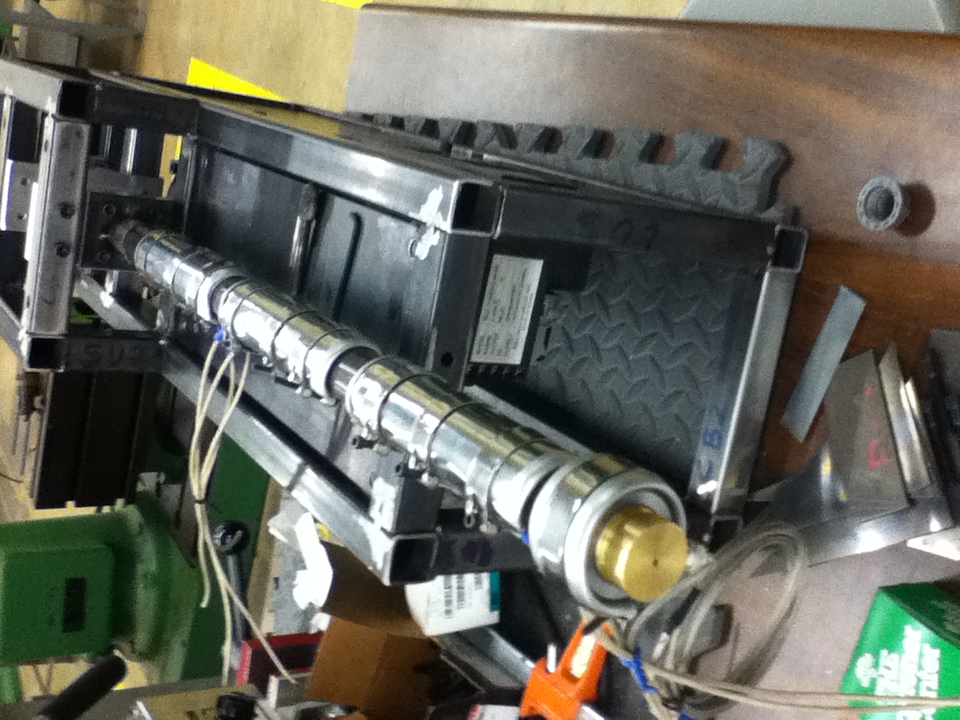
- Finished TC mounts trimmed to fit between heater bands
- Cut auger to length
- Drill and tap nozzle for TC
- Cut top panel mount
- Cut mounts for top panel (like ctrl panel)
- Added simple 1″ stops to support control panel (like rivnut mounts but no hole)
- Made new motor mount tubes
- hole centered on 2″ piece
- 6.375 from inside frame to front of rear mount
- Cut and mill new motor mount plate


2-20-2014
In lab:
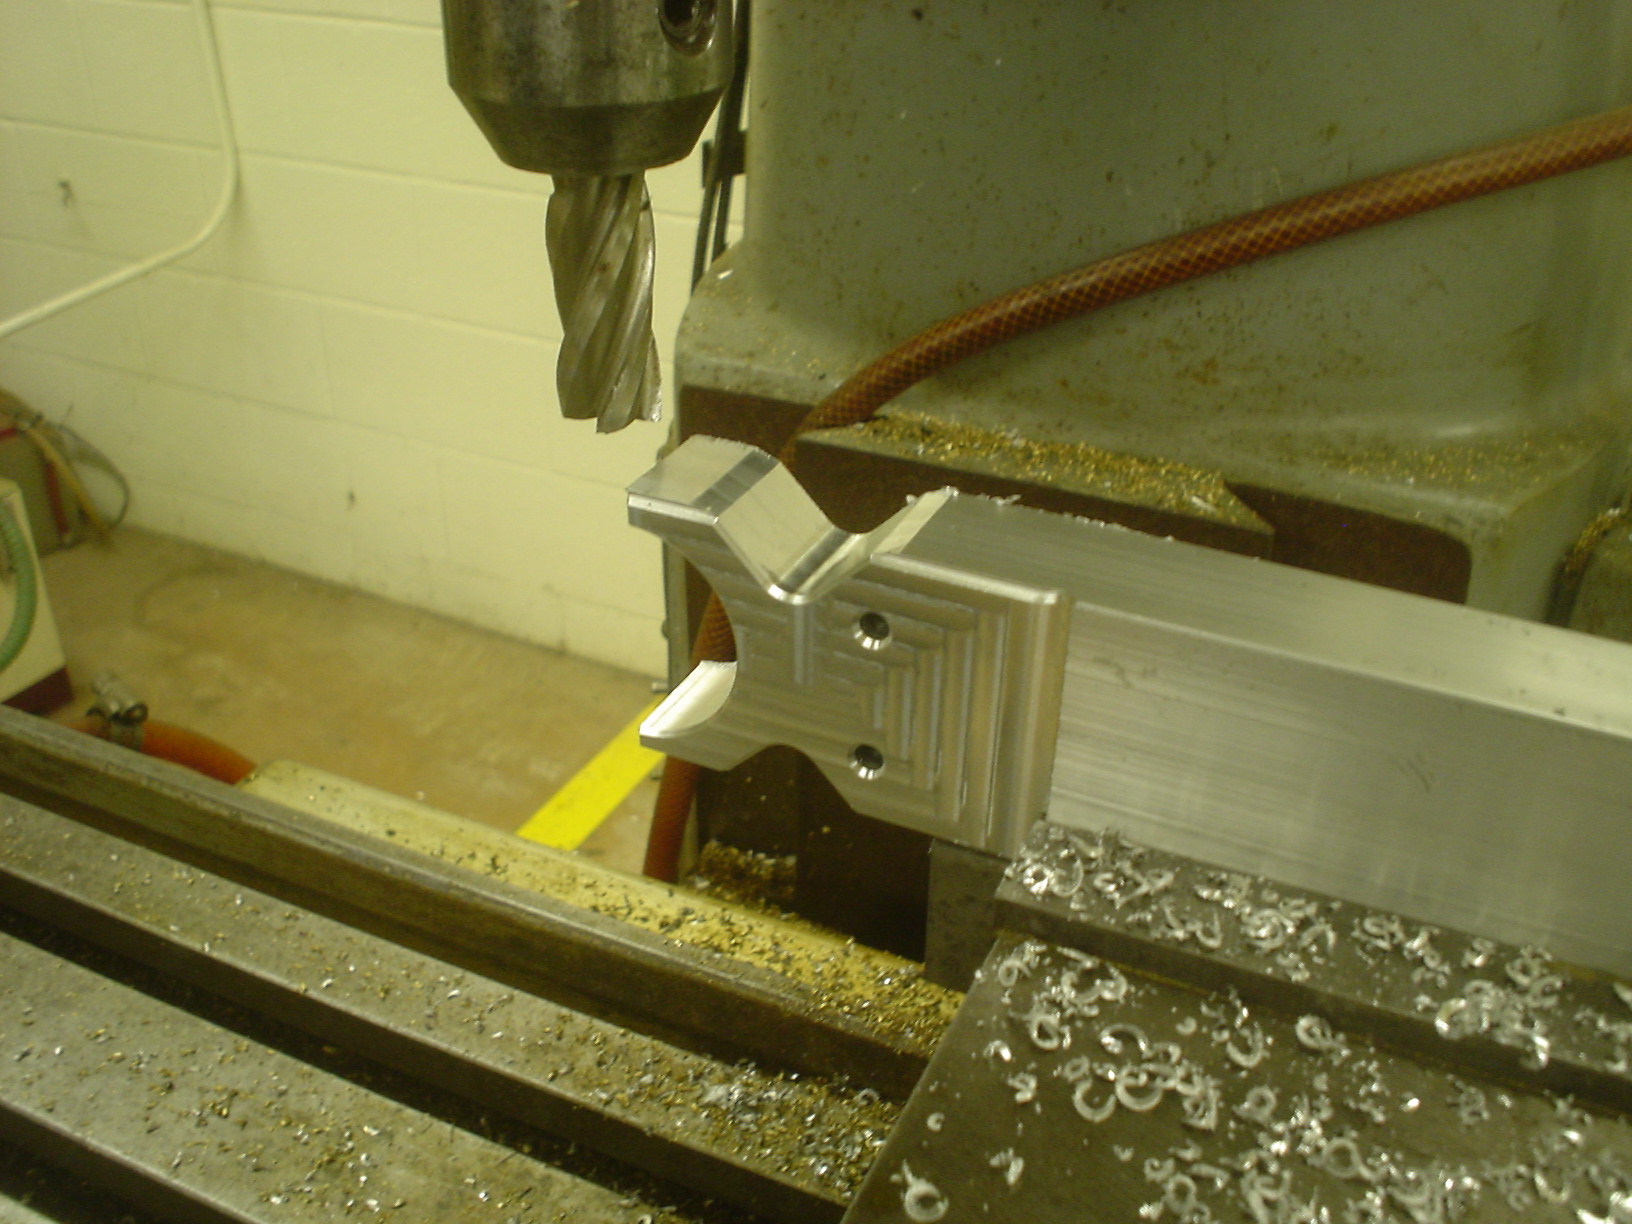
- Programmed and cut thrust block and front block
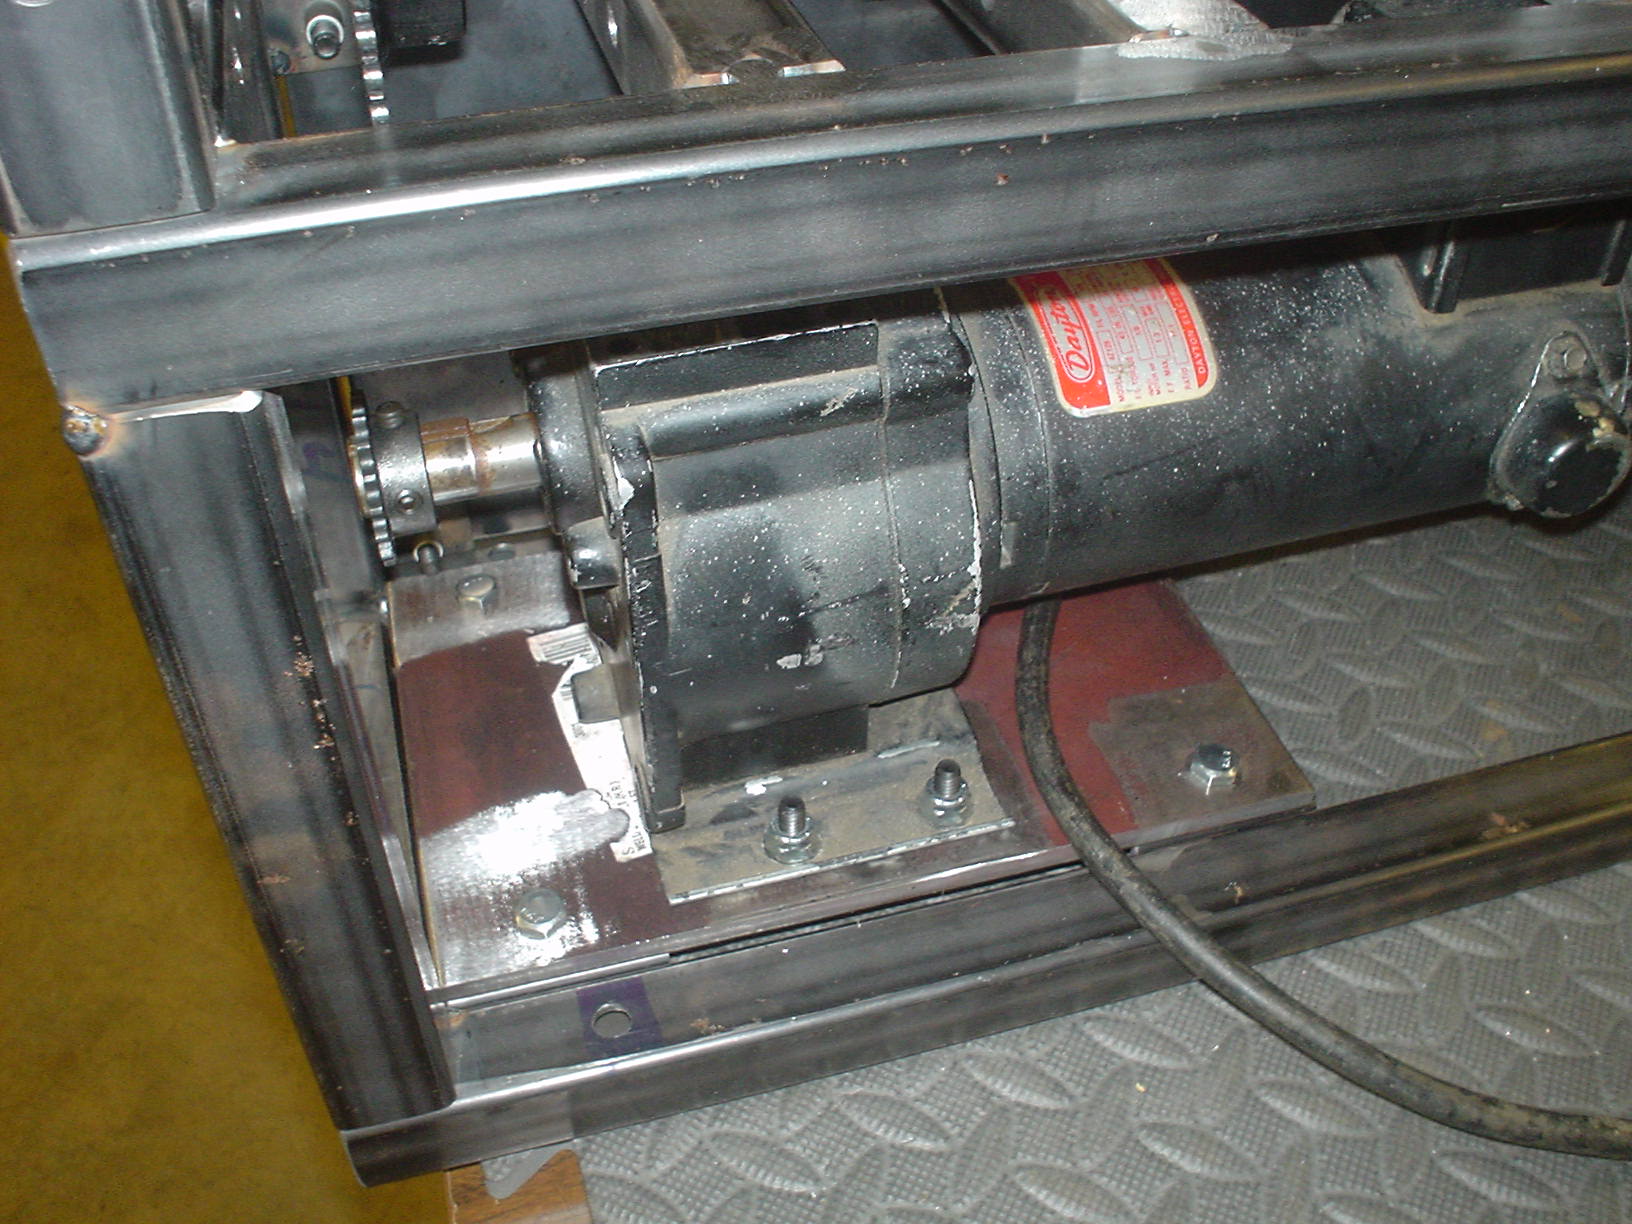
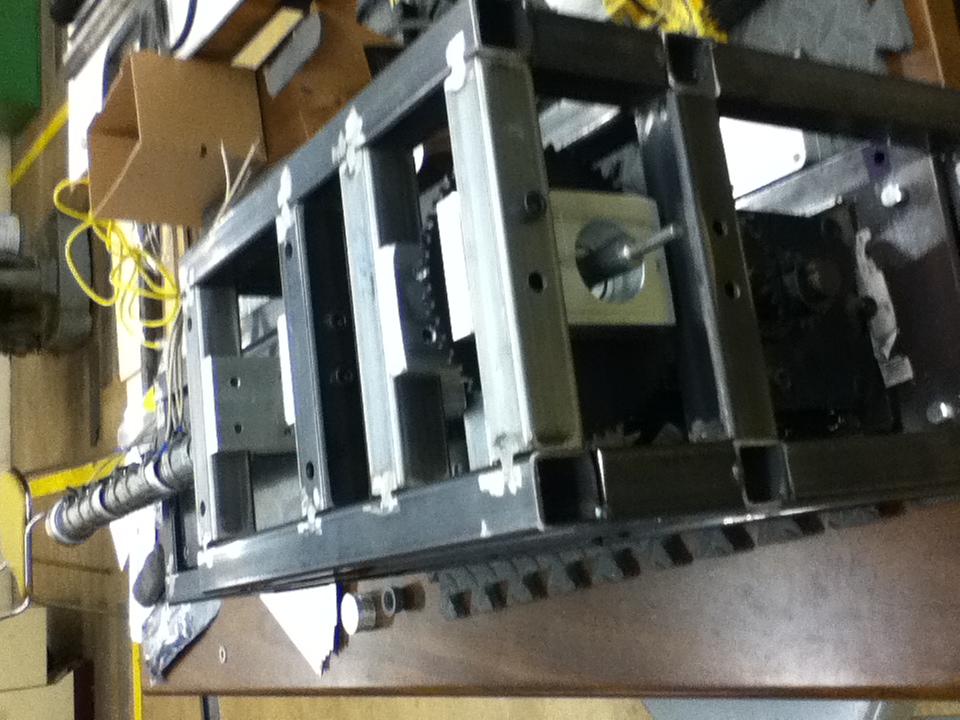
- Removed timing pulley from motor
- Installed sprocket on motor
- Mounted motor to base
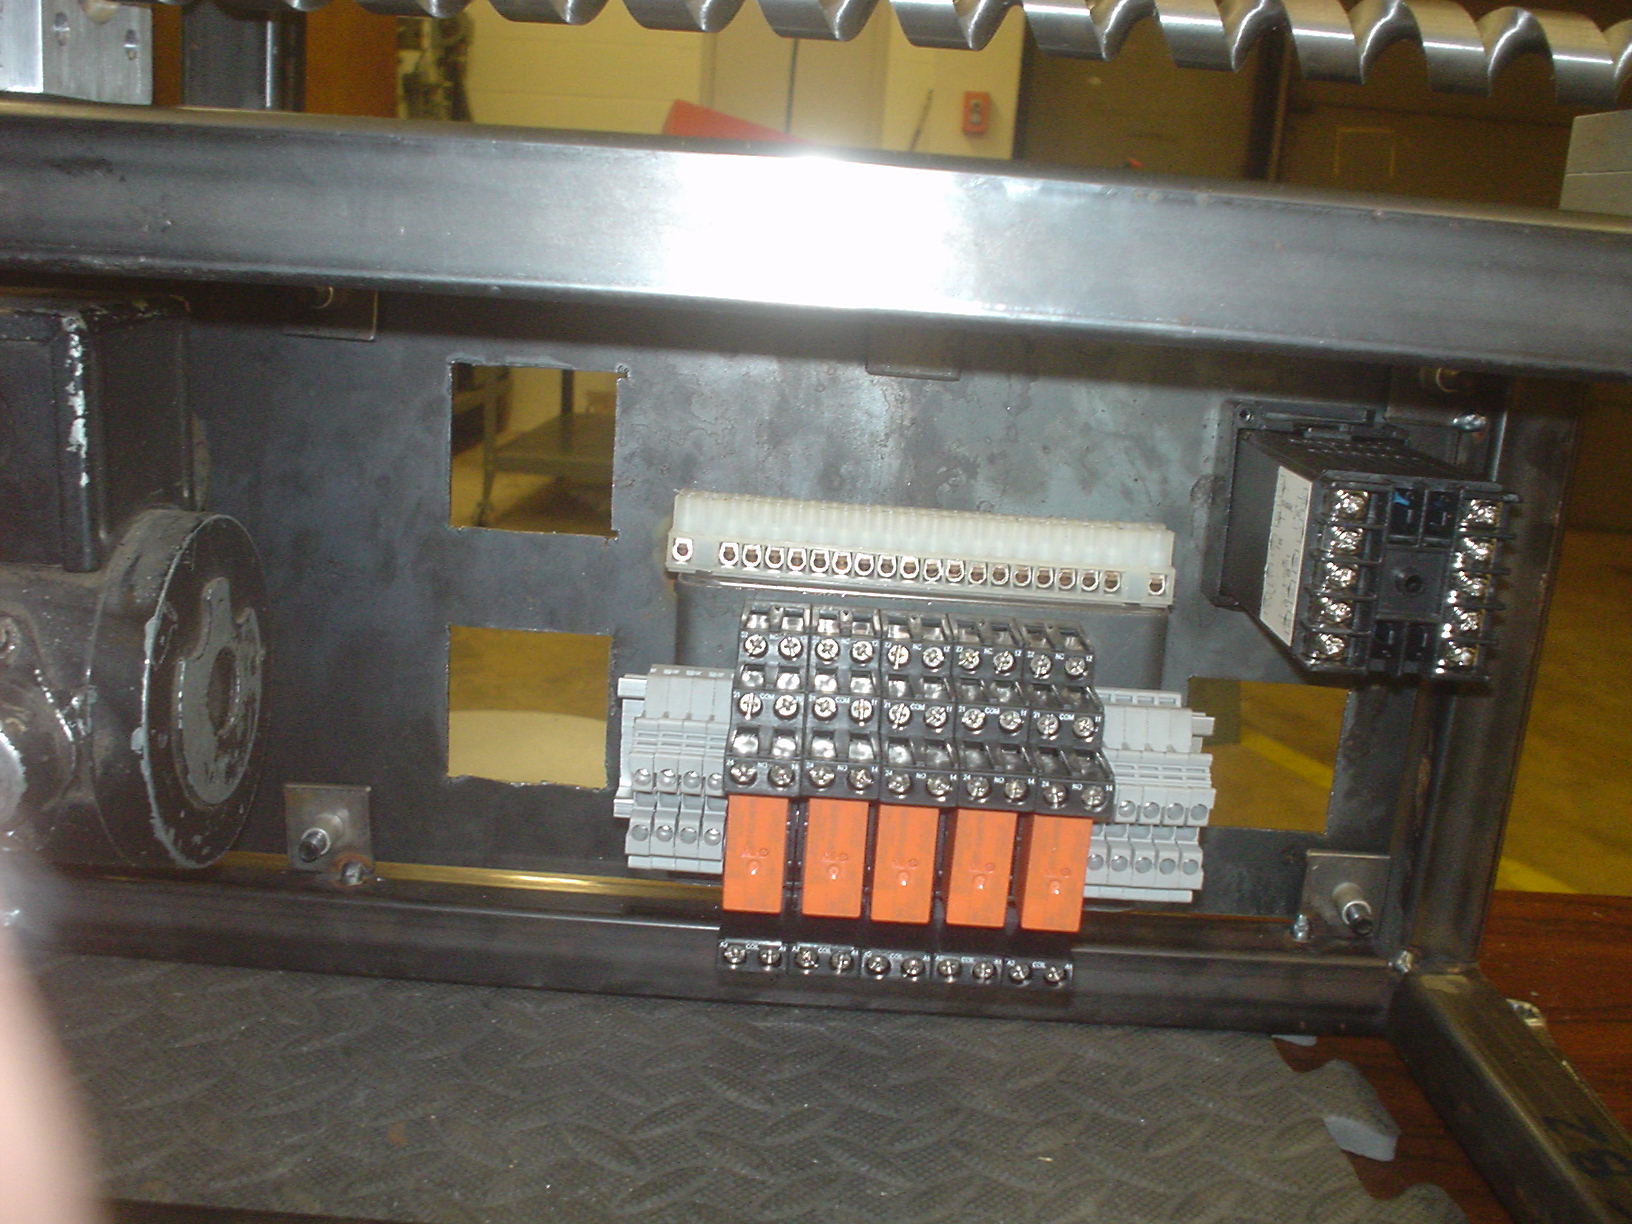
- Added terminal block to control panel


2-25-2014
- Programmed and cut bearing blocks
- Press-fit bearings
- Cut barrel to length
- Tack welded barrel mount
- Ground holes to fit

2-27-2014
- Made front panel
- Made front panel mounts
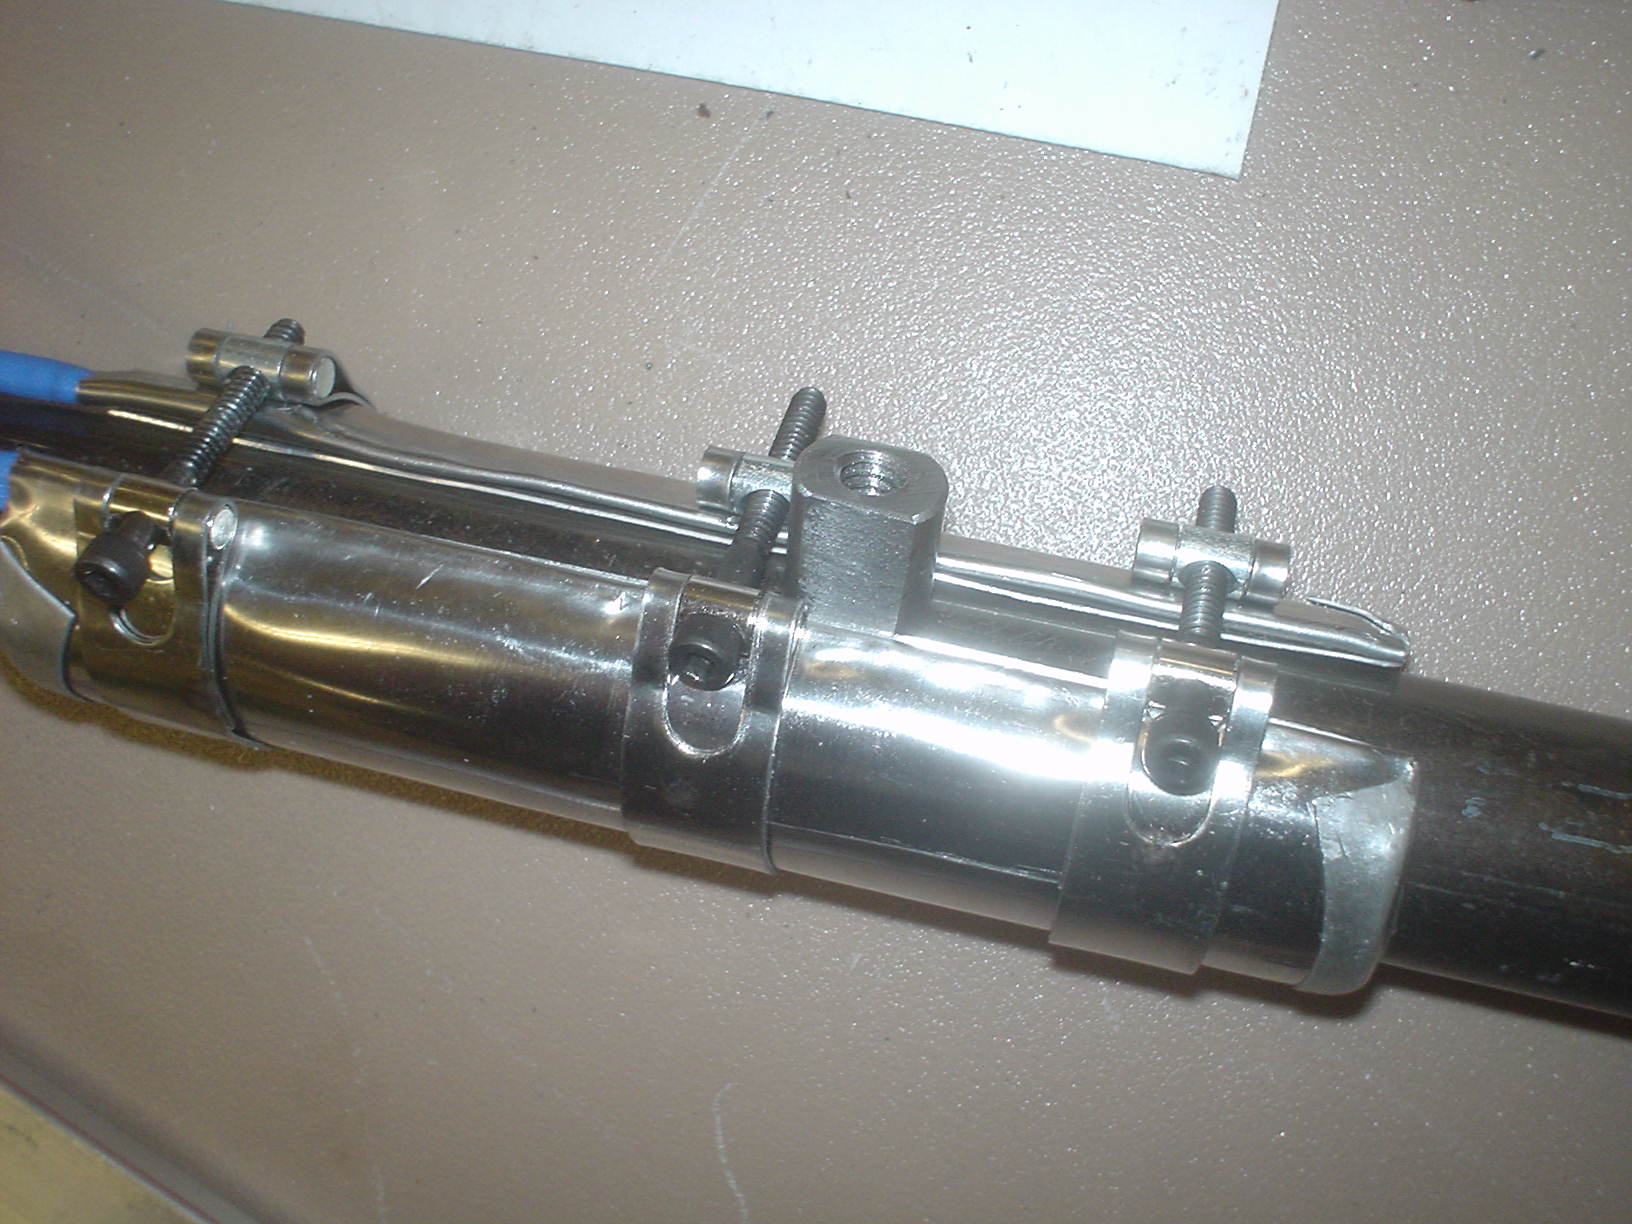
- Positioned TC mounts for welding:
- Flipped clamps on band that has 2 loose arlready
- Re-installed as first band on (SHCS up)
- Now all SHCS face up.
- Programmed and machined barrel support
- Welded front panel mounts
- Welded TC mounts


Could 3d print grommet…
3-4-14
Welded Barrel
Welded Frame
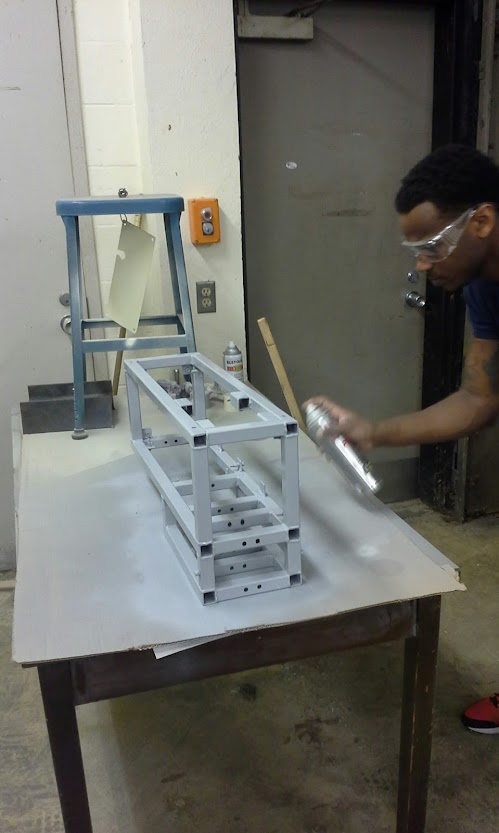
Began painting frame and panels
3-6-2014
See HaveBlue.org
- Finished painting
- Wired Panel
- Began testing
- Settings (Deg. C)
zone 1: PV: 88 SV: 50
zone 2: PV: 203 SV: 180
zone 3: PV: 203 SV: 180
zone 4: PV: 212 SV: 190
- Students design hopper
- Students design tube covers
3-18-2014
Results
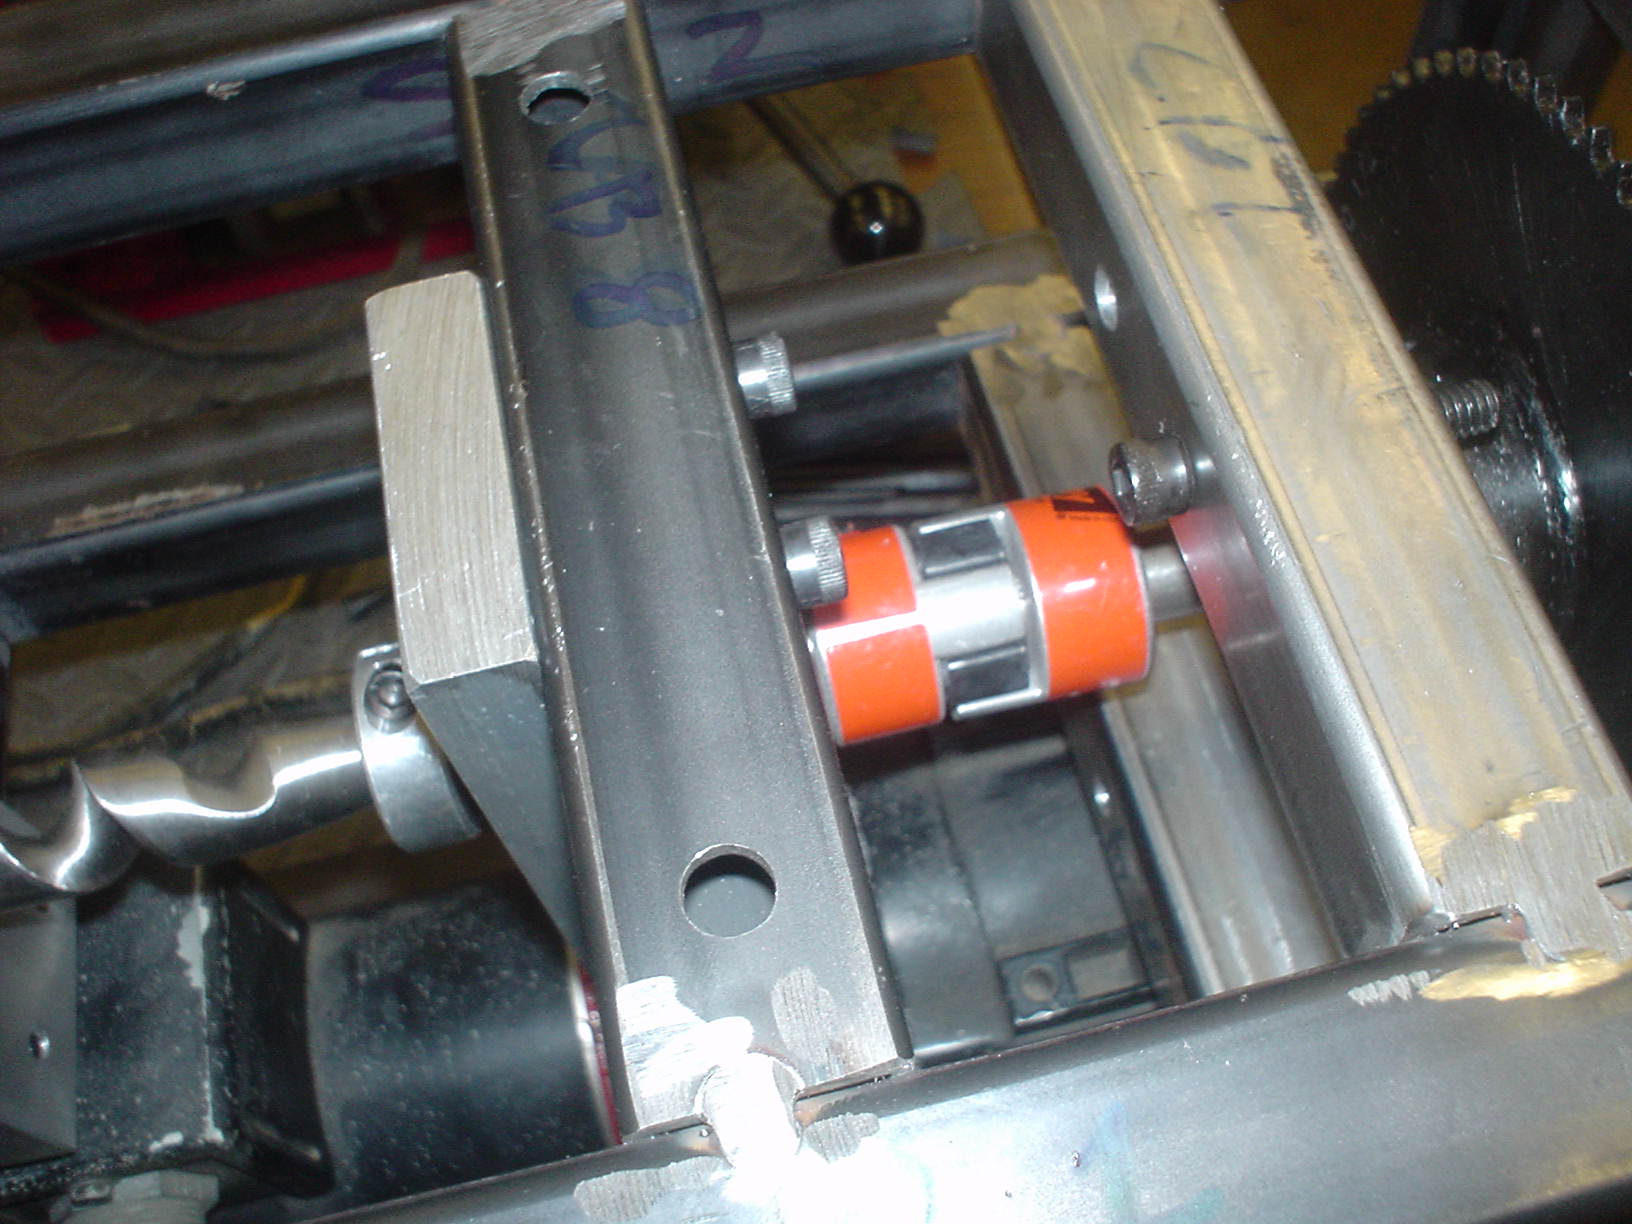
Ran two test of mass flow tonight. At 50% speed, output was .6 kg/hr. Then at 100% speed flow as 1.4 kg/hr. These numbers are above the .5 to 1.0 kg/hr goal (OFFICIALLY A SUCCESS!). However, the torque overloaded the flexible connector and caused the chain to slip off of the sprocket.
3-20-2014
Repaired the thrust problem at the rear sprocket caused by the 3-18 test at full throttle. Was able to extrude at an acceptable rate (60%) without incident.
Still getting some porosity. My current theory is that this is because the ABS resin we are using is over 20 years old (seriously). ABS is hygroscopic and this batch probably has significant water content. Will continue testing with newer resin instead of attempting to dry old pellets.
3-26-2014
Processes II class made a cast urethane tire/wheel assembly.
4-11-2014
Haul off unit is being assembled. Will need finish water cooling sleeve before testing.
4-29-2014