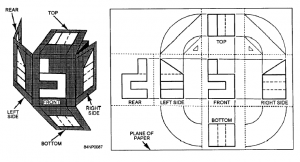
The six principal views of an object drawn in a third-angle projection are arranged according to the American standard arrangement of views. This arrangement (practiced since the late 1800s) depicts the relative position of the six principal views and their relationship to each other on a drafting plane. As shown in figure 5-12, all views (except the front view) are rotated toward the observer as though they are hinged.

Remember, the front view always lies in the plane of the drafting surface and does not require any rotation. Notice that the front, right side, left side, and rear views lineup in direct horizontal projection.
Use the minimum number of views necessary to show an item. The three principal views are the top, front, and right-side. The TOP VIEW (also called a PLAN in architectural drawings) is projected to and drawn on an image plane above the front view of the object. The FRONT VIEW (ELEVATION) should show the most
characteristic shape of the object or its most natural appearance when observed in its permanent or fixed position. The RIGHT-SIDE VIEW (ELEVATION) is located at a right angle to the front and top views, making all the views mutually perpendicular.
(Source: NAVEDTRA 14069, U.S. Navy)
