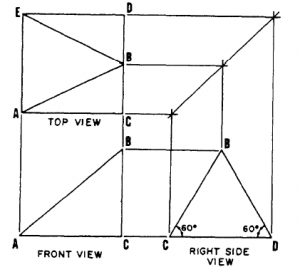
The first step in the drawing of any auxiliary view is to draw the object in normal multi-view projection, as shown in figure 5-23.

A minimum of two orthographic views is necessary. The space between these views is generally greater than normal. The reason for this will become apparent. Notice in figure 5-23, in the front view, that A is the end point of line AE (top view) and C is the end point of CD.
The second step is to decide which line or surface is to be shown in an auxiliary view andwhich orthographic view it will be projected from.
The following facts must be considered when rendering this decision:
1. Front or rear auxiliary views are always projected from a side view.
2. Right or left auxiliary views are always projected from a front view.
3. An elevation auxiliary view is always projected from the top view.
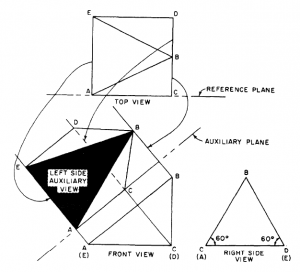
The third step is to select the auxiliary and reference planes. The auxiliary plane is simply a plane parallel to the desired line or lines representing an edge view of the desired surface. In figure 5-24, the true length of line AB and the true shapeof surface ABE are desired.

A left side auxiliary view is needed. The auxiliary plane is drawn parallel to line AB in the front view. Line AB actually represents an edge view of surface ABE. The reference plane (top view) represents an edge view of the orthographic view (front view) from which the auxiliary view will be projected.
Therefore, when front, rear, or side auxiliary views are desired, the reference plane will always be in the top view. When elevation auxiliary views are drawn, the reference plane may be in any view in which the top view is represented by a straightline. The reference plane in figure 5-24 is the edgeof the top view that represents the front view. Remember that, although these planes are represented by lines, they are actually planes running perpendicular to the views.
Step four is to project and locate the points
describing the desired line or surface. Draw
the projection lines from the orthographic view perpendicular to the auxiliary plane. Then take the distances from the reference plane, whether by scaling or with a compass. The distances are the perpendicular distances from the reference plane to the desired point. In figure 5-24, the projection lines are drawn from points A, B, and C in the front view, perpendicular to the auxiliary plane. The projection line from point A indicates the line on which point E will also be located. The projection line from point C designates the line of both C and D, and that from B locates B only. To transfer the appropriate distances, first, look for any points lying on the reference plane. These oints will also lie on the auxiliary plane where their projection lines intersect it (points A and C). To locate points B, D, and E, measure the perpendicular distances they are from the reference plane in the top view and transfer these distances along their respective projection lines in the auxiliary view. The points are equidistant from both the reference and auxiliary planes. Therefore, any line parallel to the reference plane is also parallel to the auxiliary plane and equidistant from it.
The fifth step is to connect these points. When the total auxiliary view is drawn, it is sometimes hard to discern which lines should be indicated as hidden lines. A rule to remember is as follows:
Those points and lines lying furthest away from the auxiliary plane in the orthographic view being projected from are always beneath any point or line that is closer. In figure 5-24, point C (representing line CD) in the front view is further from the auxiliary plane than any line or surface it will cross in the auxiliary view. Therefore, it will appear as a hidden line.
The final step is to label and dimension the auxiliary view. The labeling must include an adequate description. The term AUXILIARY must be included along with the location of the view in relation to the normal orthographic views (LEFT SIDE AUXILIARY VIEW, REAR ELEVATION AUXILIARY VIEW, and so forth). Dimensions are given only to those lines appearing in their true length. In figure 5-24, only lines AB, AE, and BE on the auxiliary view should be dimensioned.
