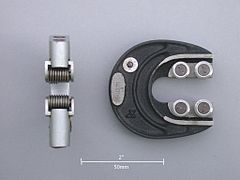
A Go-NoGo gauge (or Go/no go) refers to an inspection tool used to check a workpiece against its allowed tolerances. Its name derives from its use: the gauge has two tests; the check involves the workpiece having to pass one test (Go) and fail the other (No Go).
It is an integral part of the quality process that is used in the manufacturing industry to ensure interchangeability of parts between processes, or even between different manufacturers.
A Go NoGo gauge is a measuring tool that does not return a size in the conventional sense, but instead returns a state. The state is either acceptable (the part is within tolerance and may be used) or it is unacceptable (and must be rejected).
They are well suited for use in the production area of the factory as they require little skill or interpretation to use effectively and have few, if any, moving parts to be damaged in the often hostile production environment.
Contents |
Plug gauge
These gauges are referred to as plug gauges; they are used in the manner of a plug. They are generally assembled from standard parts where the gauge portion is interchangeable with other gauge pieces (obtained from a set of pin type gauge blocks) and a body that uses the collet principle to hold the gauges firmly. To use this style of gauge, one end is inserted into the part first and depending on the result of that test, the other end is tried.
In the right hand image, the top gauge is a thread gauge that is screwed into the part to be tested, the labeled GO end will enter into the part fully, the NOT GO end should not. The lower image is a plain plug gauge used to check the size of a hole, the green end is the GO, red is the NO GO. The tolerance of the part this gauge checks is 0.30mm where the lower size of the hole is 12.60mm and the upper size is 12.90mm, every size outside this range is out of tolerance. This may be initially expressed on the parts drawing in a number of styles, three possibilities may be:
- 12.75mm +/- 0.15mm
- 12.60mm +0.30 -0.00
- 12.90mm +0.00 -0.30
Snap gauge
Snap gauges (or snap gage) are oftentimes used when a large quantity of workpieces must be inspected.[1] The snap gauge has four anvils or jaws, the first one or pair (outermost) are set using the upper limit (tolerance) of the part and the inner set adjusted to the lower limit of the part. A correctly machined part will pass the first set of jaws and stop at the second — end of test. In this manner a part may be checked in one action, unlike the plug gauge that needs to be used twice and flipped to access the second gauge.
Other styles
Once the concept is understood, the principle of operation can lead to all manner of designs where internal grooves, keyways, splines etc. may be measured in a simple yet effective manner. These will often be made to order by the toolmakers, or a related skilled tradesman.
References
External links
- Limit (GO & NO GO) Gauges
- http://books.google.com/books?id=Fkkwep-KK7gC&lpg=PA512
- http://books.google.com/books?id=FxtWAAAAMAAJ&pg=RA12-PA15
This information originally retrieved from http://en.wikipedia.org/wiki/Go/no_go_gauge
on Monday 1st August 2011 5:09 pm EDT
Now edited and maintained by ManufacturingET.org


