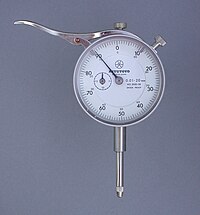
Dial indicators, also known as dial gauges and probe indicators, are instruments used to accurately measure small linear distances, and are frequently used in industrial and mechanical processes. They are named so because the measurement results are displayed in a magnified way by means of a dial.
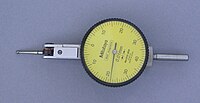
A special variety of the dial indicator is the dial test indicator (DTI) which is primarily used in machine setups. The DTI measures displacement at an angle of a lever or plunger perpendicular to the axis of the indicator. A regular dial indicator measures linear displacement along that axis.
Dial indicators may be used to check the variation in tolerance during the inspection process of a machined part, measure the deflection of a beam or ring under laboratory conditions, as well as many other situations where a small measurement needs to be registered or indicated. Dial indicators typically measure ranges from 0.25 mm to 300 mm (0.015 in to 12.0 in), with graduations of 0.001 mm to 0.01 mm (metric) or 0.00005 in to 0.001 in (imperial).
Contents |
General classification
There are several variables in dial indicators:
- Analog versus digital/electronic readout (most are analog)
- Dial size. Typically referred to be American Gage Design Specification (AGD):
| AGD | Diameter range (in) | Diameter range (mm) |
|---|---|---|
| 0 | 1–1 3/8 | 25–35 |
| 1 | 1 3/8–2 | 35–50 |
| 2 | 2–2 3/8 | 50–60 |
| 3 | 2 3/8–3 | 60–75 |
| 4 | 3–3 3/4 | 76–95 |
- Accuracy
- Range of travel
- Number of dial revolutions
- Dial style: balanced (e.g., -15 to 0 to +15) or continuous (e.g., 0 to 30)
- Graduation style: positive numbers (clockwise) or negative numbers (counterclockwise)
- Revolution counters, which show the number of revolutions of the principal needle.
Applications
- To check for runout when fitting a new disc to an automotive disc brake. Runout can rapidly ruin the disc if it exceeds the specified tolerance (typically 0.05 mm or less).
- In a quality environment to check for consistency and accuracy in the manufacturing process.
- On the workshop floor to initially set up or calibrate a machine, prior to a production run.
- By toolmakers (moldmakers) in the process of manufacturing precision tooling.
- In metal engineering workshops, where a typical application is the centering of a lathe‘s workpiece in a four jaw chuck. The DTI is used to indicate the run out (the misalignment between the work piece’s axis of rotational symmetry and the axis of rotation of the spindle) of the work piece, with the ultimate aim of reducing it to a suitably small range using small chuck jaw adjustments.
- In areas other than manufacturing where accurate measurements need to be recorded (e.g., physics).
Probe indicator
Probe indicators typically consist of a graduated dial and needle (thus the clock terminology) to record the minor increments, with a smaller embedded clock face and needle to record the number of needle rotations on the main dial. The dial has fine gradations for precise measurement. The spring-loaded probe (or plunger) moves perpendicular to the object being tested by either retracting or extending from the indicator’s body.
The dial face can be rotated to any position, this is used to orient the face towards the user as well as set the zero point, there will also be some means of incorporating limit indicators (the two metallic tabs visible in the right image, at 90 and 10 respectively), these limit tabs may be rotated around the dial face to any required position. There may also be a lever arm available that will allow the indicator’s probe to be retracted easily.
Dial test indicator
A dial test indicator, also known as a lever arm test indicator or finger indicator, has a smaller measuring range than a standard dial indicator and therefore has the ability to measure in smaller increments. A test indicator measures the deflection of the arm, the probe does not retract but swings in an arc around its hinge point. The lever may be interchanged for length or ball diameter, and permits measurements to be taken in narrow grooves and small bores where the body of a probe type may not reach. The model shown is bidirectional, some types may have to be switched via a side lever to be able to measure in the opposite direction.
These indicators actually measure angular displacement and not linear displacement. If a force is perpendicular to the finger, the linear displacement error is acceptably small within the display range of the dial. However, this error starts to become noticeable when the force is as much as 10 degrees off the ideal 90.[1]
Some cheaper models of test indicators may come with a pear-shaped contact point in an attempt to compensate for cosine error.
Contact points of higher end test indicators come with a standard carbide sphere at 1, 2, or 3 mm diameter. More usable materials are available for contact points such as ruby, teflon and PVC. These are more expensive and not available OEM, but, are extremely useful in applications where surfaces are easily scratched or damaged.
Digital indicator
With the advent of electronics and LCDs the clock face and analog display has been replaced with digital displays, these have the added advantage of sometimes being able to record and transmit the data electronically to a computer. This process is known as statistical process control (SPC) and involves a computer recording and interpreting the results, this also reduces the risk of the operator introducing recording errors. Digital indicators can also be switched between imperial and metric units with the press of a button, thereby increasing the DTI’s versatility.
Contact point (tip) types
The tip of the probe may be interchanged with a range of shapes and sizes depending on the application. However if the contact point is not the same length as the one that is designed for the indicator, an offset is required for a proper measurement reading. The shape is usually chosen to give point contact, the shape of a small sphere allows for consistent measurements as the tip moves through an arc, while the size may be changed to allow the tip to enter a small hole. The tip may also be cylindrical or flat as the need arises. The contact angle of the tip is 90 degrees (see above) in relation to the surface that is being measured. If the angle is not 90 degrees, an offset (multiplier or correction factor) must be applied to achieve a correct non-zero measurement.
Contact points typically have a #4-48 or M2.5 screw thread.
References
Further reading
- Starrett Catalog No. 31B. Athol, MA: The L. S. Starrett Company. 2007.
External links
- Practical metal and woodworking applications
- Dial Test Indicator Benchmark: Quality versus Price
- Simulator – dial indicator in millimeter with graduation of 0.01mm
This information originally retrieved from http://en.wikipedia.org/wiki/Dial_indicator
on Monday 1st August 2011 8:44 pm EDT
Now edited and maintained by ManufacturingET.org


